
My rear brake job from hell.
 09-23-2015, 11:09 AM
#1
JK Enthusiast
Thread Starter
Took the Jeep out the other day and noticed some grinding noise coming out the back. Wife said she noticed it about 1 1/2 weeks ago. When I looked at the rear brakes, the right rear was metal on metal. On retrospect, maybe I heard the wear indicator tab intermittently making noise, but I chalked it up to squeally brakes - it didn't make that usual low brake pad noise I've heard in the past on my other cars.
Anyway, it was Hell because it took me about 6-7 hrs. - most of which was spent on the right rear - my 1st time changing rotors on a Jeep. Left rear took less than an hour, after I learned from the right. And I was sore the next day from swinging a BFH. Once you bust the "rust seal" on the rotor(used BFH, air chisel, and WD40) it's still very difficult to slide the rotor off.
To make this job easier, I feel you have to be able to compress the parking brake shoes by adjusting the star wheel. But the star wheel is not easily visible from the dust shield access hole, even with the bracket and caliper off (especially on the right side). On the right side, the star wheel is at the bottom of the access hole - I didn't even see it from under the car - you kind of have to look down, which is hard to do - not enough room to get a good angle at looking down. The left rear star wheel is easier to see since it is at the top of the access hole and you can see it if you look up. I turned the star wheel toward the front of the Jeep, if looking from the access hole, to compress the parking brake shoes and spun it to the rear of the Jeep to expand them when putting the new rotor on (just eyeballed where they sat and where the rotor goes into the dust shield). I think I adjusted them ok since my parking brake handle grabs near the top and is not loose at all. There's a yellow line on the star wheel assembly, the factory settings, so you know how many times you spun it.
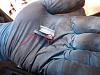
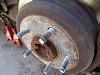
Yea, that's metal on metal. LOL
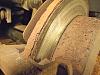
No pad left. No wear indicator tab. So that's what that noise was....Just have to laugh about it now.
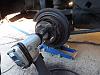
Never saw a piston pushed out this far.

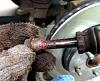
While hitting the right rear rotor with a BFH, I also hit the sides of 2 of my lug nut bolts which crushed 4 threads on each of them and also knocked one out. So pissed when that happened. Tried to "regroove" the bolt by spinning the lug nut pass the crushed threads, but didn't work at all. Used my dremel with a diamond wheel, since the kerf is small enough to fit in the bolt groove, and opened up the grooves and thinned out the crushed threads - worked great - lug nut spins without any resistance at these points. Bought one new lug nut at Autozone as a replacement.
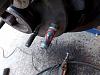
Used some large washers to get the knocked out bolt into place
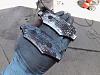
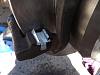
Used new clips. Be careful putting in the front pads as you might push the rear of the clip into the rotor, like I did. Pushed it back into place with a screwdriver and rebent the front tab to keep it in place. There's also a small side tab (circled in red) which helps keeping the clip in place, which I think is its function, as long as you don't force the pad into place. Easier to put the pads into the bracket first and then bolt it into place.
Seated clip.
When I was putting everything back together on the right, the rotor slid into place ok. But it didn't seem like it was seated, checked several times if everything under the rotor was where it should be. As oppose to the left side, when I pushed the left rotor into place, it slid and felt seated. I failed to mention, while hitting the right rotor with my BFH, I smashed the dust shield, the area where the caliper sits, and had to rebend it back into place with some pliers, probably my problem with the right side.?. Used some large washers and lug nuts to keep the rotor in place while reattaching the bracket and caliper.
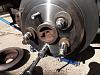
What a seated rear rotor should look like before removal.
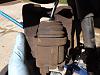
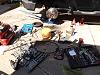
My work area
Since this was an unplanned repair, bought $40 rotors and lifetime ceramic pads from Autozone. Also did fronts the day before, an easier job. Already had front rotors and Hawk PC pads on hand (planned job from a few months ago). Didn't plan on using front ceramic pads, but the online company sent me the wrong one and I was too lazy to send back for what I ordered, the Hawk LTS ones. Bedded the new pads accordingly, no squealing noticed. Been driving the Jeep the last few days and no problems stopping. No drift of brake pedal.
I guess I used some of the red brake grease that came in the box in that small package when I changed the pads a few years ago, when the Jeep belonged to my brother. I bought it from him. Looked like some of it dried up a little. Now, I use Sil Glyde brake grease.
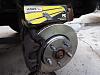
Front brake
Anyway, it was Hell because it took me about 6-7 hrs. - most of which was spent on the right rear - my 1st time changing rotors on a Jeep. Left rear took less than an hour, after I learned from the right. And I was sore the next day from swinging a BFH. Once you bust the "rust seal" on the rotor(used BFH, air chisel, and WD40) it's still very difficult to slide the rotor off.
To make this job easier, I feel you have to be able to compress the parking brake shoes by adjusting the star wheel. But the star wheel is not easily visible from the dust shield access hole, even with the bracket and caliper off (especially on the right side). On the right side, the star wheel is at the bottom of the access hole - I didn't even see it from under the car - you kind of have to look down, which is hard to do - not enough room to get a good angle at looking down. The left rear star wheel is easier to see since it is at the top of the access hole and you can see it if you look up. I turned the star wheel toward the front of the Jeep, if looking from the access hole, to compress the parking brake shoes and spun it to the rear of the Jeep to expand them when putting the new rotor on (just eyeballed where they sat and where the rotor goes into the dust shield). I think I adjusted them ok since my parking brake handle grabs near the top and is not loose at all. There's a yellow line on the star wheel assembly, the factory settings, so you know how many times you spun it.
Yea, that's metal on metal. LOL
No pad left. No wear indicator tab. So that's what that noise was....Just have to laugh about it now.
Never saw a piston pushed out this far.
While hitting the right rear rotor with a BFH, I also hit the sides of 2 of my lug nut bolts which crushed 4 threads on each of them and also knocked one out. So pissed when that happened. Tried to "regroove" the bolt by spinning the lug nut pass the crushed threads, but didn't work at all. Used my dremel with a diamond wheel, since the kerf is small enough to fit in the bolt groove, and opened up the grooves and thinned out the crushed threads - worked great - lug nut spins without any resistance at these points. Bought one new lug nut at Autozone as a replacement.
Used some large washers to get the knocked out bolt into place
Used new clips. Be careful putting in the front pads as you might push the rear of the clip into the rotor, like I did. Pushed it back into place with a screwdriver and rebent the front tab to keep it in place. There's also a small side tab (circled in red) which helps keeping the clip in place, which I think is its function, as long as you don't force the pad into place. Easier to put the pads into the bracket first and then bolt it into place.
Seated clip.
When I was putting everything back together on the right, the rotor slid into place ok. But it didn't seem like it was seated, checked several times if everything under the rotor was where it should be. As oppose to the left side, when I pushed the left rotor into place, it slid and felt seated. I failed to mention, while hitting the right rotor with my BFH, I smashed the dust shield, the area where the caliper sits, and had to rebend it back into place with some pliers, probably my problem with the right side.?. Used some large washers and lug nuts to keep the rotor in place while reattaching the bracket and caliper.
What a seated rear rotor should look like before removal.
My work area
Since this was an unplanned repair, bought $40 rotors and lifetime ceramic pads from Autozone. Also did fronts the day before, an easier job. Already had front rotors and Hawk PC pads on hand (planned job from a few months ago). Didn't plan on using front ceramic pads, but the online company sent me the wrong one and I was too lazy to send back for what I ordered, the Hawk LTS ones. Bedded the new pads accordingly, no squealing noticed. Been driving the Jeep the last few days and no problems stopping. No drift of brake pedal.
I guess I used some of the red brake grease that came in the box in that small package when I changed the pads a few years ago, when the Jeep belonged to my brother. I bought it from him. Looked like some of it dried up a little. Now, I use Sil Glyde brake grease.
Front brake
Last edited by Aragorn; 09-23-2015 at 07:05 PM.
 09-23-2015, 11:20 AM
#2
JK Enthusiast
Join Date: Feb 2011
Location: NJ
Posts: 348
Likes: 0
Received 0 Likes
on
0 Posts
I did mine last weekend. You're right about those parking brake adjusters being a pain in the ass. Next time you have to use a hammer to get a rotor off put the lugs back on to protect the threads. I spun mine by hand while tapping the back of the rotor in the spot where the caliper was removed to break it free.
09-23-2015, 11:37 AM
#3
JK Freak
Sounds like my brake job too.... 
Right side took me about 5 hours. After I saw how to adjust the parking brakes, the left side took me an hour.
And both my wear indicators were broken....never even heard them
Right side took me about 5 hours. After I saw how to adjust the parking brakes, the left side took me an hour.
And both my wear indicators were broken....never even heard them
09-23-2015, 12:18 PM
#4
Took the Jeep out the other day and noticed some grinding noise coming out the back. Wife said she noticed it about 1 1/2 weeks ago. When I looked at the rear brakes, the right rear was metal on metal. On retrospect, maybe I heard the wear indicator tab intermittently making noise, but I chalked it up to squeally brakes - it didn't make that usual low brake pad noise I've heard in the past on my other cars.
Anyway, it was Hell because it took me about 6-7 hrs. - most of which was spent on the right rear - my 1st time changing rotors on a Jeep. Left rear took less than an hour, after I learned from the right. And I was sore the next day from swinging a BFH. Once you bust the "rust seal" on the rotor(used BFH, air chisel, and WD40) it's still very difficult to slide the rotor off.
To make this job easier, I feel you have to be able to compress the parking brake shoes by adjusting the star wheel. But the star wheel is not easily visible from the dust shield access hole, even with the bracket and caliper off (especially on the right side). On the right side, the star wheel is at the bottom of the access hole - I didn't even see it from under the car - you kind of have to look down, which is hard to do - not enough room to get a good angle at looking down. The left rear star wheel is easier to see since it is at the top of the access hole and you can see it if you look up. I turned the star wheel toward the front of the Jeep, if looking from the access hole, to compress the parking brake shoes and spun it to the rear of the Jeep to expand them when putting the new rotor on (just eyeballed where they sat and where the rotor goes into the dust shield). I think I adjusted them ok since my parking brake handle grabs near the top and is not loose at all. There's a yellow line on the star wheel assembly, the factory settings, so you know how many times you spun it.
Yea, that's metal on metal. LOL
No pad left. No wear indicator tab. So that's what that noise was....Just have to laugh about it now.
Never saw a piston pushed out this far.
While hitting the right rear rotor with a BFH, I also hit the sides of 2 of my lug nut bolts which crushed 4 threads on each of them and also knocked one out. So pissed when that happened. Tried to "regroove" the bolt by spinning the lug nut pass the crushed threads, but didn't work at all. Used my dremel with a diamond wheel, since the kerf is small enough to fit in the bolt groove, and opened up the grooves and thinned out the crushed threads - worked great - lug nut spins without any resistance at these points. Bought one new lug nut at Autozone as a replacement.
Used some large washers to get the knocked out bolt into place
Used new clips. Be careful putting in the front pads as you might push the rear of the clip into the rotor, like I did. Pushed it back into place with a screwdriver and rebent the front tab to keep it in place. There's also a small side tab (circled in red) which helps keeping the clip in place, which I think is its function, as long as you don't force the pad into place. Easier to put the pads into the bracket first and then bolt it into place.
Seated clip.
When I was putting everything back together on the right, the rotor slid into place ok. But it didn't seem like it was seated, checked several times if everything under the rotor was where it should be. As oppose to the left side, when I pushed the left rotor into place, it slid and felt seated. I failed to mention, while hitting the right rotor with my BFH, I smashed the dust shield, the area where the caliper sits, and had to rebend it back into place with some pliers, probably my problem with the right side.?. Used some large washers and lug nuts to keep the rotor in place while reattaching the bracket and caliper.
What a seated rear rotor should look like before removal.
My work area
Since this was an unplanned repair, bought $40 rotors and lifetime ceramic pads from Autozone. Also did fronts the day before, an easier job. Already had front rotors and Hawk PC pads on hand (planned job from a few months ago). Didn't plan on using front ceramic pads, but the online company sent me the wrong one and I was too lazy to send back for what I ordered, the Hawk LTS ones. Bedded the new pads accordingly, no squealing noticed. Been driving the Jeep the last few days and no problems stopping. No drift of brake pedal.
I guess I used some of the red brake grease that came in the box in that small package when I changed the pads a few years ago, when the Jeep belonged to my brother. I bought it from him. Looked like some of it dried up a little. Now, I use Sil Glyde brake grease.
Front brake
Sent from my SM-N920T using JK-Forum
09-23-2015, 02:54 PM
#5
JK Enthusiast
Thread Starter
I did mine last weekend. You're right about those parking brake adjusters being a pain in the ass. Next time you have to use a hammer to get a rotor off put the lugs back on to protect the threads. I spun mine by hand while tapping the back of the rotor in the spot where the caliper was removed to break it free.
09-23-2015, 03:02 PM
#6
JK Enthusiast
Thread Starter
Can you guys see the pics? On this laptop I can but on our other one I cannot. There are only small boxes where the pics should be. I tried to post full size pics using their url.
09-23-2015, 04:08 PM
#7
JK Freak
Trending Topics
09-23-2015, 05:21 PM
#8
JK Enthusiast

Join Date: Jul 2014
Location: Chicago
Posts: 173
Likes: 0
Received 0 Likes
on
0 Posts
Done brakes on my cars for 30 years. Good ones took an hour, bad ones like this the same all day. A few years ago I started looking them up on u tube for any project I was going to tackle. Have to say it really helps watching a pro do it a few times. Last few have all been super fast.
Sent from my iPad using JK-Forum
Sent from my iPad using JK-Forum
09-23-2015, 07:14 PM
#9
JK Enthusiast
Thread Starter
09-23-2015, 07:24 PM
#10
JK Enthusiast
Thread Starter
Done brakes on my cars for 30 years. Good ones took an hour, bad ones like this the same all day. A few years ago I started looking them up on u tube for any project I was going to tackle. Have to say it really helps watching a pro do it a few times. Last few have all been super fast.
Sent from my iPad using JK-Forum
Sent from my iPad using JK-Forum
Wished they had those 2 small holes so could of backed it out out or at least unseize it with a a couple small bolts