
Front Bumper Build
 05-03-2009, 05:00 AM
#21
JK Enthusiast
Thread Starter
Join Date: Jul 2007
Location: Ocala
Posts: 434
Likes: 0
Received 0 Likes
on
0 Posts
OK, I'm trying to put together a build along, so here goes it.
Step One (which should probably be step two in most cases): Look at the available material to make the bumper out of. In this case, I have an abundance of 4x6" 3/16" stock; but, it's not quite as long as the entire bumper, so I'll have to make separate wings.
Step Two: Design the bumper.
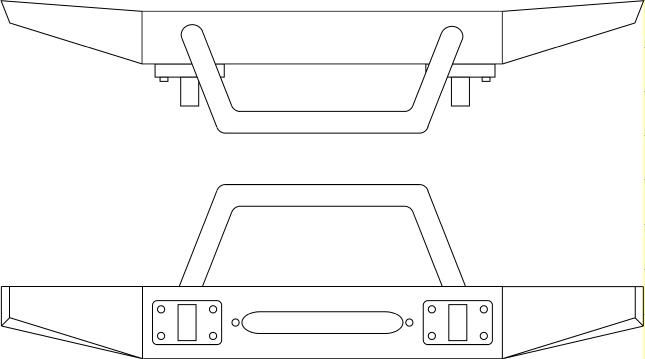
This is my quick rendering of what I want it to look like. Since this is a quick rendering, it's not to scale, with no measurements provided.
Step Three: Assuming there are measurements from the designing of the bumper, start making templates of the various shapes out of cardboard. Then trace out the templates on the steel stock with a Sharpie.
Step Four: Cut the shapes out of the steel. I'm using an angle-grinder.
Step Five: Clean up the cuts. Make sure all pieces are equal to their opposite side counter part, and that all corresponding pieces fit together.
Step Six: Clean up the steel. My stock is pretty rough, with surface rust on the inside and a heavy primer on the outside. I want to make sure all the rust and primer is off. Additionally, I want the inside to be primed, or have some kind of rust inhibitor applied to it.
Step Seven: Drill holes.
Step Eight: Test-fit the center piece.
Step Nine: Weld up the shapes.
Step Ten: Clean up the welds. My welds will not be pretty, so I'm going to have to hit them with the angle grinder to make everything look nice.
Step Eleven: Apply primer/finish coat to bumper. I'm not sure what I'm going to do yet. I'm thinking I'll rattle-can it first. Once I get a winch, then I'll probably have it powder coated to match the Expedition One rear bumper.
OK, I just made up all these steps as I've been typing, and as I said before, I've never done this before. The steps will probably change; but, for now, this is my outline.
Step One (which should probably be step two in most cases): Look at the available material to make the bumper out of. In this case, I have an abundance of 4x6" 3/16" stock; but, it's not quite as long as the entire bumper, so I'll have to make separate wings.
Step Two: Design the bumper.
This is my quick rendering of what I want it to look like. Since this is a quick rendering, it's not to scale, with no measurements provided.
Step Three: Assuming there are measurements from the designing of the bumper, start making templates of the various shapes out of cardboard. Then trace out the templates on the steel stock with a Sharpie.
Step Four: Cut the shapes out of the steel. I'm using an angle-grinder.
Step Five: Clean up the cuts. Make sure all pieces are equal to their opposite side counter part, and that all corresponding pieces fit together.
Step Six: Clean up the steel. My stock is pretty rough, with surface rust on the inside and a heavy primer on the outside. I want to make sure all the rust and primer is off. Additionally, I want the inside to be primed, or have some kind of rust inhibitor applied to it.
Step Seven: Drill holes.
Step Eight: Test-fit the center piece.
Step Nine: Weld up the shapes.
Step Ten: Clean up the welds. My welds will not be pretty, so I'm going to have to hit them with the angle grinder to make everything look nice.
Step Eleven: Apply primer/finish coat to bumper. I'm not sure what I'm going to do yet. I'm thinking I'll rattle-can it first. Once I get a winch, then I'll probably have it powder coated to match the Expedition One rear bumper.
OK, I just made up all these steps as I've been typing, and as I said before, I've never done this before. The steps will probably change; but, for now, this is my outline.

 05-04-2009, 09:35 AM
#23
JK Enthusiast
Thread Starter
Join Date: Jul 2007
Location: Ocala
Posts: 434
Likes: 0
Received 0 Likes
on
0 Posts
Ordered my Teraflex spacers and shackle mounts today. I have a pretty busy work week, so I probably won't get back to the bumper until the end of the week. Maybe my new grinder will be here by then.
05-04-2009, 04:25 PM
#24
JK Enthusiast
Thread Starter
Join Date: Jul 2007
Location: Ocala
Posts: 434
Likes: 0
Received 0 Likes
on
0 Posts
I shit-canned the Teraflex spacers and shackle mounts because I thought I was buying pairs when I was buying single pieces. I ended up ordering the PJ shackle mounts.
I'm thinking about the Daystar 3/4" spacers, though.
I'm thinking about the Daystar 3/4" spacers, though.
05-07-2009, 06:57 AM
#27
JK Freak
Join Date: Oct 2007
Location: Hangin in the sunshine state....staging forum..
Posts: 943
Likes: 0
Received 2 Likes
on
2 Posts
Chris great idea using the cardboard as a template 

as far as getting rid of the rust you could coat the steal in Por-15 or get it sand blasted, just sanding it wont get rid of it, it will come back.
as far as getting rid of the rust you could coat the steal in Por-15 or get it sand blasted, just sanding it wont get rid of it, it will come back.
05-07-2009, 07:10 AM
#28
JK Enthusiast
Thread Starter
Join Date: Jul 2007
Location: Ocala
Posts: 434
Likes: 0
Received 0 Likes
on
0 Posts
