
Opinions on DIY cargo lid for JKU
 02-21-2016, 01:40 PM
#11
JK Newbie
Thread Starter

Join Date: Jul 2015
Location: Northglenn, Colorado
Posts: 10
Likes: 0
Received 0 Likes
on
0 Posts
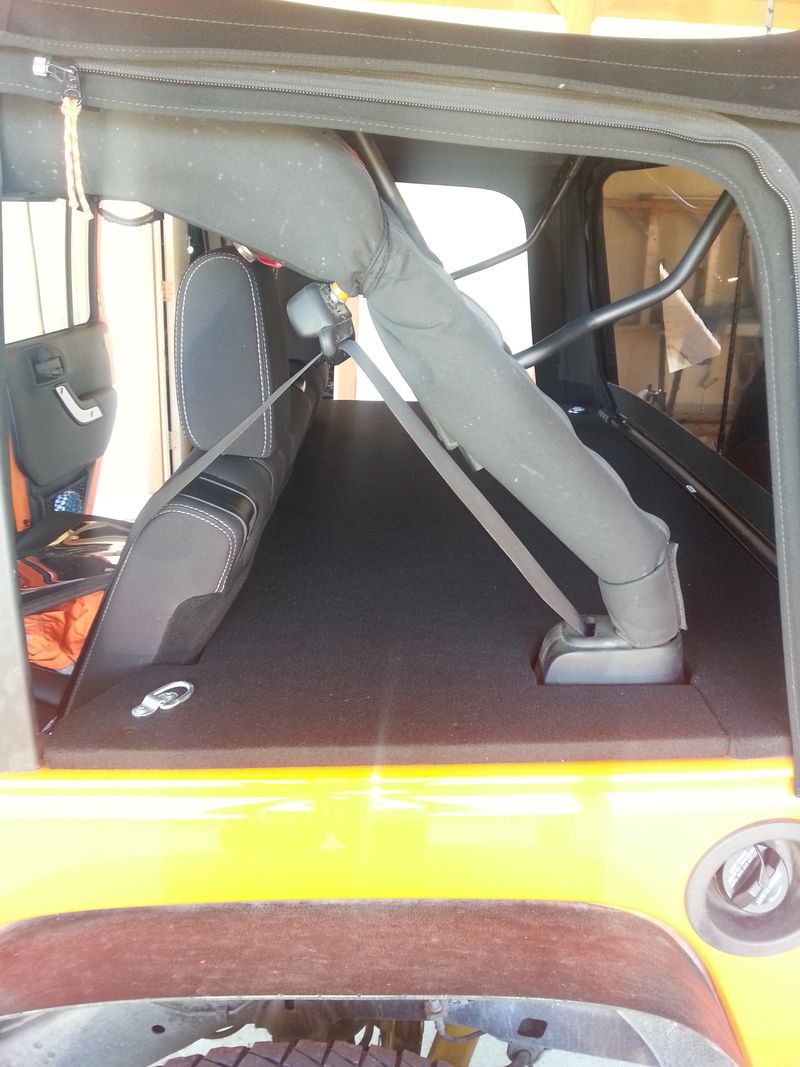
I built mine 5+ years ago (wow seems like a long time lol). All I wanted it for was to allow me to use the soft top or bikini top and to keep the stuff in the truck "out of sight, out of mind".
Here's a picture of it on my old JK (07). I had to modify it to fit my 2012 due to the seatbelt cover things in the rear being higher. I also rounded the corners so that it would fit my soft top with no issues. The front on mine (against the seats) is open, as I need that to access my fridge (the initial reason why I raised it above the tub). It's also less for security then just to keep things out of sight. So far I've been extremely lucky (even when vacationing in major centers) that no one has messed with the jeep - even when running doorless or just soft doors.
Haven't used it as much lately, just as I've been sticking with the hard top - but I'll never get rid of this, as it's too handy for when I want to go topless or run the ST for any length of time.
The main piece of the top is all one piece of plywood, with two smaller pieces that fit in behind the rollbars (where I slide the top part in around them).
 02-21-2016, 02:44 PM
#12
JK Enthusiast

Join Date: Jul 2014
Location: Chicago
Posts: 173
Likes: 0
Received 0 Likes
on
0 Posts
Th red one looks like a backbone. Very nice work if you made that. I don't have the skills for,that so I purchased a backbone. Just installed it this,weekend.
Sent from my iPad using JK-Forum
Sent from my iPad using JK-Forum
02-22-2016, 08:37 AM
#13
JK Junkie
02-22-2016, 07:33 PM
#14
JK Enthusiast

If it's sitting, then yeah some rain will get in around the rollbars. One could fix that by just adding a very small lip on the front side to push the water away. I did this (not shown) on the front where the lid meets the rear seats. But water will pool on it initially, so one needs to be aware of it if it's been raining and either brush it off, or pull away really quickly so the water goes over the rear and not sloshing forward onto the seats (make sure the rear deck extends over the tailgate). But when actually moving? Does fine. Was in a few heavy rain storms - got caught topless and it was raining so bad that my radio started to get messed up (needed a few days to dry out), but when I pulled over after the rain to get out the bikini top while there was a little water under it, there wasn't that much.
Again, mine was used less as protection against the weather and more as "out of sight out of mind" and to ensure whatever junk I tossed back there didn't blow away. It was great for that!
02-22-2016, 08:49 PM
#15
JK Newbie

Join Date: Feb 2013
Location: Wylie, Tx
Posts: 42
Likes: 0
Received 0 Likes
on
0 Posts
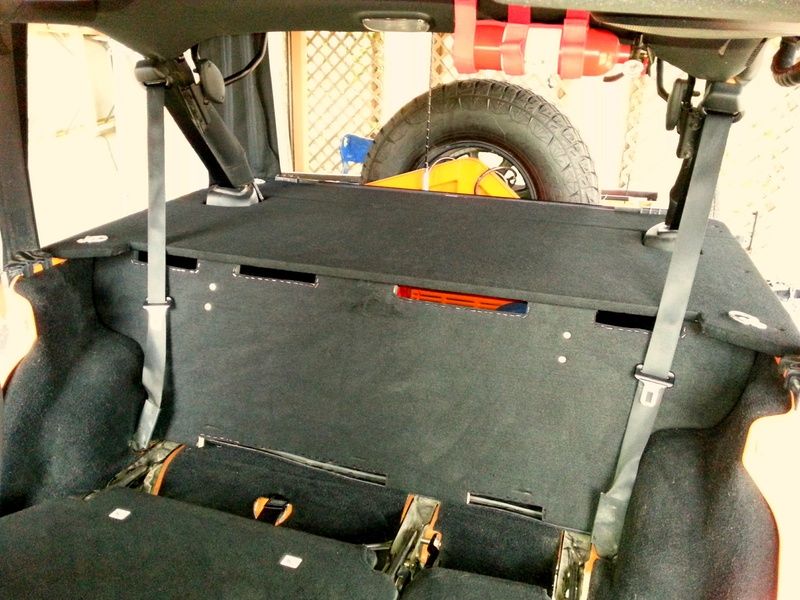
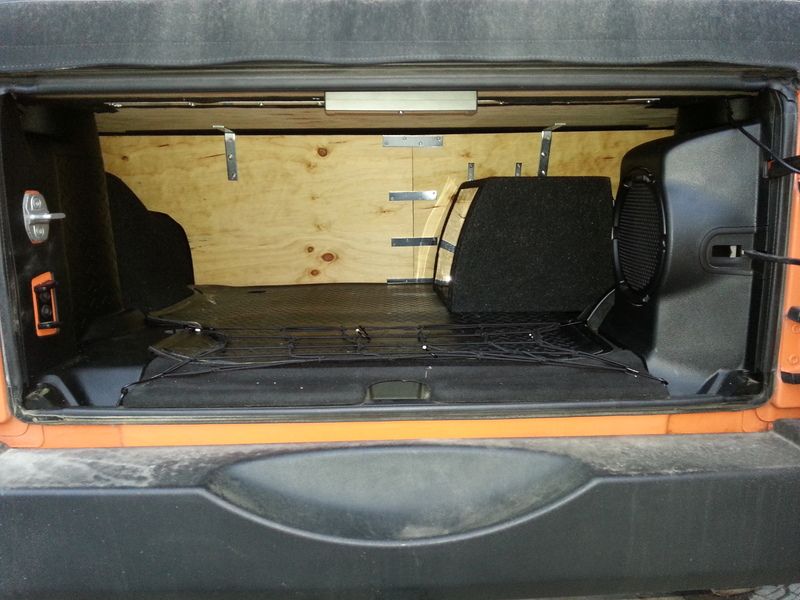
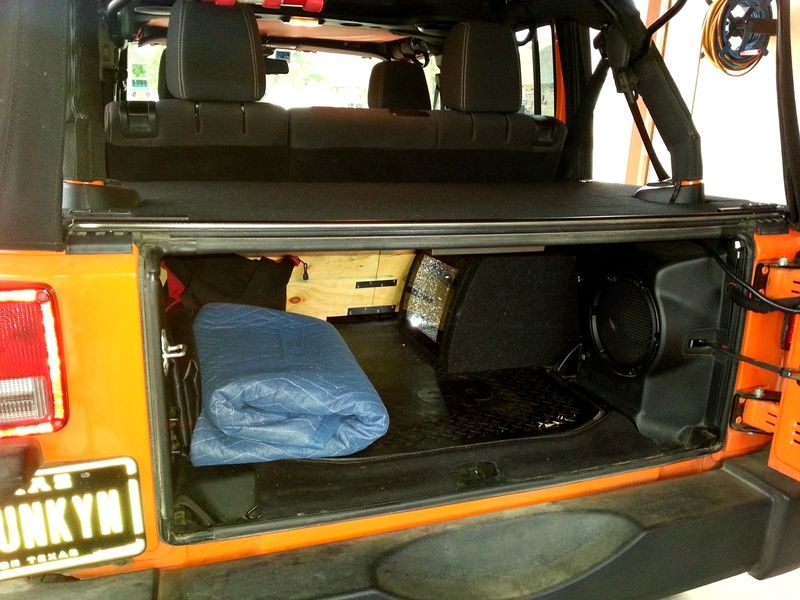
I built ours from 3/4" treated plywood. I also water sealed the wood, especially the cut edges, after it was cut to shape. I started by first doing some measurements and then making a slightly oversized cardboard template that I could trim to a tighter more exact fit. Then I traced it out from a single sheet of 4X8 ply. You can see that the behind the rear seat separating wall had to be made from 2 pieces to get it all done with a single sheet of ply. I used marine grade carpeting and a staple gun to cover it. I tried spray adhesive, but since I had sealed the wood the adhesive didnt stick as well as I would have liked where it was folded over an edge. It sticks fine on the large flat surfaces.
In one pic you can see that I initially made the behind the rear seat divider wall a solid piece that was not ported, but that severely limited the sound from the subs inside the cargo area. I had to go back and cut the ports. Unfortunately I didnt have enough carpet left to be able to recover it, so for the moment it is stapled in place at the ports. I have to remember to order more carpet some day. But being that it is behnd the rear seat, I never see it! I also had to go back and trim the deck when I did the rear seat recline. But being that it is wood it was easy enough to do with a jig saw. I made sure that it didnt interfere with the soft top, so it stays on full time. We have taken trips with cargo strapped down on the deck and it held up great. I may add a removable center support to it at some point, since the full ice chest strapped to it did cause a bit of flex on bumpy trails. I also need to find a way to tap into the interior lights so I can install some sort of light that will come on in the trunk when the doors open. Right now we have a battery powered LED light back there on velcro. It works, but my kids forget to shut it off all the time and we go thru batteries in it way too fast.
We love having the deck to keep things locked up safe when the top is down and the doors are off.


 02-23-2016, 05:59 AM
#16
JK Newbie
Thread Starter
Join Date: Jul 2015
Location: Northglenn, Colorado
Posts: 10
Likes: 0
Received 0 Likes
on
0 Posts
I built ours from 3/4" treated plywood. I also water sealed the wood, especially the cut edges, after it was cut to shape. I started by first doing some measurements and then making a slightly oversized cardboard template that I could trim to a tighter more exact fit. Then I traced it out from a single sheet of 4X8 ply. You can see that the behind the rear seat separating wall had to be made from 2 pieces to get it all done with a single sheet of ply. I used marine grade carpeting and a staple gun to cover it. I tried spray adhesive, but since I had sealed the wood the adhesive didnt stick as well as I would have liked where it was folded over an edge. It sticks fine on the large flat surfaces.
In one pic you can see that I initially made the behind the rear seat divider wall a solid piece that was not ported, but that severely limited the sound from the subs inside the cargo area. I had to go back and cut the ports. Unfortunately I didnt have enough carpet left to be able to recover it, so for the moment it is stapled in place at the ports. I have to remember to order more carpet some day. But being that it is behnd the rear seat, I never see it! I also had to go back and trim the deck when I did the rear seat recline. But being that it is wood it was easy enough to do with a jig saw. I made sure that it didnt interfere with the soft top, so it stays on full time. We have taken trips with cargo strapped down on the deck and it held up great. I may add a removable center support to it at some point, since the full ice chest strapped to it did cause a bit of flex on bumpy trails. I also need to find a way to tap into the interior lights so I can install some sort of light that will come on in the trunk when the doors open. Right now we have a battery powered LED light back there on velcro. It works, but my kids forget to shut it off all the time and we go thru batteries in it way too fast.
We love having the deck to keep things locked up safe when the top is down and the doors are off.
In one pic you can see that I initially made the behind the rear seat divider wall a solid piece that was not ported, but that severely limited the sound from the subs inside the cargo area. I had to go back and cut the ports. Unfortunately I didnt have enough carpet left to be able to recover it, so for the moment it is stapled in place at the ports. I have to remember to order more carpet some day. But being that it is behnd the rear seat, I never see it! I also had to go back and trim the deck when I did the rear seat recline. But being that it is wood it was easy enough to do with a jig saw. I made sure that it didnt interfere with the soft top, so it stays on full time. We have taken trips with cargo strapped down on the deck and it held up great. I may add a removable center support to it at some point, since the full ice chest strapped to it did cause a bit of flex on bumpy trails. I also need to find a way to tap into the interior lights so I can install some sort of light that will come on in the trunk when the doors open. Right now we have a battery powered LED light back there on velcro. It works, but my kids forget to shut it off all the time and we go thru batteries in it way too fast.
We love having the deck to keep things locked up safe when the top is down and the doors are off.
I want to say thank you to everyone that has responded so far. My cheat sheet that I'm making is getting bigger with really great ideas and things to look out for!
02-23-2016, 08:19 AM
#17
JK Newbie
Join Date: Feb 2013
Location: Wylie, Tx
Posts: 42
Likes: 0
Received 0 Likes
on
0 Posts
Cardboard was my friend. I made a template of the entire thing out of cardboard before I ever cut a single piece of wood. The sides of the cargo area behind the seat get narrower toward the tailgate and have those curved corners, and that bow that secures the rear window is a long arching curve. I just kept securing pieces of cardboard down in place and using a sharpie to get the final shape traced onto it. I had to go back and sand a few spots to get a nice tight fit. So if you do yours this way its best to cut just slightly larger than you need and do final fitting with a file and sander, especially that back arched piece for the window retaining bar and the corners of the tub. Especially if you have a soft top and dont want to have the deck interfere with anything. The deck fits tight to just about everything around it with no gaps.
It did come out pretty nice, and is extremely functional. It had to since my wife claims the jeep as her own. So anything I do to it has to look good first, functioning appropriate is a secondary consideration! Like I mentioned I still need to figure out lighting that uses the vehicles power. If you plan to add subs to your jeep something like this is a necessity. Cutting those ports in the wall behind the seat also made the sound really come through in very tight punchy bass style.
Its not a difficult project. It just takes time and patience to make it right the first time.
The rear section of my deck cover is actually cut and fit to slid right up under that window retaining bar lip. So there is absolutely no gap anywhere along its entire length. It takes some careful attention to detail to get the fit right, but its worth it to get that tight of a seal between the two pieces.

Last edited by Punkyn13; 02-23-2016 at 08:25 AM.
02-26-2016, 11:50 AM
#19
JK Newbie
Join Date: Jun 2014
Location: Houston, TX
Posts: 39
Likes: 0
Received 0 Likes
on
0 Posts
how log did you make the piece that is bent behind the seat?? do you remember the angle?
did you make any kind of attachment tabs for that part to the floor?
AND.. did you make any kind of perforation/holes in the front plate?
Thanks