
Pro Comp 2.5" CRT Spring Lift Install & Review
 10-23-2008, 09:10 PM
#1
JK Freak
Thread Starter
Join Date: Jun 2007
Location: Vancouver, B.C., Canada
Posts: 676
Likes: 0
Received 2 Likes
on
2 Posts
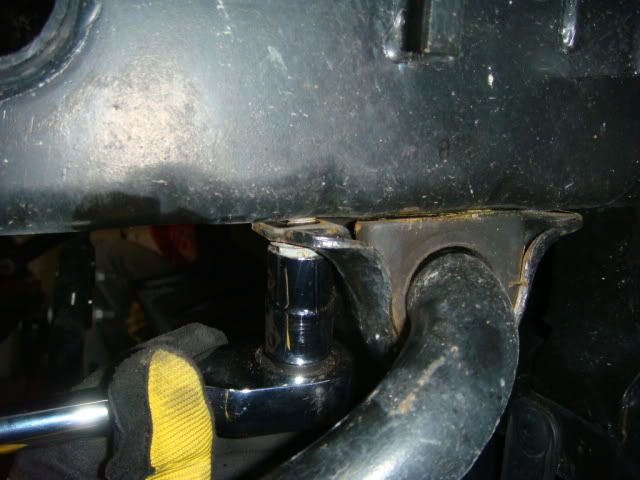
Now you can slowly drop the axle down by lowereing the jack that is inder the front differential. Only lower the axel by enough to remove the stock coil springs. always be sure the beake and ABS lines are not being stretched. Once you have the stock coil springs out and set aside you can begin installing the Aluminum bumpstop extensions.
Begin first by cleaning up the spring pad, then positioning the bumpstop on the pad and tracing the circle with a light colored pencil. This will help you to drill in the true center of the pad.
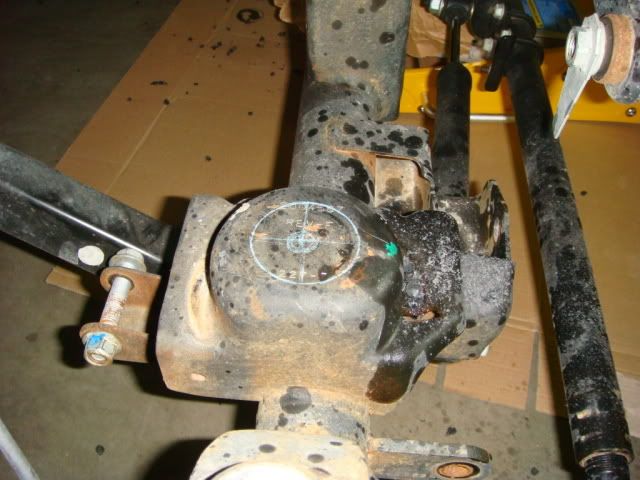
To drill, prepare an electric drill with a 3/8" high speed metal drill bit, and drill through the axle pad and use the supplied hardware to secure the bumpstop to the axle pad.
Be careful with how much torque you apply to the bolts on the bumpstop spacers, it found the numbers listed in the instructions to be excessive as I totally stripped out one of the nylon lock nuts.
Hey Group,
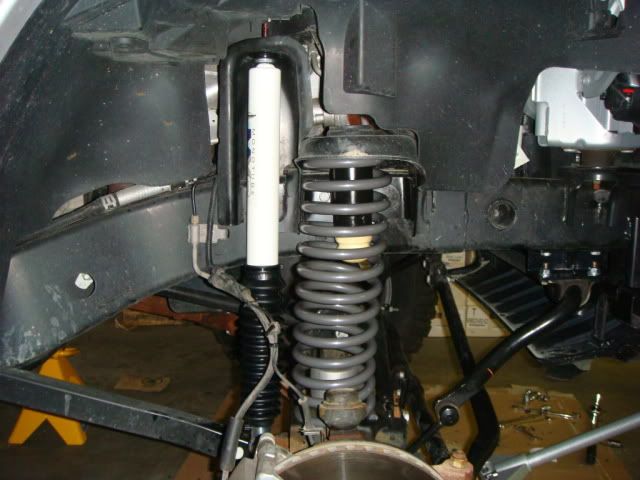
I just picked up the Pro Comp Comfort Ride Tuned 2.5" Coil Lift with 6-way adjustable monotube design MX6 shocks. I am documenting the kit and install on this thread to provide others with facts. I have done many searches for this kit with no information as of yet. I thought it would help to give photos and thoughts for the general community. I realize ther are other 2.5" coil lifts on the market, but I wanted to see how this performes... "Don't knock it till you try it".
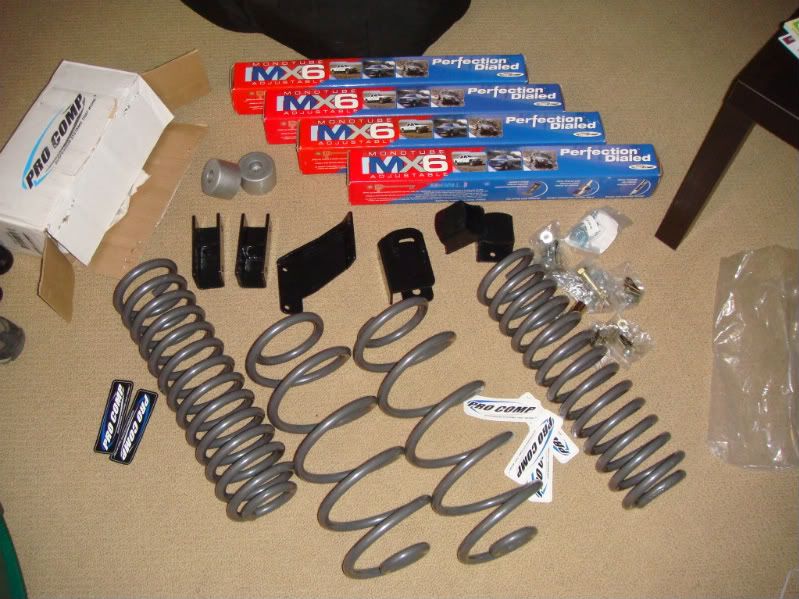
Here is the Kit:
- Aluminum front bumpstop spacers
- rear bumpstop spacers
- Rear trackbar relocation bracket & re-enforcement brace
- Front sway bar drop brackets
- lift springs
- adjustable monotube shocks
- Required Hardware pack
- Full instructions & many stickers
As an overview, the kit is shipped in 4 separate boxes. One box each for the rear springs, front springs, 4 shocks and the last box contains all the brackets, bumpstops, hardware and instructions; he kit is packaged well. There are more than enough stickers and decals included for every toolbox you have.
All 4 springs arrive with light grey paint without a blemish. The MX6 shocks are shipped in the compressed state and include a black rubber boot with strap. The brackets are all painted black and the front bumpstops were simple cast aluminum. The only blemish I found was a small paint chip missing on one of the corners of a bracket, not a problem at all. The kit comes with multiple pouches of hardware with contents dedicated to each part of the install. There was no missing hardware. Lastly 1 print copy of install instructions are included along with the usual end-user disclaimer notice.
The instructions remain quite basic with only a few schematic diagrams, however, I do not forsee any problems as everything seems very strait forward. If you would like a PDF copy of the installation intructions please PM me and I will send you the link.
A few things you will need before you complete the install on your own:
1 - Small tube of Loctite
2 - Assortment of metal Drill Bits including at minimum a 3/8" metal-purpose bit.
3 - Electric drill (corded or cordless)
4 - Floor Jack
5 - Torque Wrench
6 - Work Light (Optional)
Procedure: FRONT END
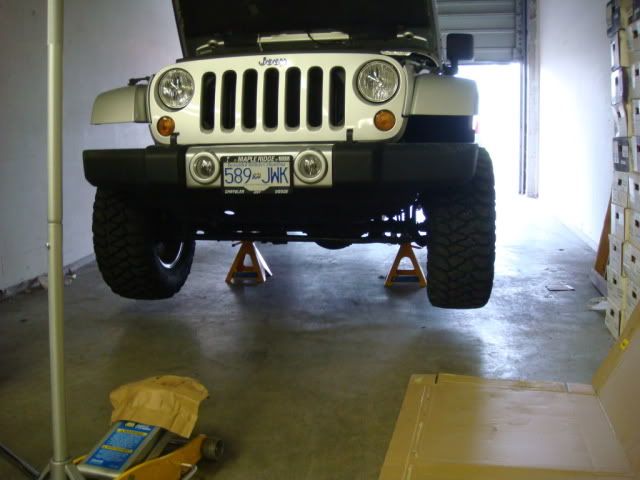
Park in a flat, level, area; secure the Jeep on jackstands and keep the jack under the front axel and remove the fron wheels. Be sure to set parking break and block the rear wheels.
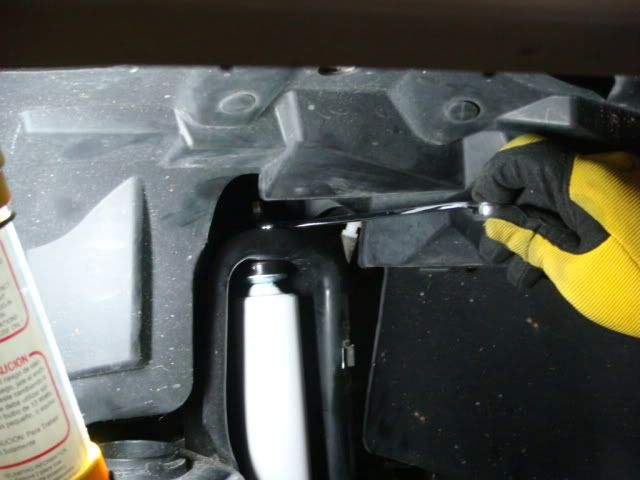
If you have an automatic transmission, remove the 3 - 18mm bolts that secure the transmission skid plate.
Remove the lower sway bar links, the upper shock mounting nuts and the lower shock mount bolt. The shocks may be set aside since they will be replaced later by the shocks in the kit.
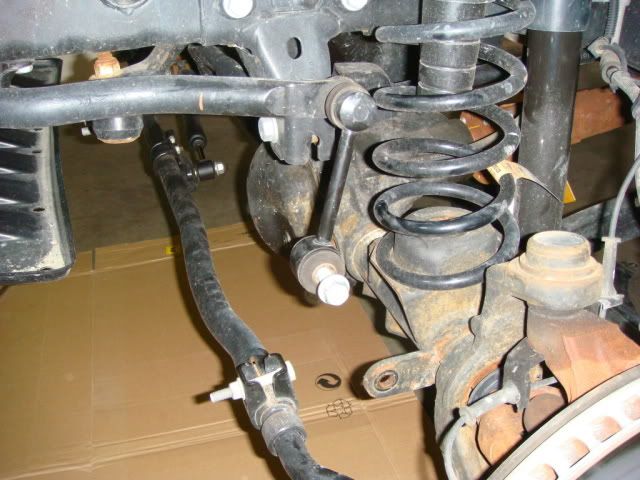
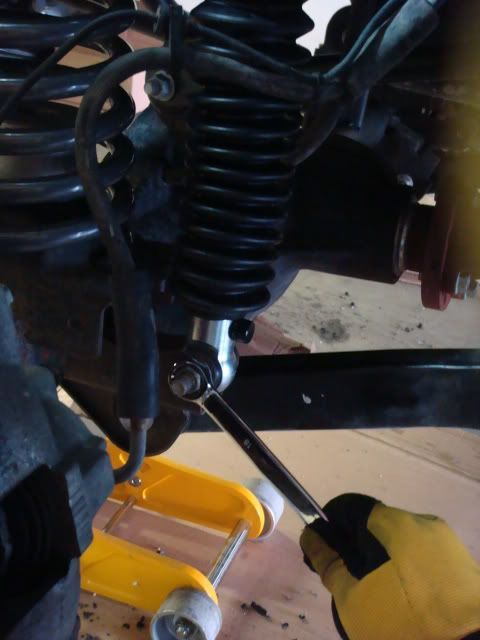
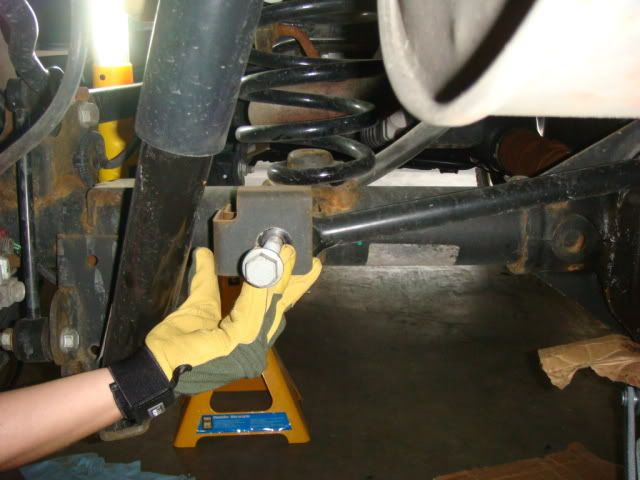
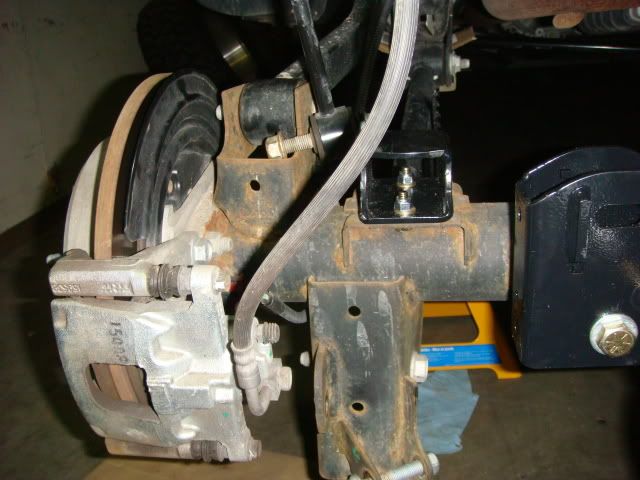
Remove the front track bar bolt connected to the front axle , secure the track bar out of the way for the time being. Also be sure unbolt the brake like bracket from the frame for now.
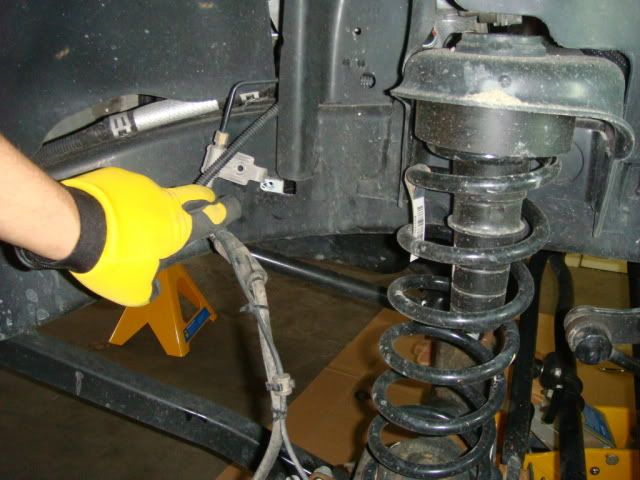
Now you are ready to install the Pro Comp front coil springs. This is done quite simply, even with the added bumpstop spacers installed. You will have to lower the jack supporting the front axle slowly keeping an eye on the brake lines. Do one side at a time, you will be able to push down on the end of the axle to slide the spring into place by placing the top into place and slide the bottom up and over the aluminum bumpstop. Be sure the bottom of the springs are seated correctly then raise the axle slightly with the jack.
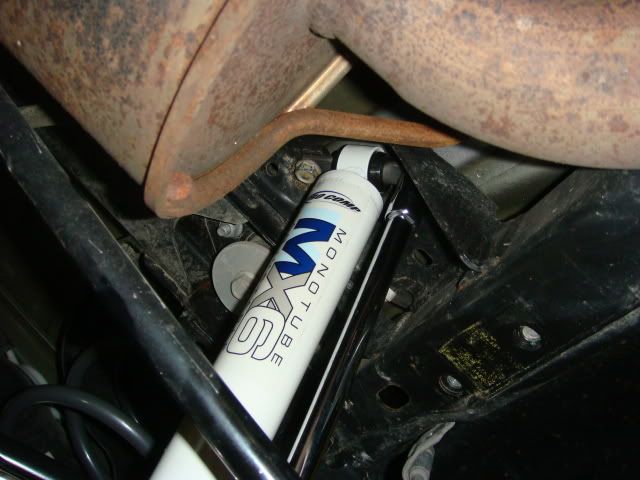
After the springs are set into place, you can install the supplied longer Pro comp shocks. I have the adjustable monotube shocks and chose to have the dial facing towards the rear. Installing these is the exact reverse of removing the originals and they come with there own upper mounting nut. Torque specs are listed in the instructions. As a note, the monotube MX6 shocks come with there own dust boot, but if you opt for the regular twin tube shock you will have to run without or get your own somewhere. At this point you should have the springs and shocks installed so you can reattach the brake line bracket to the frame.
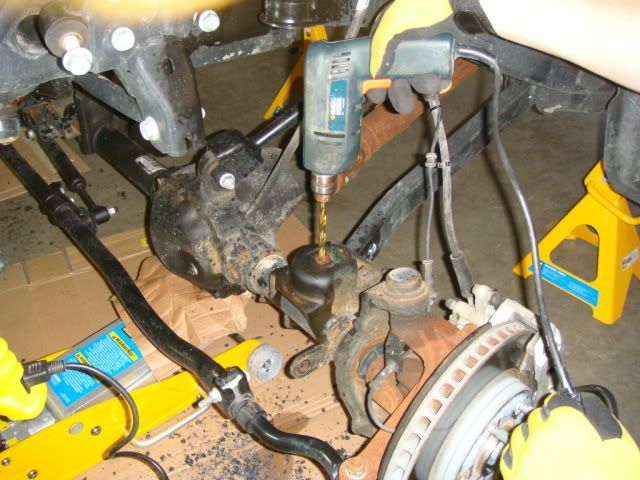
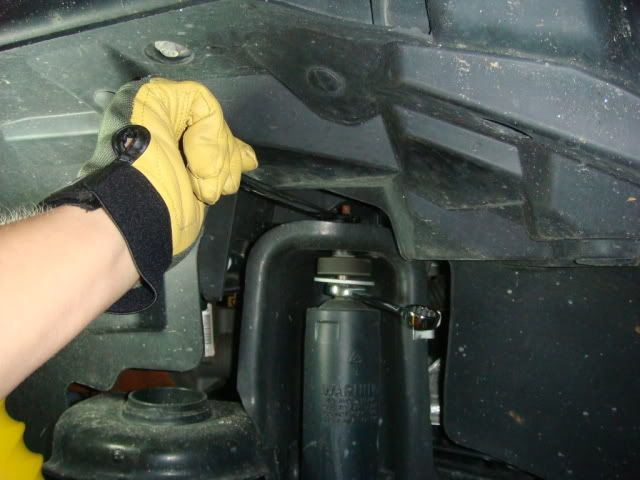
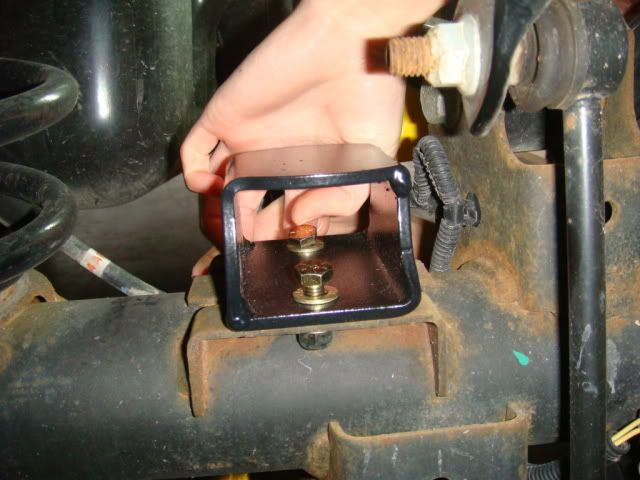
This was not discussed in the instructions. I resolved the issue by removing the brake caliper and rotor disc, but this didn't quite give me enough clearance to properly align the drill. As you can see, the dust guard still remains in the way but I decided NOT to remove any more of the hub assembly.
I decided to use a smaller drill bit to create a small pilot hole through to the bracket. Then simply drill from the other direction to complete the hole. To do this you will have to remove the large 9/16" bolt from the brackets, but install the 2 upper 3/8" hardware to keep the adapter bracket in place.
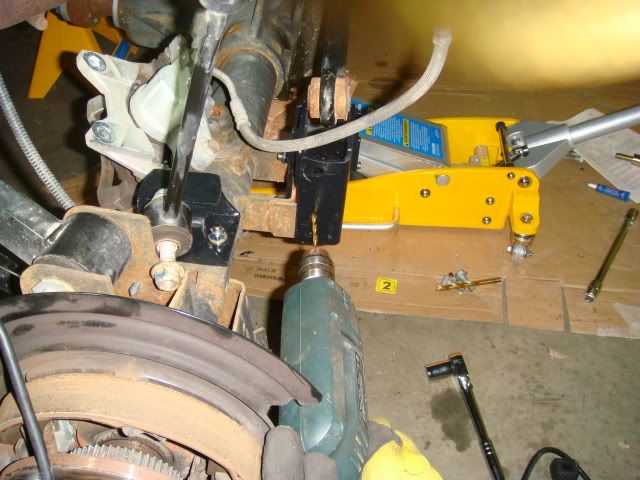
Now with the pilot drilled through and the big bolt gone, you can drill back through to the other side with the 3/8" drill bit.
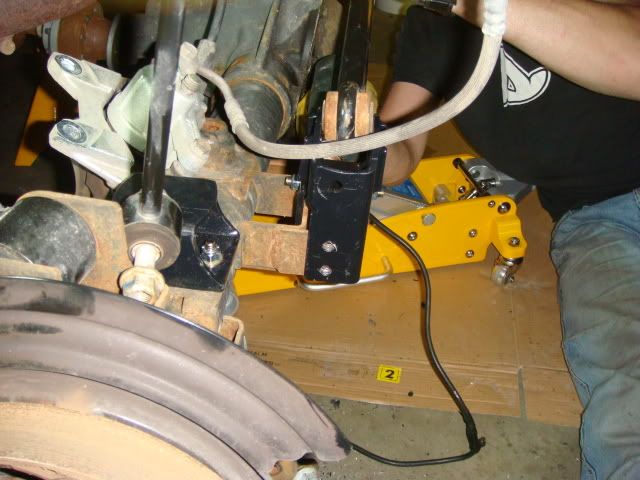
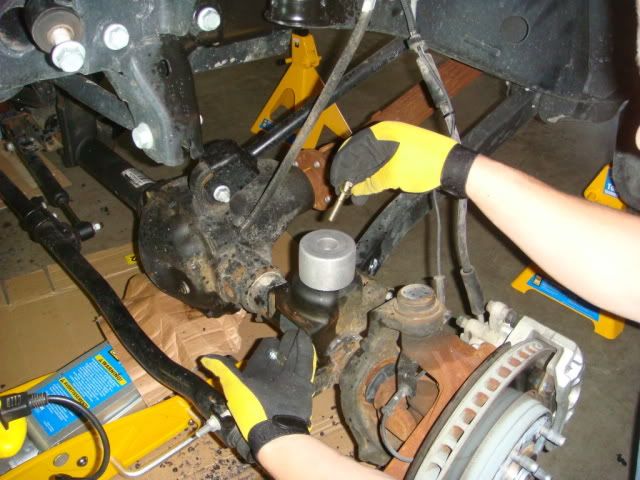
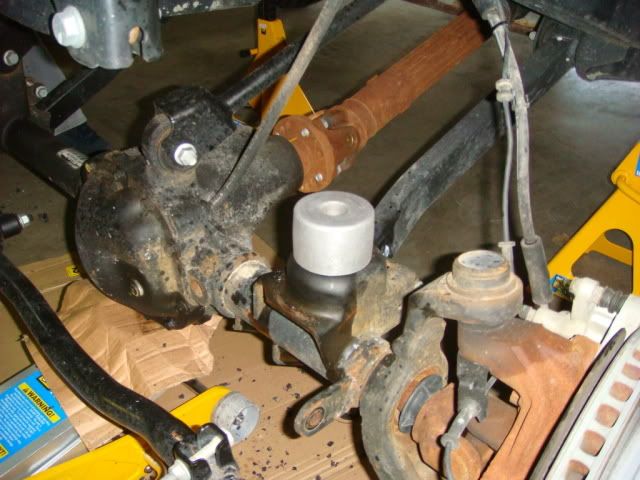
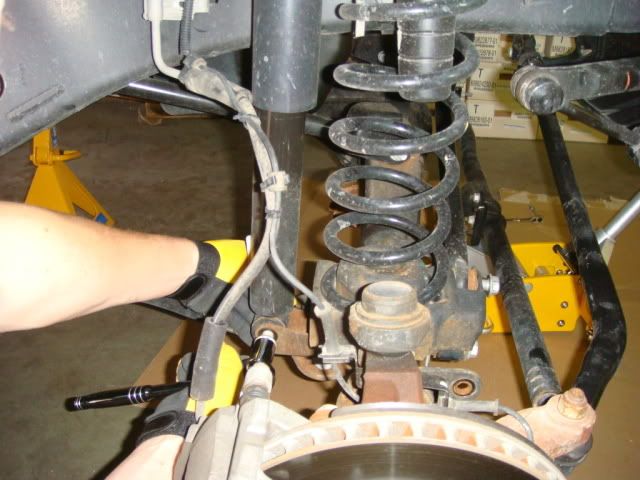
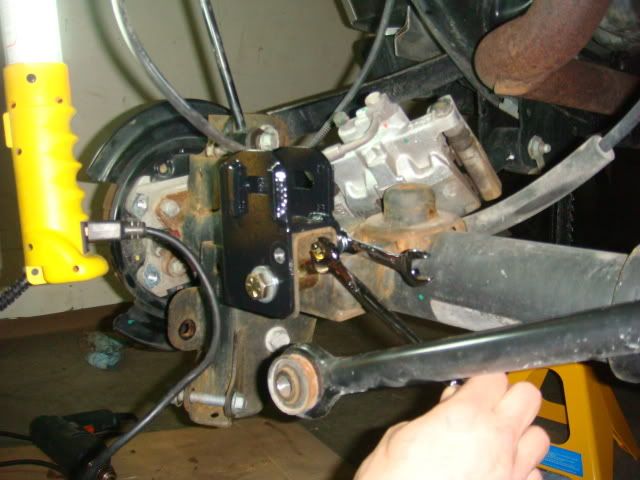
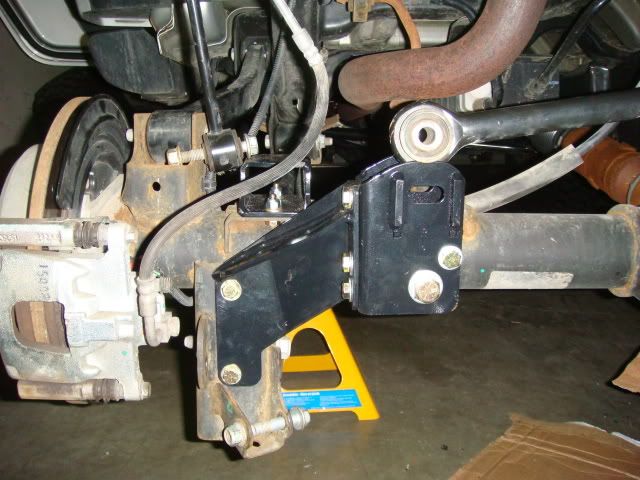
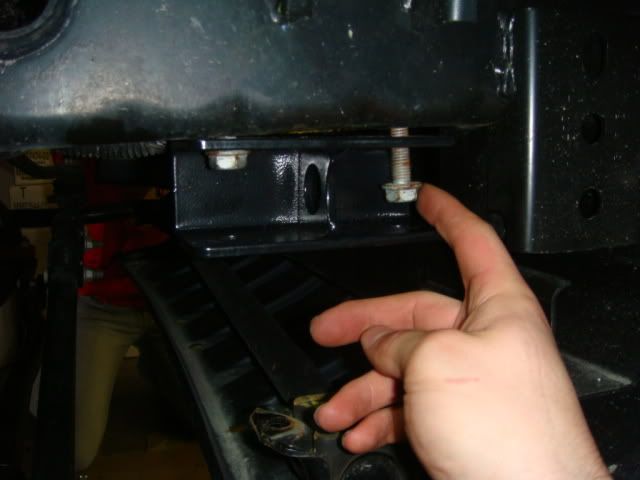
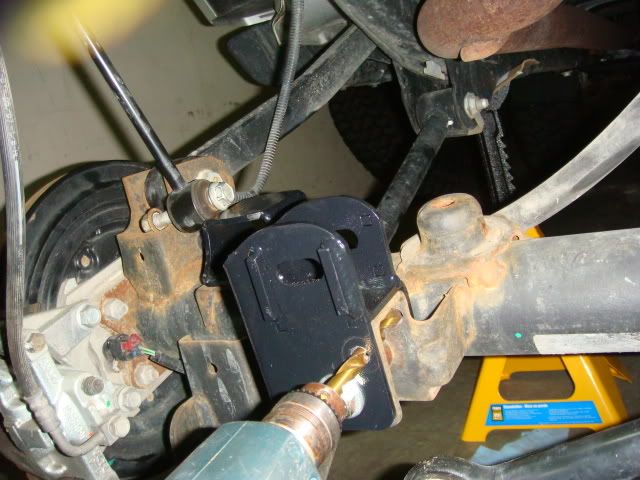
Now with all those holes drilled out, you can go ahead and position and bolt up the track bar relocation bracket brace. This should go on easy and bolt up with all the supplied 3/8" hardware. Here is a photo with everything bolted up:
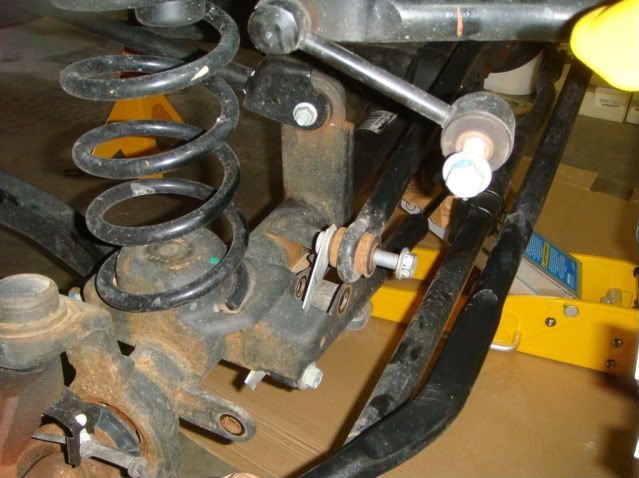
At this point, unless you have adjustable sway bar quick disconnects, you will install the front sway bar drop brackets. My JKS disconnects are a few weeks away so I installed the drop brackets. They are very simpe to install, first you remove both sway bar mounts from the frame, then install the brackets using the original hardware and then reinstall the sway bar mount to the bracket with the supplied hardware. I assume this is done to maintain the geometry of the sway bar, and keep it away from the tire sidewall.
Now all you have to do is re-attach the sway bar links and the front track bar to the axle with the original hardware and the front end is complete! Put the wheels back, lower the jeep, remove the jackstands and get set for the rear.
-----REAR INSTALL---------------
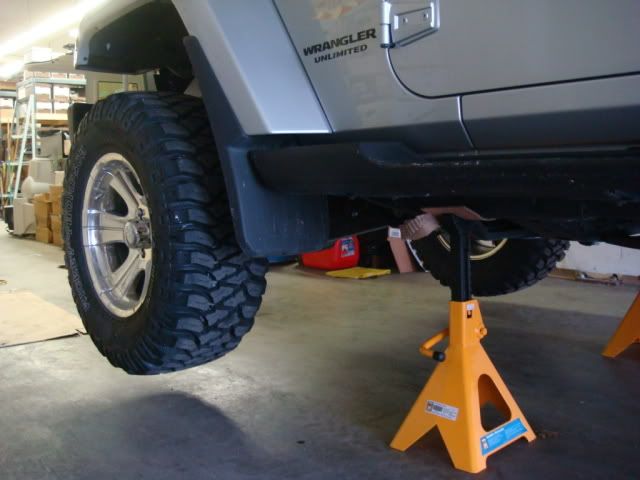
For the rear, you will have to secure the rear on jackstands, block the front wheels, and remove the rear wheels. The first step is to remove the bolt attaching the rear trackbar to the axle, keep it out of the way and stash the hardware with the springs and shocks because you won't be re-using it.
Next I installed the rear bumpstop pad spacers. The spacers bolt up to the existing axle pad through the existing holes. I found that the bolts must be installed from the bottom with the nut on top, otherwize there will be clearance issues with the axle tube. At this time you can also remove the factory shocks and springs, not too different from the front.
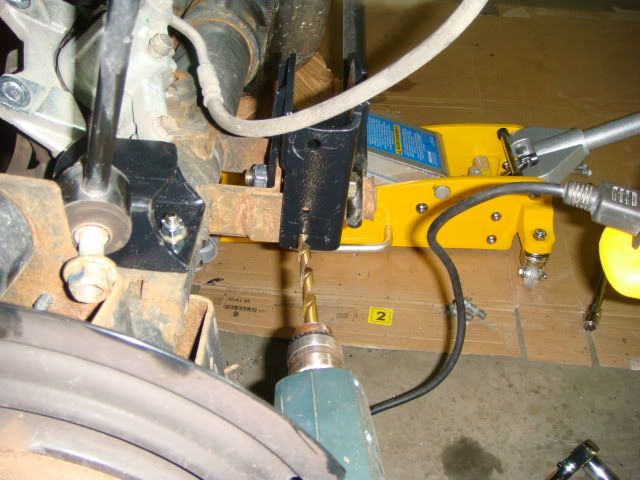
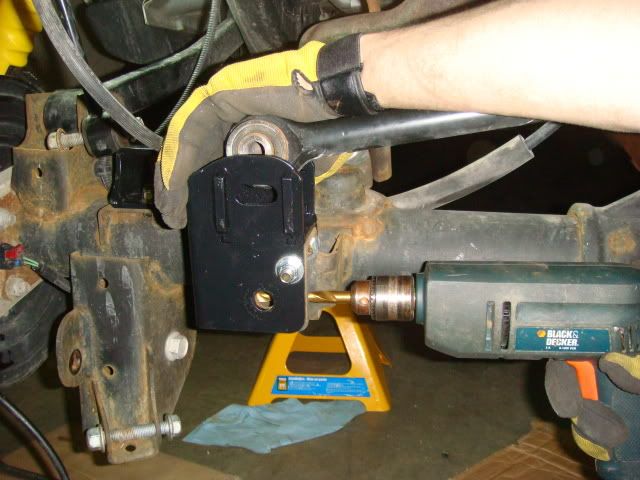
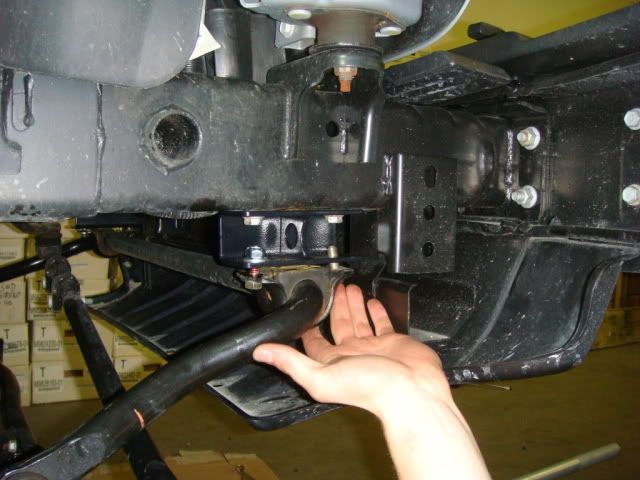
Now the fun stuff. If you opted for an aftermarket adjustable track bar, then I am sure you will ignore the rear track bar relocation system that Pro Comp has included in this kit. I installed it. To do this firt you must install the raise bracket over the original axle mount, and use the supplied bolt nut and spacer to tighten it down. Now you will have to fit the 3/8" drill bit to your drill and drill away. The first hole is straight across from the rear to the front of the bracket as shown in the photo below, you will have to keep a steady arm to make sure it is aligned on both sides. The Pro Comp Bracket already has 1/4" holes as a guide so it is really quite simple.
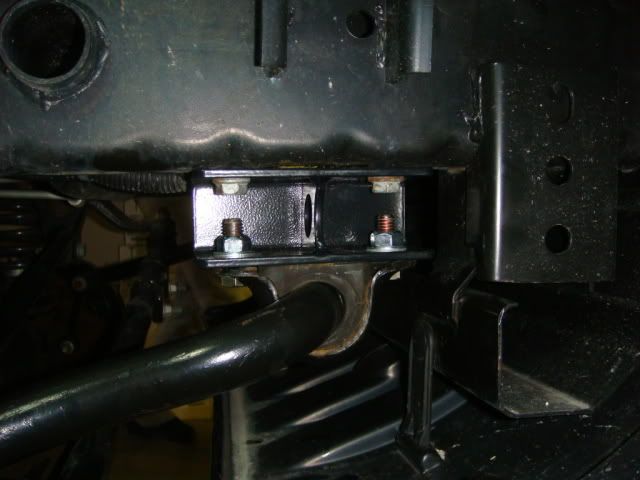
Now you are required to drill 2 more holes. This time they need to be drilled on the drivers side of the bracket. Again, there are already two 1/4" holes as a guide. This is where I ran into a few problems. I was not able to fit my drill between the brake caliper and the bracket and could not drill the hole, look at the photo below to see what I am talking about.
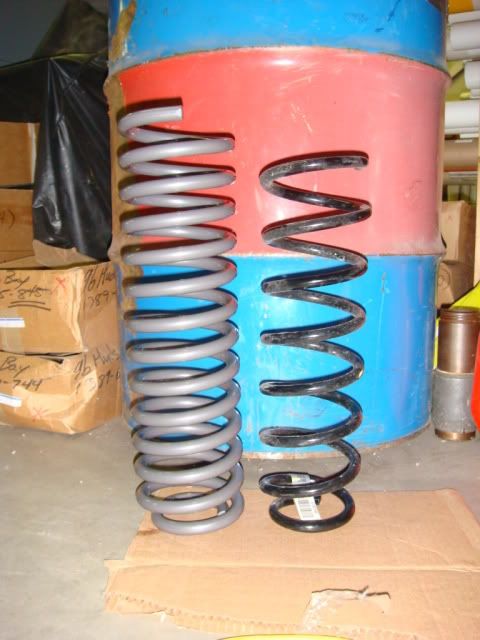
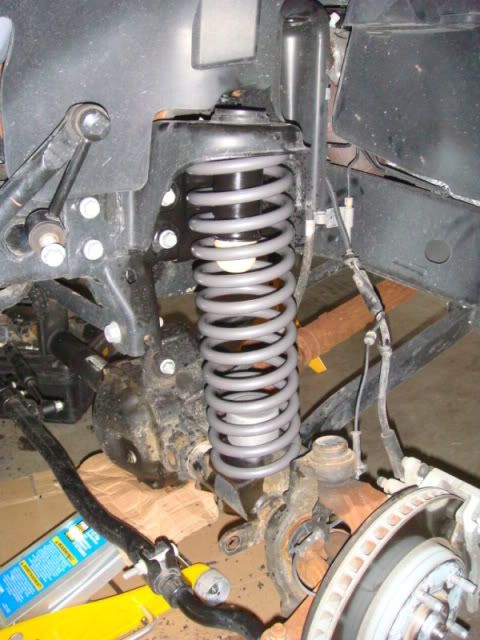
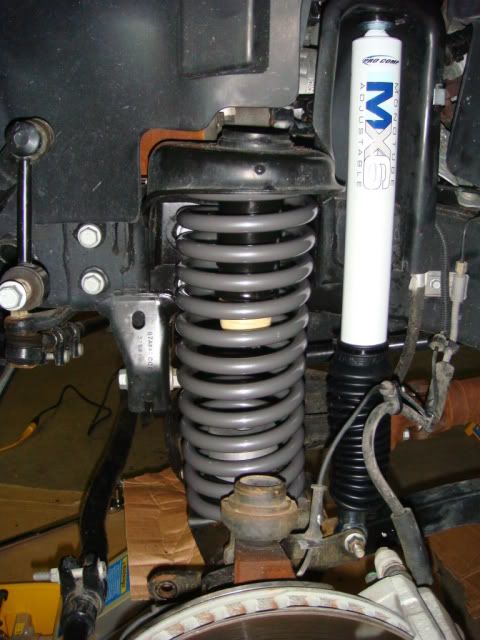
With that completed, feel free to wiggle in the Pro Comp coil springs and install the Pro comp extended shocks. For both of these, the installation is the reverse of removal. Here you can compare the 2 springs:

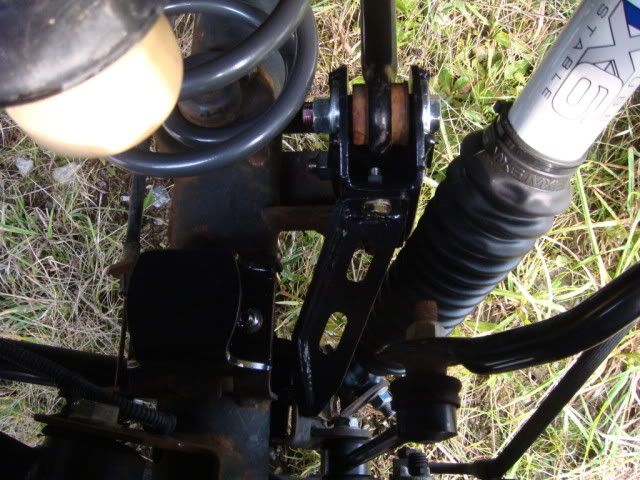
Now the last thig is to re-install the rear track bar. This will be completed with the cam bolt supplied with the kit. The instructions state to put the wheels back on, lower the jeep and remove the jackstands. Be sure the jeep is on a flat level place and slide the cam bolt through and thread the nut on the back.
You will be able to turn the cam bolt and change how the body is centered over the axle. Once it appears centered torque down the nut, now, I had a few problems doing this because of how close it can be to the coil spring, but it is possible. Here is a phot of the cam bolt setup on the bracket:
You Are Done!
Go have a beer and relax....then go wheeling.
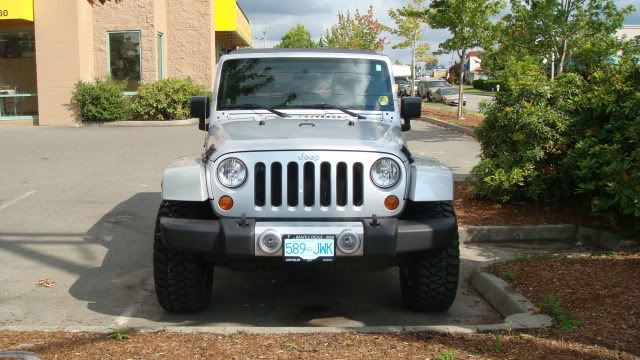
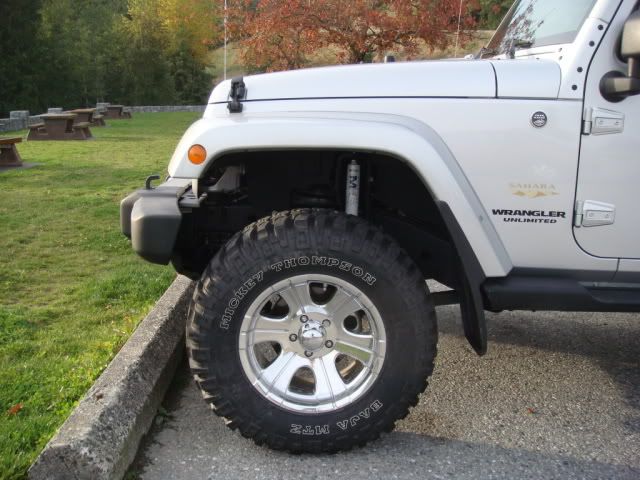
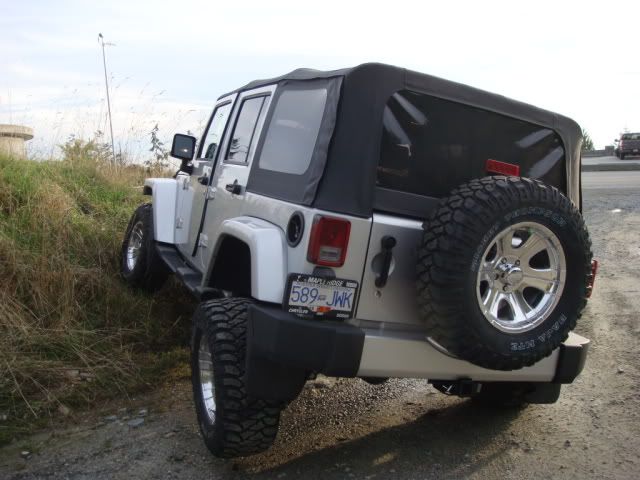
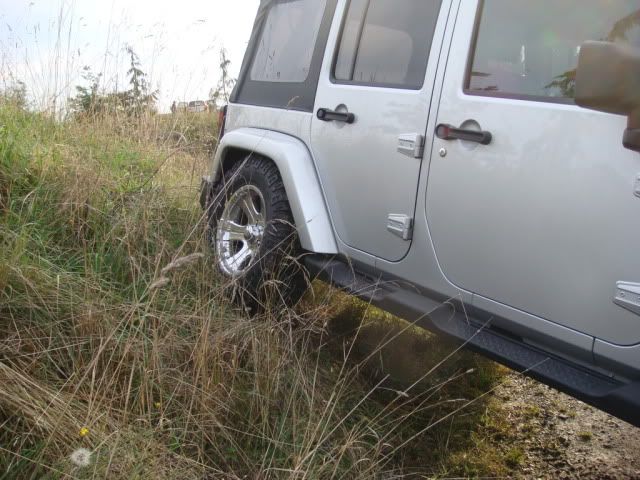
I have now had the lift installed for about 1 week. I have done some highway and some light off road activity. The lift overall performs very well so far. I am really impressed with the stance it gives the Jeep and how it levels it out perfectly. The 6-way adjustability of the suspension is pure magic and very noticeable. At this point is appears to have lifted the jeep a full 2.5" in the rear and almosr 4" in the front to give it a complete level ride height.
On the road it is planted and secure with very minimal wandering. With the more firm setting, the ride is equal to or better than the stock ride. I a very confident with the set up. I have noticed on sharp turning at speed the ESP will kick in and start growling at me, I assume this requires a minor correction in the steering linkage.
I have only done a few things off the pavement so far but the flex is better than stock and the "soft" settings help the suspension to stick to the ground. I will be sure to post a few more photos after I get my sway bar quick disconnects, all photos on this post are with a connected sway bar.
If you have any questions, let me know.
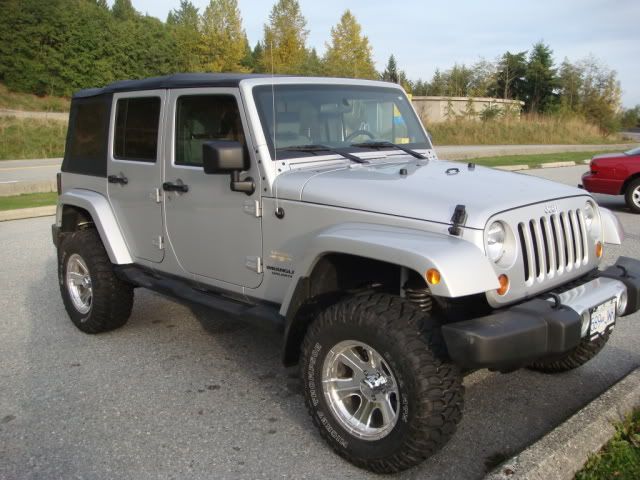
FRONT BEFORE LIFT:
FRONT AFTER LIFT:

SIDE BEFORE:
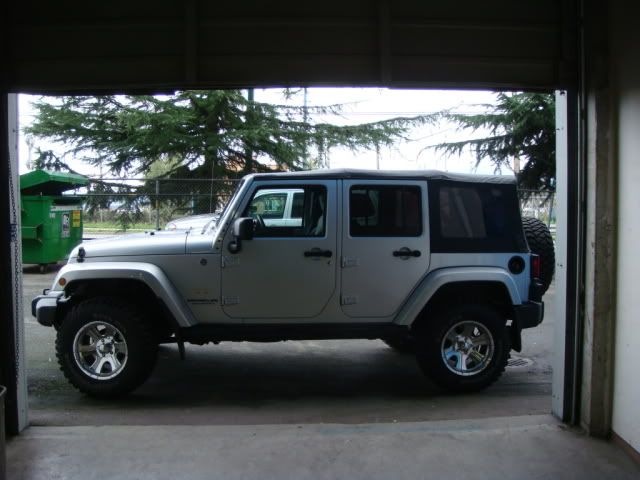
SIDE AFTER:
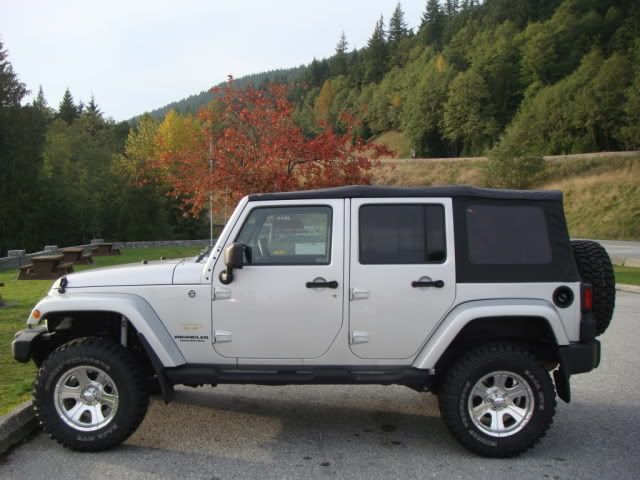
Here are a few other after shots:

Some Youtube vids:
YouTube - 2008 Jeep Wrangler JK Climbs Hill
Begin first by cleaning up the spring pad, then positioning the bumpstop on the pad and tracing the circle with a light colored pencil. This will help you to drill in the true center of the pad.
To drill, prepare an electric drill with a 3/8" high speed metal drill bit, and drill through the axle pad and use the supplied hardware to secure the bumpstop to the axle pad.
Be careful with how much torque you apply to the bolts on the bumpstop spacers, it found the numbers listed in the instructions to be excessive as I totally stripped out one of the nylon lock nuts.
Hey Group,
I just picked up the Pro Comp Comfort Ride Tuned 2.5" Coil Lift with 6-way adjustable monotube design MX6 shocks. I am documenting the kit and install on this thread to provide others with facts. I have done many searches for this kit with no information as of yet. I thought it would help to give photos and thoughts for the general community. I realize ther are other 2.5" coil lifts on the market, but I wanted to see how this performes... "Don't knock it till you try it".
Here is the Kit:
- Aluminum front bumpstop spacers
- rear bumpstop spacers
- Rear trackbar relocation bracket & re-enforcement brace
- Front sway bar drop brackets
- lift springs
- adjustable monotube shocks
- Required Hardware pack
- Full instructions & many stickers
As an overview, the kit is shipped in 4 separate boxes. One box each for the rear springs, front springs, 4 shocks and the last box contains all the brackets, bumpstops, hardware and instructions; he kit is packaged well. There are more than enough stickers and decals included for every toolbox you have.
All 4 springs arrive with light grey paint without a blemish. The MX6 shocks are shipped in the compressed state and include a black rubber boot with strap. The brackets are all painted black and the front bumpstops were simple cast aluminum. The only blemish I found was a small paint chip missing on one of the corners of a bracket, not a problem at all. The kit comes with multiple pouches of hardware with contents dedicated to each part of the install. There was no missing hardware. Lastly 1 print copy of install instructions are included along with the usual end-user disclaimer notice.
The instructions remain quite basic with only a few schematic diagrams, however, I do not forsee any problems as everything seems very strait forward. If you would like a PDF copy of the installation intructions please PM me and I will send you the link.
A few things you will need before you complete the install on your own:
1 - Small tube of Loctite
2 - Assortment of metal Drill Bits including at minimum a 3/8" metal-purpose bit.
3 - Electric drill (corded or cordless)
4 - Floor Jack
5 - Torque Wrench
6 - Work Light (Optional)
Procedure: FRONT END
Park in a flat, level, area; secure the Jeep on jackstands and keep the jack under the front axel and remove the fron wheels. Be sure to set parking break and block the rear wheels.
If you have an automatic transmission, remove the 3 - 18mm bolts that secure the transmission skid plate.
Remove the lower sway bar links, the upper shock mounting nuts and the lower shock mount bolt. The shocks may be set aside since they will be replaced later by the shocks in the kit.
Remove the front track bar bolt connected to the front axle , secure the track bar out of the way for the time being. Also be sure unbolt the brake like bracket from the frame for now.
Now you are ready to install the Pro Comp front coil springs. This is done quite simply, even with the added bumpstop spacers installed. You will have to lower the jack supporting the front axle slowly keeping an eye on the brake lines. Do one side at a time, you will be able to push down on the end of the axle to slide the spring into place by placing the top into place and slide the bottom up and over the aluminum bumpstop. Be sure the bottom of the springs are seated correctly then raise the axle slightly with the jack.
After the springs are set into place, you can install the supplied longer Pro comp shocks. I have the adjustable monotube shocks and chose to have the dial facing towards the rear. Installing these is the exact reverse of removing the originals and they come with there own upper mounting nut. Torque specs are listed in the instructions. As a note, the monotube MX6 shocks come with there own dust boot, but if you opt for the regular twin tube shock you will have to run without or get your own somewhere. At this point you should have the springs and shocks installed so you can reattach the brake line bracket to the frame.
This was not discussed in the instructions. I resolved the issue by removing the brake caliper and rotor disc, but this didn't quite give me enough clearance to properly align the drill. As you can see, the dust guard still remains in the way but I decided NOT to remove any more of the hub assembly.
I decided to use a smaller drill bit to create a small pilot hole through to the bracket. Then simply drill from the other direction to complete the hole. To do this you will have to remove the large 9/16" bolt from the brackets, but install the 2 upper 3/8" hardware to keep the adapter bracket in place.
Now with the pilot drilled through and the big bolt gone, you can drill back through to the other side with the 3/8" drill bit.
Now with all those holes drilled out, you can go ahead and position and bolt up the track bar relocation bracket brace. This should go on easy and bolt up with all the supplied 3/8" hardware. Here is a photo with everything bolted up:
At this point, unless you have adjustable sway bar quick disconnects, you will install the front sway bar drop brackets. My JKS disconnects are a few weeks away so I installed the drop brackets. They are very simpe to install, first you remove both sway bar mounts from the frame, then install the brackets using the original hardware and then reinstall the sway bar mount to the bracket with the supplied hardware. I assume this is done to maintain the geometry of the sway bar, and keep it away from the tire sidewall.
Now all you have to do is re-attach the sway bar links and the front track bar to the axle with the original hardware and the front end is complete! Put the wheels back, lower the jeep, remove the jackstands and get set for the rear.
-----REAR INSTALL---------------
For the rear, you will have to secure the rear on jackstands, block the front wheels, and remove the rear wheels. The first step is to remove the bolt attaching the rear trackbar to the axle, keep it out of the way and stash the hardware with the springs and shocks because you won't be re-using it.
Next I installed the rear bumpstop pad spacers. The spacers bolt up to the existing axle pad through the existing holes. I found that the bolts must be installed from the bottom with the nut on top, otherwize there will be clearance issues with the axle tube. At this time you can also remove the factory shocks and springs, not too different from the front.
Now the fun stuff. If you opted for an aftermarket adjustable track bar, then I am sure you will ignore the rear track bar relocation system that Pro Comp has included in this kit. I installed it. To do this firt you must install the raise bracket over the original axle mount, and use the supplied bolt nut and spacer to tighten it down. Now you will have to fit the 3/8" drill bit to your drill and drill away. The first hole is straight across from the rear to the front of the bracket as shown in the photo below, you will have to keep a steady arm to make sure it is aligned on both sides. The Pro Comp Bracket already has 1/4" holes as a guide so it is really quite simple.
Now you are required to drill 2 more holes. This time they need to be drilled on the drivers side of the bracket. Again, there are already two 1/4" holes as a guide. This is where I ran into a few problems. I was not able to fit my drill between the brake caliper and the bracket and could not drill the hole, look at the photo below to see what I am talking about.
With that completed, feel free to wiggle in the Pro Comp coil springs and install the Pro comp extended shocks. For both of these, the installation is the reverse of removal. Here you can compare the 2 springs:
Now the last thig is to re-install the rear track bar. This will be completed with the cam bolt supplied with the kit. The instructions state to put the wheels back on, lower the jeep and remove the jackstands. Be sure the jeep is on a flat level place and slide the cam bolt through and thread the nut on the back.
You will be able to turn the cam bolt and change how the body is centered over the axle. Once it appears centered torque down the nut, now, I had a few problems doing this because of how close it can be to the coil spring, but it is possible. Here is a phot of the cam bolt setup on the bracket:
You Are Done!
Go have a beer and relax....then go wheeling.
I have now had the lift installed for about 1 week. I have done some highway and some light off road activity. The lift overall performs very well so far. I am really impressed with the stance it gives the Jeep and how it levels it out perfectly. The 6-way adjustability of the suspension is pure magic and very noticeable. At this point is appears to have lifted the jeep a full 2.5" in the rear and almosr 4" in the front to give it a complete level ride height.
On the road it is planted and secure with very minimal wandering. With the more firm setting, the ride is equal to or better than the stock ride. I a very confident with the set up. I have noticed on sharp turning at speed the ESP will kick in and start growling at me, I assume this requires a minor correction in the steering linkage.
I have only done a few things off the pavement so far but the flex is better than stock and the "soft" settings help the suspension to stick to the ground. I will be sure to post a few more photos after I get my sway bar quick disconnects, all photos on this post are with a connected sway bar.
If you have any questions, let me know.
FRONT BEFORE LIFT:
FRONT AFTER LIFT:
SIDE BEFORE:
SIDE AFTER:
Here are a few other after shots:
Some Youtube vids:
YouTube - 2008 Jeep Wrangler JK Climbs Hill
Last edited by Matt08jk; 08-28-2010 at 09:06 AM.
 10-24-2008, 03:32 PM
#3
JK Enthusiast
Join Date: Jul 2008
Location: Lebanon, PA
Posts: 350
Likes: 0
Received 0 Likes
on
0 Posts
keep us posted on the install and on how you like it. I'm very interested in this one.
couple questions too. first, does it come with drop brackets for the brake lines? and second, does it compensate for the factory rake like the teraflex kit does?
couple questions too. first, does it come with drop brackets for the brake lines? and second, does it compensate for the factory rake like the teraflex kit does?
10-26-2008, 06:38 AM
#5
JK Junkie
Join Date: May 2007
Location: Kingston Ont.
Posts: 2,815
Likes: 0
Received 0 Likes
on
0 Posts
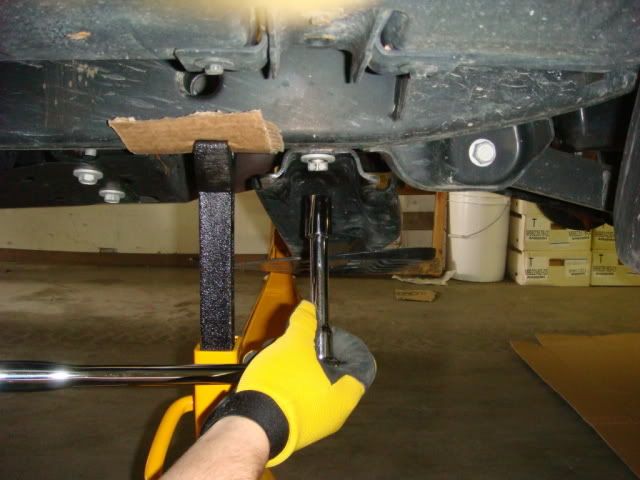
What is with the cardboard under your frame with the jack stand? Protecting it from scratches or something?
I like the kit, looks good. Kind of a neat way to relocate swaybar too. Would you not just have used your rear links like the TF kit though?
On second glance also, that sure is a lot of drilling for a 2.5 kit. Most of the backyard mechanics wouldnt want to muck about with that. There are 4" kits that dont require you pull out the drill that much. But at least you know it is solid I guess.
Last edited by dyolfknip; 10-26-2008 at 06:42 AM.

Trending Topics
02-10-2009, 01:08 PM
#9
JK Super Freak
Join Date: Jan 2009
Location: LSU-Death Valley, Louisiana
Posts: 1,004
Likes: 0
Received 0 Likes
on
0 Posts
I have to give this write up and lift kit a bump because it is so good and helpful. I just installed this kit today and I used my computer in the garage, looking at Matts write up, while I did the install. It was awesome and so is the kit! If you are thinking about this kit, do it! It is very easy and it levels out the JK nicely! 