
Hardtop Storage < $50
 05-19-2007 | 02:30 PM
#1
Thread Starter
JK Newbie
Joined: Jan 2007
Posts: 39
Likes: 0
From: GTA Toronto, Canada
Thought I might pass on a few pics of my solution - took less than 1/2 hr to put together (most was figuring out the dimensions).
I don't have a garage to strap the top to the roof of, like many of the current roof solution posts... so this had to do.
Tried to get one from Mopar - they quoted me $400+ and said it'd take at least 2-3 weeks to get in - no stock. So... with a trip to the local hardware store, picked up what I needed.
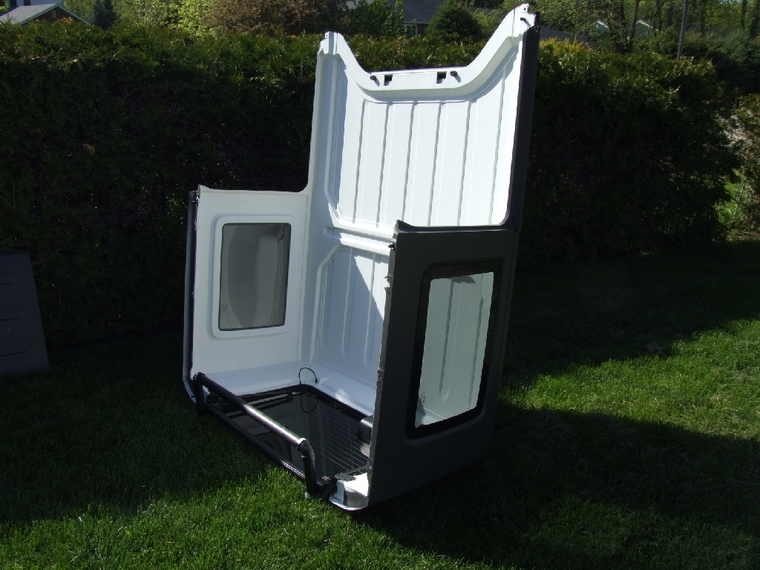


Materials list: 2 x 12-foot lengths of 1 1/4" ABS pipe, 6 x 90-degree 1 1/4" elbows, 2 x 90-degree 3-way elbows. Also, pick up some type of foam for across the bottom & for where the top rests against the back support.
I arranged the setup so that the bottom rails fit between the back window hinges, but not outside the glass - so that it held it in place (didn't extend down).
This meant an inside measurement of 36" from the left side to the right (inside the posts). The depth was a total of 26" from the front lip to the back supports.
I bought the 2 T-connections to allow additional stability at the rear - I'm debating buying a couple of 45-degree Y-connects and adding additional rear stability (although it appears quite stable already.
Then, glue all the pieces in place, add foam at the appropriate point, and you're on your way... I may yet build something similar for the two front top panels - still deciding on how to do it... I may put it on the back side behind the top.
Anyways, hopefully this can save someone else some $$$ too for more important mods...
I don't have a garage to strap the top to the roof of, like many of the current roof solution posts... so this had to do.
Tried to get one from Mopar - they quoted me $400+ and said it'd take at least 2-3 weeks to get in - no stock. So... with a trip to the local hardware store, picked up what I needed.
Materials list: 2 x 12-foot lengths of 1 1/4" ABS pipe, 6 x 90-degree 1 1/4" elbows, 2 x 90-degree 3-way elbows. Also, pick up some type of foam for across the bottom & for where the top rests against the back support.
I arranged the setup so that the bottom rails fit between the back window hinges, but not outside the glass - so that it held it in place (didn't extend down).
This meant an inside measurement of 36" from the left side to the right (inside the posts). The depth was a total of 26" from the front lip to the back supports.
I bought the 2 T-connections to allow additional stability at the rear - I'm debating buying a couple of 45-degree Y-connects and adding additional rear stability (although it appears quite stable already.
Then, glue all the pieces in place, add foam at the appropriate point, and you're on your way... I may yet build something similar for the two front top panels - still deciding on how to do it... I may put it on the back side behind the top.
Anyways, hopefully this can save someone else some $$$ too for more important mods...
Last edited by JK4Life; 09-28-2008 at 05:55 PM.
 I see 4 x's and one picture.
05-19-2007 | 02:59 PM
I see 4 x's and one picture.
05-19-2007 | 02:59 PM
#3
Thread Starter
JK Newbie
Joined: Jan 2007
Posts: 39
Likes: 0
From: GTA Toronto, Canada
Sorry - all pics are coming up in my link - which is the one you're seeing???
Pulled them off my shared pics page on the web...
Here's another link to the album...
http://ca.pg.photos.yahoo.com/ph/mha...AgixGBqNepc.s_
Pulled them off my shared pics page on the web...
Here's another link to the album...
http://ca.pg.photos.yahoo.com/ph/mha...AgixGBqNepc.s_
05-23-2007 | 07:18 AM
#7

JK Enthusiast
Joined: Dec 2006
Posts: 216
Likes: 0
From: Vancouver, Canada
Seriously, pull out a tape measure, stand at the back of your jeep and take a quick measurement... It should take all of about 5 seconds.
And (not suggesting you are, so don't get all up tight) if you aren't comfortable taking a measurement - - or don't own a tape measure, you aught not to build something like this (or arguably anything at all)
And (not suggesting you are, so don't get all up tight) if you aren't comfortable taking a measurement - - or don't own a tape measure, you aught not to build something like this (or arguably anything at all)
Trending Topics
05-23-2007 | 08:53 AM
#8
Thread Starter
JK Newbie
Joined: Jan 2007
Posts: 39
Likes: 0
From: GTA Toronto, Canada
As mentioned above, cut the two width sections need to be 36" wide. This allows the top to rest just outside the rear window hinges (holding it in place), but still holding the window from hitting the ground. When you add the elbows at the bottom, it still maintains the 36" wide section.
As for the depth, you cut 2 x 26" pieces. The height is personal choice - I used 54" - which is the extra length of pipe I had left over - but the top is approximately 60" high.
The lip at the bottom is just a couple of scraps - I cut a couple 4" sections, in order to create a bottom brace to hold it in.
Using the T-joints at the bottom of the uprights allowed me to extend the back another 6" and prevent any inclination of the rig from falling over.
Diagrams may be a little hard to put on, but hopefully this clarifies things a little...
05-24-2007 | 08:32 PM
#9
JK Enthusiast
Joined: Jan 2007
Posts: 154
Likes: 0
From: Plano, TX
As mentioned above, cut the two width sections need to be 36" wide. This allows the top to rest just outside the rear window hinges (holding it in place), but still holding the window from hitting the ground. When you add the elbows at the bottom, it still maintains the 36" wide section.
As for the depth, you cut 2 x 26" pieces. The height is personal choice - I used 54" - which is the extra length of pipe I had left over - but the top is approximately 60" high.
The lip at the bottom is just a couple of scraps - I cut a couple 4" sections, in order to create a bottom brace to hold it in.
Using the T-joints at the bottom of the uprights allowed me to extend the back another 6" and prevent any inclination of the rig from falling over.
Diagrams may be a little hard to put on, but hopefully this clarifies things a little...
As for the depth, you cut 2 x 26" pieces. The height is personal choice - I used 54" - which is the extra length of pipe I had left over - but the top is approximately 60" high.
The lip at the bottom is just a couple of scraps - I cut a couple 4" sections, in order to create a bottom brace to hold it in.
Using the T-joints at the bottom of the uprights allowed me to extend the back another 6" and prevent any inclination of the rig from falling over.
Diagrams may be a little hard to put on, but hopefully this clarifies things a little...