
Hardtop hoist/storage write-up
 04-19-2008, 02:31 PM
#61
JK Freak
Join Date: Jan 2008
Location: Central NY
Posts: 742
Likes: 0
Received 0 Likes
on
0 Posts
What's the easiest way to find the balance point? On the channel strut, if I move it one hole forward, it tips back; one hole back and it tips forward.
As for the hooks, how do you have yours in place? Do you have to remove the one in back and put it on every time? On the hooks, do you have the nuts tightened down?
I'll have more time to play tomorrow but, right now, I'm not liking it.
As for the hooks, how do you have yours in place? Do you have to remove the one in back and put it on every time? On the hooks, do you have the nuts tightened down?
I'll have more time to play tomorrow but, right now, I'm not liking it.
 04-19-2008, 05:20 PM
#62
JK Junkie
Thread Starter
Join Date: Oct 2006
Location: Pottstown, PA
Posts: 2,466
Likes: 0
Received 0 Likes
on
0 Posts
What's the easiest way to find the balance point? On the channel strut, if I move it one hole forward, it tips back; one hole back and it tips forward.
As for the hooks, how do you have yours in place? Do you have to remove the one in back and put it on every time? On the hooks, do you have the nuts tightened down?
I'll have more time to play tomorrow but, right now, I'm not liking it.
As for the hooks, how do you have yours in place? Do you have to remove the one in back and put it on every time? On the hooks, do you have the nuts tightened down?
I'll have more time to play tomorrow but, right now, I'm not liking it.
1. These can be tightened anywhere along the channel without having to go all the way through the holes on the opposite side of the channel. They literally slide along the channel.
2. the bolts won't protrude through the other side of the channel which would easily scratch your top. See this picture below for an example of a channel nut used on the T-gusset plate... I measured the balance point on mine and the eye bolt ends up 20 1/4" from the T connection which may or may not be lined up with one of the holes in the channel. Click HERE for the channel nut, I actually got mine in bags of 5 at Home Depot.
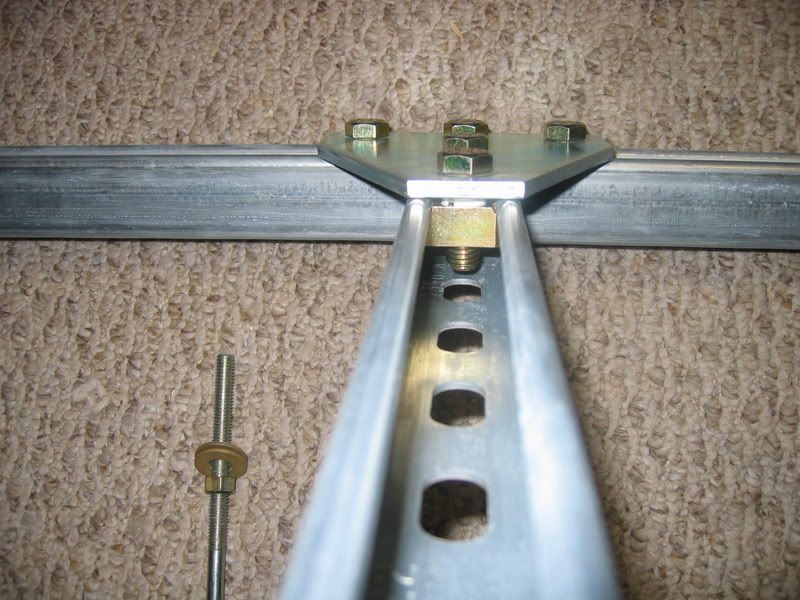
And as far as testing the balance point for the first time, I just had the top on the ground and lifted it slightly to see how it was balanced until I got it right ...

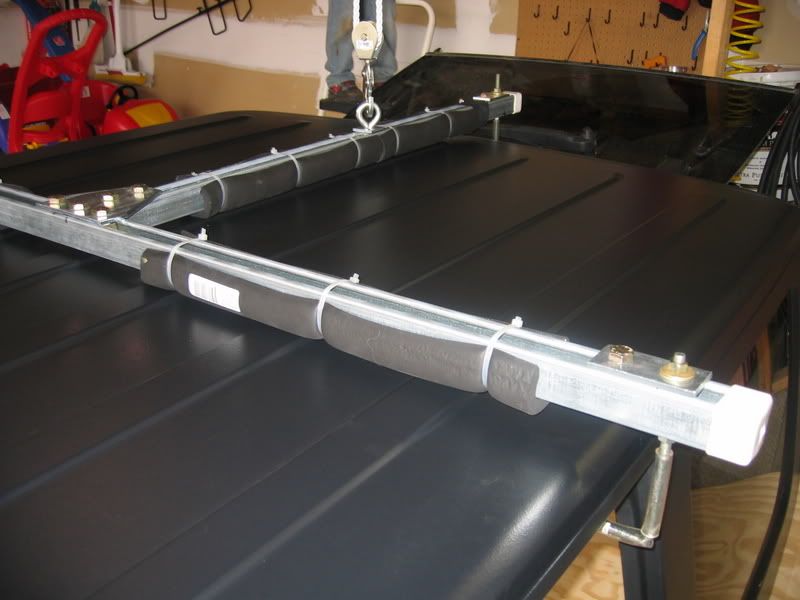
Also you can see below how the T-bar lays flush on the top since there are no bolts coming through the bottom of the bar:
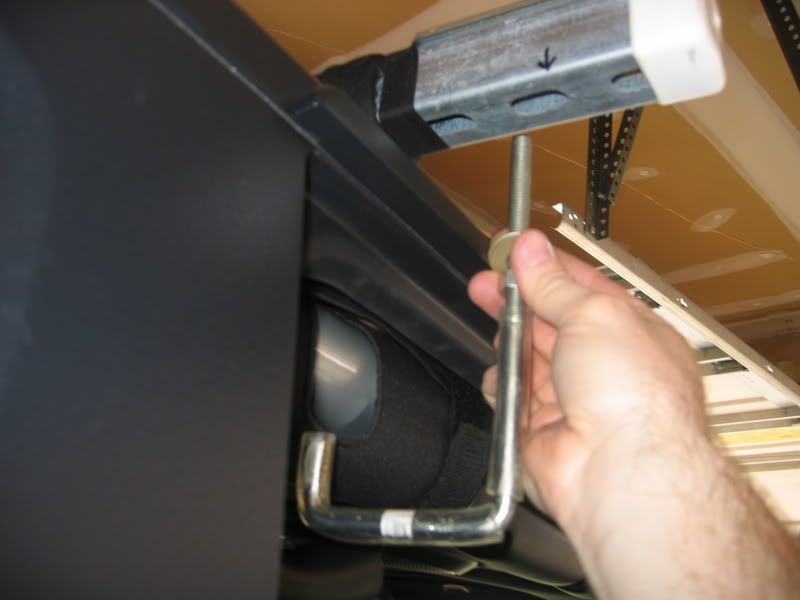
As far as the hooks go, they are all removed from the t-bar at first. First lay the T-Bar on the roof (make sure it's wrapped in foam insulation so you don't scratch the top). Then insert the hooks through the channel holes and install the washers and nut on each hook. You can hand tighten or tighten with a wrench, you just want them tight enough so the hook doesn't spin out of place. See picture below of hook installation.
I hope this helps...let me know if you have any further questions and let me know how it turns out.
Last edited by HG07JKRubi; 04-19-2008 at 05:32 PM.
04-19-2008, 07:18 PM
#63
JK Freak
Join Date: Jan 2008
Location: Central NY
Posts: 742
Likes: 0
Received 0 Likes
on
0 Posts
That helps TREMENDOUSLY! I don't have channel nuts/bolts so I'm limited to where the holes are. I'll make a trip to HD tomorrow to pick those up. Good to know that you remove the bolts when not in use from the t-bar.
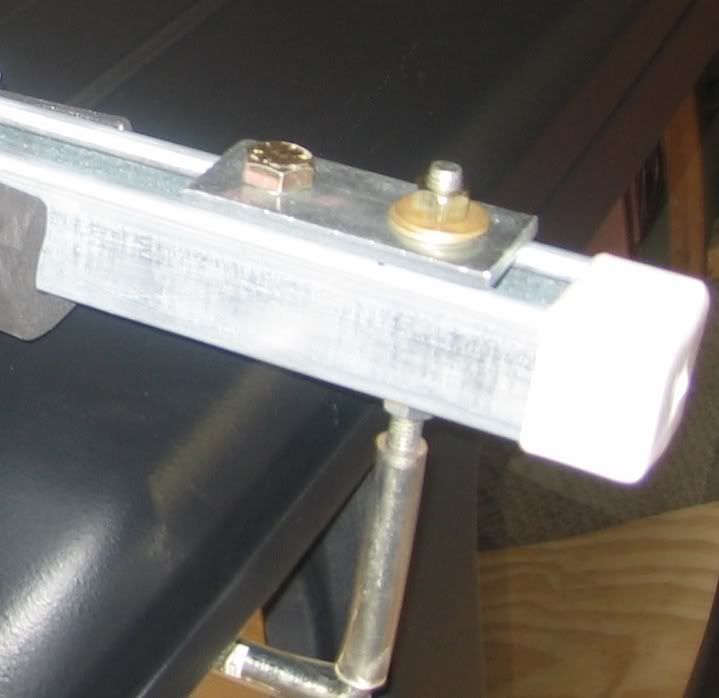
Where did you find the washer-type fitting that sits at the ends of the t-bars? You have the big J-bar and then a second bolt that looks to hold that in place. Where did you get that rectangular piece so that the bolts don't go through the channel? I tried using angle-iron that I cut in half, but that isn't quite working out. Did you machine them yourself?
Thanks for all the help! I plan on buttoning this up tomorrow and finally giving Leslie a good scrubbing and full detail. She hasn't had a good washing yet this spring and is in need of one!
04-20-2008, 05:25 AM
#64
JK Newbie

Join Date: Feb 2008
Location: Ellerslie, GA 31807
Posts: 14
Likes: 0
Received 0 Likes
on
0 Posts
This was an excellent write up. It only took me a day to build and install since the difficult part of finding the parts was done in this write up. I did do a few things different. I used 1/2" U-Bolts and I also used 2 - 5 lb weight plates as a counter weight. The weights are dropped on a piece of 1" OD pipe that is bolted to the "T". This balances the "T" as it is raised and lowered without the top. I remove the counter weights before I raise the top. I also used the same type channel on the ceiling (not as deep as for the "T") with swing set bolts to hang the top once it has been lifted. Thanks again for the original write up. Your leg worked saved all the time.
 04-20-2008, 04:31 PM
#66
JK Junkie
Thread Starter
Join Date: Oct 2006
Location: Pottstown, PA
Posts: 2,466
Likes: 0
Received 0 Likes
on
0 Posts
Where did you find the washer-type fitting that sits at the ends of the t-bars? You have the big J-bar and then a second bolt that looks to hold that in place. Where did you get that rectangular piece so that the bolts don't go through the channel? I tried using angle-iron that I cut in half, but that isn't quite working out. Did you machine them yourself?
 04-20-2008, 04:32 PM
#67
JK Junkie
Thread Starter
Join Date: Oct 2006
Location: Pottstown, PA
Posts: 2,466
Likes: 0
Received 0 Likes
on
0 Posts
04-20-2008, 05:27 PM
#68
JK Freak
Join Date: Jan 2008
Location: Central NY
Posts: 742
Likes: 0
Received 0 Likes
on
0 Posts
Its complete!!! With the right pieces of hardware, its amazing how things work!
I'll post pictures of the top on the hoist tomorrow. But follow the link here and you'll see some of the pics.
Thanks for the excellent write-up and for all the answers to my questions! Thank you.
picasaweb.google.com/bob.squire/JeepHoist
I'll post pictures of the top on the hoist tomorrow. But follow the link here and you'll see some of the pics.
Thanks for the excellent write-up and for all the answers to my questions! Thank you.
picasaweb.google.com/bob.squire/JeepHoist
04-20-2008, 08:37 PM
#69
JK Freak

Join Date: Jun 2007
Location: Garden Grove, CA
Posts: 614
Likes: 0
Received 0 Likes
on
0 Posts
Finished my yesterday night...
Thanks for the write up!


I'm not done yet...ran out of ratchet straps for the 2x4. I just figure some added support couldnt hurt....just remove the latch on one side of the 2x4... pull it off and lower it down.
Thanks for the write up!
I'm not done yet...ran out of ratchet straps for the 2x4. I just figure some added support couldnt hurt....just remove the latch on one side of the 2x4... pull it off and lower it down.
04-20-2008, 10:06 PM
#70
JK Enthusiast
Join Date: Feb 2007
Location: Yorkville, IL
Posts: 234
Likes: 0
Received 0 Likes
on
0 Posts
Wow, great minds think alike...
I built pretty much the same hoist system about the same time this write up was posted, without even seeing it
I did some things a little different, but its pretty much the same design.
Its been working great for a year now, I use it all the time and never use my soft top except for wheeling.
I have a cordless drill with a torx bit to zip out the bolts and I can pull the complete hard top off in two minutes... much quicker then removing windows and folding the big 4 door soft top, and I dont have the ugly door frames still on the Jeep
I mounted a 2000 lbs Harbor Freight 12v winch in the attic hooked to an old car battery that I had laying around, its being charged by a little 12v charger from an old "Power Wheels" toy, whenever the garage lights are on
I opted to use a ratchet strap bolted to the uni-strut for the rear support, it goes through the rear window opening and hooks into a hole I drill inside the tops channel. I have the strap set to just the right length so I dont ever need to fool with the ratchet part. I did it this way so I can keep my rear window closed, which allows me to pull the top tight to the ceiling for more clearance. I can walk under the top (Im 6'3") or park the Jeep under it (backed in with the soft top on) if I ever need to.
The side hooks are big U-bolts with one side cut off, then I slid some rubber hose over them. They are also cut and adjusted just right so I dont have to fool with removing them. They are just loose enough that I can rotate them under the top and lift away.
Like I said, the whole process only takes me two minutes to remove the complete top
Then I cut some 2x4's that lay inside the top to store my front panels inside the top
The whole project only cost me about $120 including the winch
Here are some pics of mine.....
Last edited by Eracer76; 04-20-2008 at 10:32 PM.