
DIY Hardtop Cart

 11-23-2009 | 05:45 AM
#24
JK Super Freak
Joined: Jan 2009
Posts: 1,004
Likes: 0
From: LSU-Death Valley, Louisiana
I am planning on taking my top off tomorrow but I needed a way to move and store the top. I have seen several ways to hang it on the side wall of the grarge or suspend it from the ceiling. For me the most practical way to store it would be a cart to put it on. There are several available at the shops starting around $140 I had seen a few board pages that talked about building your own out of wood. I found the following parts list and dimensions::
I am not sure where these plans originated, I just found them on the web. I was recently contacted by David Mellon @. http://performancejeepchrysler.com/
He claims that I have plagerized these instructions and materials list. If he is truly the originator of these directions , I apologize. Infringement was not my intention. The pictures are mine and it is my jeep. I hope he acepts my apology and is statisfied with me giving him credit for his contribution. Otherwise I will have to remove this post.
Parts list
1) 1 59 inch length of 1x2
2) 2 30 inch lengths of 2x4
3) 2 59 inch lengths of 2x4
4) 6 6 inch lengths of 2x4
5) 8 1/2 inch long wood screws
6) 2 1 1/2 inch wood screws
7) 20 3 inch long wood screws
8) 4 2 inch swivel wheels. Poly, plastic or metal wheels will all work - locking wheels are optional - recommended if your storage surface is uneven.
9) Optional: Two 12x2 cuts of Foam, felt or soft fabric
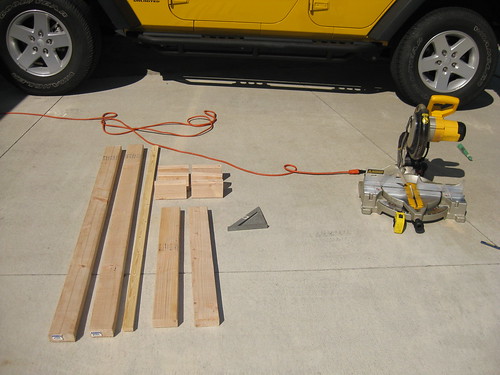
Tools needed for construction / assembly
1) Philips screw driver OR Philips bit for electric drill
2) Electric Drill
3) Hand saw OR power saw
4) Drill bit 5/32
Construction / assembly instructions
1) Lay the two 59" 2x4's parallel to each other on level and solid work space. Floor works well.
2) Lay the two 30" 2x4 pieces over the top of the longer (59" pieces) creating a rectangle (Fig 1)

3) Drill two 5/32 starter holes for the screws in each corner
4) Screw each corner together filling all holes using 3" screws
5) Place each wheel on the outside edge of the 59" piece of 2x4 allowing enough room for the wheel to turn 360 degrees (Figure 3)
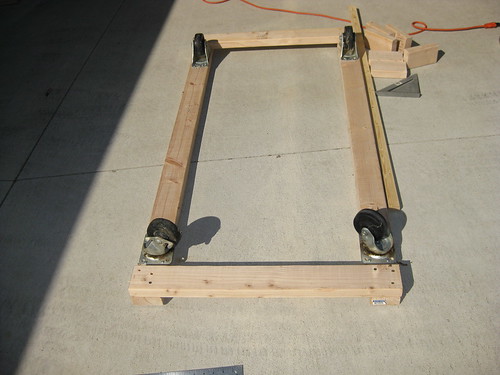
6) Screw wheels in place using at least two screws per wheel placed diagonally to each other using 1/2" long wood screws.
7) Turn rack over with wheel side down (Figure 2)
8) Measure 9.5 inches in from either side, place the 59 inch 1x2 at that location. Drill a 5/32 starter hole on each end then screw in place using one 1 1/2 inch screw on each end. (this window bar is in place to hold your rear window closed)

9) On the farthest 59" 2x4 from the window bar measure 10.5 inches from each end and mark these locations for the 6" rear support pieces to be installed (Figure 2).
10) Place one 6" 2x4 on each of your marked location, drill two 5/32 starter holes in each piece then screw in place using two 3" screws per block. Continue stacking, drilling starter holes and screwing 6" pieces in place until each stack is 3 pieces high ( Figure 2)
11) Optional: Pad the tops of the rear support pieces with foam, felt or soft fabric

12) Figure 4 shows placement of hardtop on the dolly.
Unfortunately there were no diagrams or pictures when it said figure1-2-3-4 so That part was a little more my imagination.
  I bought the materials which cost about $22.00. The caster wheels I had picked up at a yard sale for some unknown future project. it took me about 90 minutes to build it on the drive way. later tonight or tomorrow I will post my build pictures to go with the assembly instructions. I think it will do the job nicely.
and before you say it:

I will post them asap, but right now I have to get the boy to a Cub Scout Meeting
I am not sure where these plans originated, I just found them on the web. I was recently contacted by David Mellon @. http://performancejeepchrysler.com/
He claims that I have plagerized these instructions and materials list. If he is truly the originator of these directions , I apologize. Infringement was not my intention. The pictures are mine and it is my jeep. I hope he acepts my apology and is statisfied with me giving him credit for his contribution. Otherwise I will have to remove this post.
Parts list
1) 1 59 inch length of 1x2
2) 2 30 inch lengths of 2x4
3) 2 59 inch lengths of 2x4
4) 6 6 inch lengths of 2x4
5) 8 1/2 inch long wood screws
6) 2 1 1/2 inch wood screws
7) 20 3 inch long wood screws
8) 4 2 inch swivel wheels. Poly, plastic or metal wheels will all work - locking wheels are optional - recommended if your storage surface is uneven.
9) Optional: Two 12x2 cuts of Foam, felt or soft fabric
Tools needed for construction / assembly
1) Philips screw driver OR Philips bit for electric drill
2) Electric Drill
3) Hand saw OR power saw
4) Drill bit 5/32
Construction / assembly instructions
1) Lay the two 59" 2x4's parallel to each other on level and solid work space. Floor works well.
2) Lay the two 30" 2x4 pieces over the top of the longer (59" pieces) creating a rectangle (Fig 1)
3) Drill two 5/32 starter holes for the screws in each corner
4) Screw each corner together filling all holes using 3" screws
5) Place each wheel on the outside edge of the 59" piece of 2x4 allowing enough room for the wheel to turn 360 degrees (Figure 3)
6) Screw wheels in place using at least two screws per wheel placed diagonally to each other using 1/2" long wood screws.
7) Turn rack over with wheel side down (Figure 2)
8) Measure 9.5 inches in from either side, place the 59 inch 1x2 at that location. Drill a 5/32 starter hole on each end then screw in place using one 1 1/2 inch screw on each end. (this window bar is in place to hold your rear window closed)
9) On the farthest 59" 2x4 from the window bar measure 10.5 inches from each end and mark these locations for the 6" rear support pieces to be installed (Figure 2).
10) Place one 6" 2x4 on each of your marked location, drill two 5/32 starter holes in each piece then screw in place using two 3" screws per block. Continue stacking, drilling starter holes and screwing 6" pieces in place until each stack is 3 pieces high ( Figure 2)
11) Optional: Pad the tops of the rear support pieces with foam, felt or soft fabric
12) Figure 4 shows placement of hardtop on the dolly.
Unfortunately there were no diagrams or pictures
when it said figure1-2-3-4 so That part was a little more my imagination. I bought the materials which cost about $22.00. The caster wheels I had picked up at a yard sale for some unknown future project. it took me about 90 minutes to build it on the drive way. later tonight or tomorrow I will post my build pictures to go with the assembly instructions. I think it will do the job nicely.and before you say it:
I will post them asap, but right now I have to get the boy to a Cub Scout Meeting
I built this cart this past weekend. Fast and easy to build and a great idea. Thanks for the post!
11-30-2009 | 06:50 PM
#25
JK Freak
Joined: Apr 2008
Posts: 888
Likes: 1
From: Mt. Pleasant, SC
....
I am not sure where these plans originated, I just found them on the web. I was recently contacted by David Mellon @. http://performancejeepchrysler.com/
He claims that I have plagerized these instructions and materials list. If he is truly the originator of these directions , I apologize. Infringement was not my intention. The pictures are mine and it is my jeep. I hope he acepts my apology and is statisfied with me giving him credit for his contribution. Otherwise I will have to remove this post.

 12-14-2009 | 09:38 PM
#27

JK Newbie
Joined: Dec 2009
Posts: 8
Likes: 0
From: detroit,mi
Great write up. I built 1 today and thought about a couple of potential flaws that might interest some people. First, you probably shouldn't use 3 inch screws to screw together 2 2x4's. Instead use 2 1/2 inch screws which greatly reduces chance of poking out of 1 side since overall thickness is 3 inches on 2 2x4's. Another thing that I've noticed was that I really only needed 2 of the small pieces of wood stacked up instead of 3. Some pics show the top resting on the long 2x4 while others (which I would think is correct) are shown resting against inside of the long 2x4. Just observations thats all. Keep up the great posts. Oh yeah, I also found that a carpet runner made for patio doors with the rubber attached to the back is exactly 59 inches and doesn't fray when cut. hopes this helps someone.
Last edited by slugbug; 12-14-2009 at 09:43 PM.


