
What was done to your JK this week?


 12-06-2008, 02:31 PM
#3442
Installed the Tuffy console insert and Glovebox insert today.
Both are very nice products that look great. The armrest is very functional, and the glovebox door looks great.
Both are very nice products that look great. The armrest is very functional, and the glovebox door looks great.
12-06-2008, 04:55 PM
#3444
JK Super Freak
Join Date: Dec 2007
Location: WV relocated 2 Dyess AFB, TX
Posts: 1,750
Likes: 0
Received 1 Like
on
1 Post
Control arms went in tonight. Took just under 2 hours due to the wheels and tires coming off, the cold garage floor, tinkering, etc. I could have made it in 1 hour but I love spending quality time with my Jeep.
So here goes.
Tips: While the frame sits on jackstands and the tires removed let the axle drop to the full extension. Remove both sides of the stock lower control arms. Using the floor jack, lift the front side of the crosslink mounts on the knuckles to move the axle away from the control arms giving you room to line up the new longer control arms. You may need to use the jack on the axle at several places to get the bolts to line up. I found that mounting the axle side of the control arms first then lineing them up at the frame mounts made it a bit easier due to the flex arms mounting position.
The stock control arms are 22 1/2 inches. The new control arms are adjustable to numerous lenths but I chose 33 inches. The reason for this is to kick out the angle of the bottom to regain control arm length and create a caster of 6-7 degrees.


Here is a shot of the directions for their control arms.


Passenger side installed.


Driver side installed. The design only allows for full rotation of the flex joint. They are 10 degrees off set on the threaded end. TF is working for a fix as I have notified them. The directions are wrong also. So dont be alarmed when they install different from the instructions.


So here goes.
Tips: While the frame sits on jackstands and the tires removed let the axle drop to the full extension. Remove both sides of the stock lower control arms. Using the floor jack, lift the front side of the crosslink mounts on the knuckles to move the axle away from the control arms giving you room to line up the new longer control arms. You may need to use the jack on the axle at several places to get the bolts to line up. I found that mounting the axle side of the control arms first then lineing them up at the frame mounts made it a bit easier due to the flex arms mounting position.
The stock control arms are 22 1/2 inches. The new control arms are adjustable to numerous lenths but I chose 33 inches. The reason for this is to kick out the angle of the bottom to regain control arm length and create a caster of 6-7 degrees.
Here is a shot of the directions for their control arms.
Passenger side installed.
Driver side installed. The design only allows for full rotation of the flex joint. They are 10 degrees off set on the threaded end. TF is working for a fix as I have notified them. The directions are wrong also. So dont be alarmed when they install different from the instructions.
12-06-2008, 05:40 PM
#3446
JK Super Freak
Join Date: Dec 2007
Location: WV relocated 2 Dyess AFB, TX
Posts: 1,750
Likes: 0
Received 1 Like
on
1 Post
Steering is smoother, I dont have to try to point it down the road straight. It snaps back to center after I make a turn. I have no steering vibes nor drivetrain issues. I love them and they are way beefier then the stockers. They weigh 15 lbs each, the stock control arm is 7 lbs.
More in my signature's lift buildup.
More in my signature's lift buildup.
12-06-2008, 05:58 PM
#3447
JK Super Freak
Join Date: Jul 2007
Location: SoCal
Posts: 1,492
Likes: 0
Received 0 Likes
on
0 Posts
Ok so I haven't had time to post these but here are some of my things that were done in the weeks prior to Thanksgiving...
* RockHard sports cage

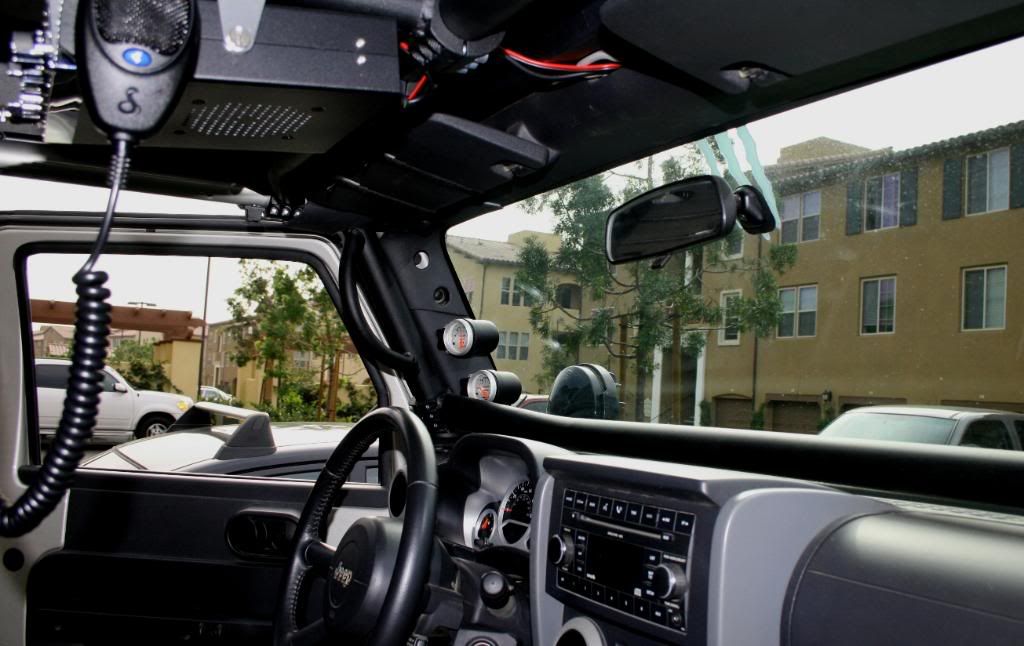
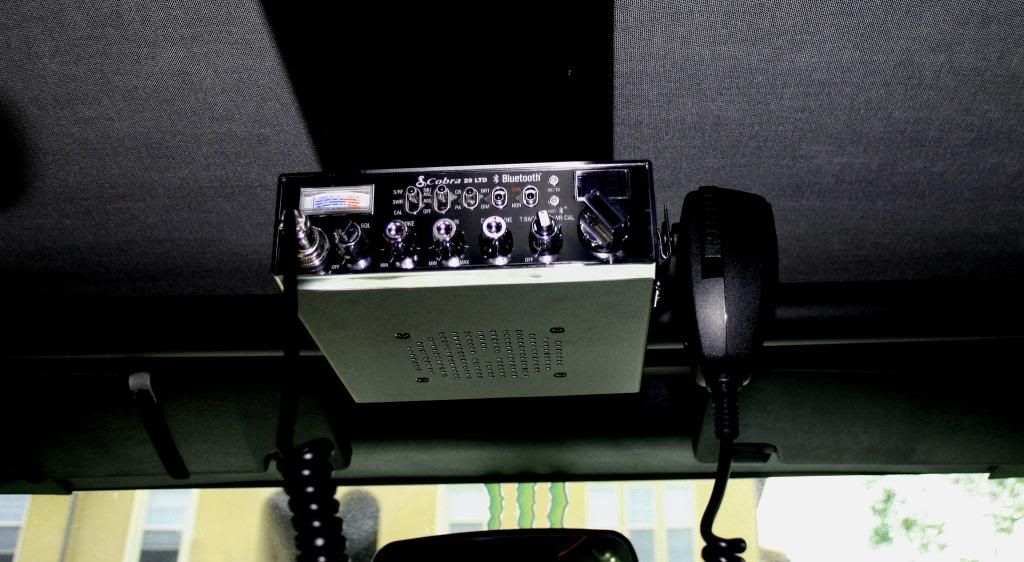
* New Cobra29 LTD CB with Bluetooth
* 4 inch Teraflex lift ( installed with help of WOL, WOLette, Toad, Bullfrog, Offtopic, and Mel Wade. ) Thanks again all

For those of you who like to see someone standing next to the JK for a height comparison... here I am 6ft 1inch next to my JK. My TOYO 37's are on the way

Also installed but not pictured :JE REEL 1350 HD front and rear driveshafts and Riddler front and rear D44 diff covers
* RockHard sports cage
* New Cobra29 LTD CB with Bluetooth
* 4 inch Teraflex lift ( installed with help of WOL, WOLette, Toad, Bullfrog, Offtopic, and Mel Wade. ) Thanks again all
For those of you who like to see someone standing next to the JK for a height comparison... here I am 6ft 1inch next to my JK. My TOYO 37's are on the way
Also installed but not pictured :JE REEL 1350 HD front and rear driveshafts and Riddler front and rear D44 diff covers
Jake your jeep looks awesome!
Can't wait to see it with the 37's.  12-06-2008, 08:32 PM
#3448
JK Freak
Join Date: Sep 2008
Location: Hackettstown, NJ
Posts: 503
Likes: 0
Received 0 Likes
on
0 Posts
Serveapurpose, beautiful,  I don't know what else to say.
Where did you get your gauge set on on the driver side pillar - is it something that you fabbed yourself, or is it an off the rack set up?
JD
I don't know what else to say.Where did you get your gauge set on on the driver side pillar - is it something that you fabbed yourself, or is it an off the rack set up?
JD
12-07-2008, 05:19 AM
#3449
JK Jedi Master

Control arms went in tonight. Took just under 2 hours due to the wheels and tires coming off, the cold garage floor, tinkering, etc. I could have made it in 1 hour but I love spending quality time with my Jeep.
So here goes.
Tips: While the frame sits on jackstands and the tires removed let the axle drop to the full extension. Remove both sides of the stock lower control arms. Using the floor jack, lift the front side of the crosslink mounts on the knuckles to move the axle away from the control arms giving you room to line up the new longer control arms. You may need to use the jack on the axle at several places to get the bolts to line up. I found that mounting the axle side of the control arms first then lineing them up at the frame mounts made it a bit easier due to the flex arms mounting position.
The stock control arms are 22 1/2 inches. The new control arms are adjustable to numerous lenths but I chose 33 inches. The reason for this is to kick out the angle of the bottom to regain control arm length and create a caster of 6-7 degrees.
Here is a shot of the directions for their control arms.
Passenger side installed.
Driver side installed. The design only allows for full rotation of the flex joint. They are 10 degrees off set on the threaded end. TF is working for a fix as I have notified them. The directions are wrong also. So dont be alarmed when they install different from the instructions.

