
Got my rig back from David @ Northridge!!!
 04-15-2008, 11:04 PM
#21
JK Junkie
Join Date: Sep 2007
Location: 5280 CRAWLORADO
Posts: 2,140
Likes: 0
Received 0 Likes
on
0 Posts
So do you want details on the DCX mirror w/mic or the large HD or both?
The HD is not something that I can really give you pictures of without tearing open my console.
To give you some background on myself, I've been writing code and managing systems for more than 20 years now. for the past 12 - 15 I've been dealing with embedded devices (similar in concept to the MyGig -- although the MyGig is much more powerful that what I typically work with). Upgrading the HD was not all that big a chore once I got a little experience playing around with QNX.
It's night time here now, so I can't get you pictures of the mirror, but I can tell you it looks stock (no little mic wedged in a corner or taped to the dash). I'll see about posting pics tomorrow. I can tell you that me MyGig works fabulously with both the Hard Top and the Soft Top. I'll try it out this summer with no top, but I'm sure it won't work well with no to while driving.
The mirror is a Nitro part, and the harness that connects between the mirror and the MyGig comes out of a Sebring (the harness in the Nitro would be better as it is longer, but unfortunately it's not available separately from the headliner, and the headliner costs ~$500.00. Because the sebring harness is too short, I had to get a little creative with my own harness to extend it to the back of the radio.
The DCX parts you will need are:
Nitro UConnect Mirror -- 55157457AA or 55157457AB
Sebring Mirror Harness -- 4795864AG
10 Pin Extension Cable -- 5191195AA
The Sebring harness has the correct connector for the back of the mirror and enough wire to get into the dash (but not enough to reach the MyGig).
What I did was remove the visors and the plastic fascia and made a notch in the fascia where I wanted the cable to enter. Then I ran the cable and through the fascia down into the dash. The harness comes with a couple of body plug mounts taped to it. I drilled a couple of holes in the windshield frame and plugged those mounts into them to keep things from rattling around (you'll understand what I mean when you see the cable).
Once I had that done and re assembled, I removed the driver's side door and the end piece of the dash so I could see the cable dangling in there. I then cut the connector off the end of it (the end that does not plug into the mirror) and discarded it.
At this point I also cut the male end (the end with the pins) off of the 10 inch extension and discarded it as well. Now you have to get a little creative and connect the two harnesses (you'll need to come up with about 20" of wire per connection depending on how you have routed from the MyGig to the Mirror Harness. The wiring diagram should be:
Mirror Harness----------------MyGig Connector
Pin 3 - BK/LB -------------------------- Pin 1
Pin 1 - BK/DG -------------------------- Pin 2
Pin 15 - BK/YL ------------------------- Pin 4
Pin 2 - BK/TN --------------------------- Pin 7
Pin 10 - BK/GY ------------------------- Pin 8
For better audio quality; BK/LB, BK/DG & BK/YL should be twisted together.
This will leave a couple of wires from the Mirror Harness unconnected. You will want to connect them as follows:
Pin 8 BK ----------------------------- Ground
Pin 9 BK/LG -------------------------- Reverse Lights Power
Pin 14 BK/PK ------------------------ Switched Hot
These three wires get the auto dimming mirror to work.
I found a Ground point under the dash for the Ground, connected to the hot lead of the lighter (left hand lighter is switched, right hand is always hot if you have the smoker's group) and found the reverse light power lead in a 34 pin connector in the passenger side foot well. It is a WT/GY wire connected to Pin 3. It's not easy to reach, but once you get in there, it's not too much trouble to crimp on a T-Tap.
If you do decide to do this, it will cost you more than some of the other solutions out there (the Mirror alone is > $150), but in my opinion it was well worth the addition cost for the stock appearance.
If you need more info, feel free to ask.
--Sky
 the details that matter the most love the ideas you have. I went with a different way on installing the rear view mirror but mine is not the OEM.
With regards to Uconnect. I went with the old wire hiding on the side of the dash (really no time to B creative).
Inside pics would help a lot
Thanks for sharing
 04-16-2008, 01:55 AM
#23
JK Jedi
Join Date: Oct 2007
Location: Colorado
Posts: 5,537
Likes: 0
Received 0 Likes
on
0 Posts
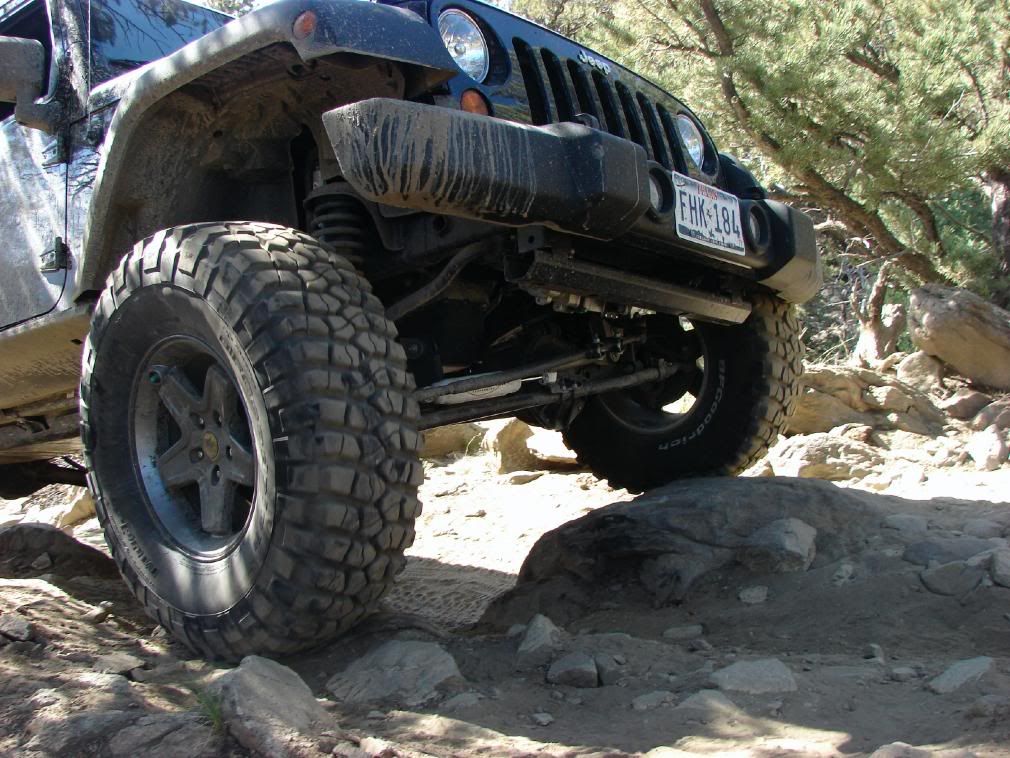
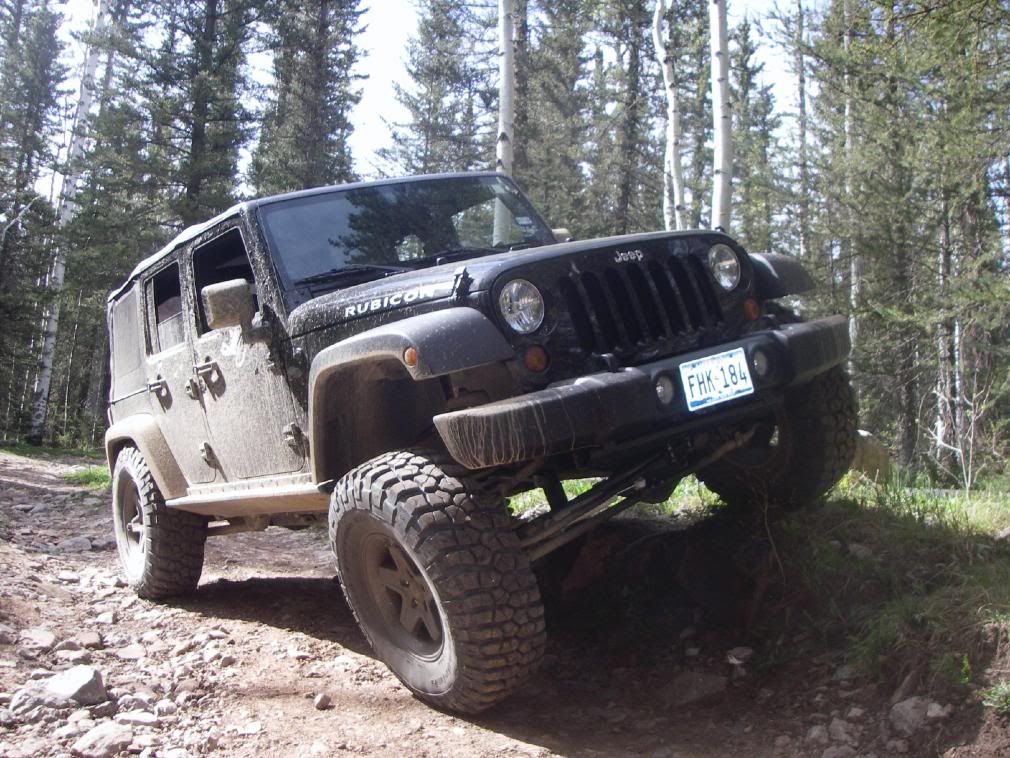
Looks good. Before I read your text I actually thought you had the wheels color-matched to the Jeep. I do also agree that the flares seem to dwarf the 35's, but if you do 37's in the future it might even out.
04-16-2008, 06:09 AM
#24
JK Enthusiast

Join Date: Jun 2007
Location: Winston
Posts: 208
Likes: 0
Received 0 Likes
on
0 Posts
 Can you post a pix of these zirk locations?
Very nice rig sky!!! Awesome!!!
Last edited by myorbital91; 04-16-2008 at 06:48 AM.
 06-08-2008, 07:07 PM
#26
JK Super Freak
Join Date: Oct 2007
Location: Dallas, Texas, United States
Posts: 1,640
Likes: 0
Received 0 Likes
on
0 Posts
My crystal ball shows 37's in your future,...


Please PM me with the new Zirk locations. I will need to be greasing these puupies b4 too long.
Same lift and gears and loving it.

Please PM me with the new Zirk locations. I will need to be greasing these puupies b4 too long.
Same lift and gears and loving it.
Last edited by mmcan; 06-08-2008 at 07:34 PM.
09-30-2008, 06:51 AM
#27
JK Enthusiast
Join Date: Sep 2008
Location: Chicago, IL
Posts: 100
Likes: 0
Received 0 Likes
on
0 Posts
Your rig looks awesome skydyvyr.
I am looking at getting some 33x12.5 on some Pro Comp 7089s. Your picture, although of a different size tire and different wheel, still tells me that I will like my choice of the all-black wheel on my Steel Blue JK.
I have a question for you. Do you think that the Bushwacker flares will be too much for a set of 33x12.5 on 16x8 wheels with no lift?
I won't have the money for now to do a lift, and don't really feel the need to go with 35's. Plus, as you mention, I need to ensure that I keep it street legal here in IL.
Thanks.
09-30-2008, 07:07 AM
#28
JK Enthusiast
Thread Starter
Join Date: Jun 2007
Location: Bellevue, WA
Posts: 213
Likes: 0
Received 0 Likes
on
0 Posts
Thanks,
I'm still very happy with it and the only thing I've added to this point is Rock Hard sliders. It's very trail capable and rides like a dream on the roads.
I had the flares on for a week or so before I got the lift done, and they looked pretty bad in my opinion. Of course I was still running the 18" Sahara wheels and tires, so they were tucked pretty far in there. You may find that with the correct back spacing and slightly taller tires that they won't look so bad. They really made the rig look shorter than it was, and only after I put the lift on did the rig look balanced.
Hope this helps
--Sky
I'm still very happy with it and the only thing I've added to this point is Rock Hard sliders. It's very trail capable and rides like a dream on the roads.
Hope this helps
--Sky
09-30-2008, 07:18 AM
#29
JK Enthusiast
Join Date: Sep 2008
Location: Chicago, IL
Posts: 100
Likes: 0
Received 0 Likes
on
0 Posts
Great to hear that you're happy with it, and that it is riding well!
Yeah, I can believe that the stock 18's looked bad. They aren't even flush with the stock flares, so I bet they really sit back far under the BW's. With the few tire options I am looking at, they should sit anywhere from 2.7-2.95" outside where the stock 18's sit. So the BW's should cover the new tires I choose, but they might sit back inside slightly (like the stock 18's do on the stock flares).
I guess the main problem will be height then, as 33's, depending on brand are not much taller than the stock 32's, most aren't even truly 33" tall.
Do you have a pic of the BW's with the stock 18's and no lift?