
EVO Rear RockSkins and Tire Carrier Install
 02-27-2013, 05:33 AM
#151
JK Freak
Started installing my evo skins Monday, primed them yesterday and I'm going to paint them today and install them tomorrow and wire up the tail lights
<img src="https://www.jk-forum.com/forums/attachment.php?attachmentid=427387"/>
<img src="https://www.jk-forum.com/forums/attachment.php?attachmentid=427389"/>
<img src="https://www.jk-forum.com/forums/attachment.php?attachmentid=427387"/>
<img src="https://www.jk-forum.com/forums/attachment.php?attachmentid=427389"/>
 02-27-2013, 05:40 AM
#152
JK Junkie
Thanks a lot, I can't wait to its all finished, then heading to the hammers next week. The install isn't really too hard, but I already had a little experience with putting the rocker skins on and the nutserts plus I made my own nutsert tool that hasn't failed me like the HF did on the very first nutsert lol
02-27-2013, 07:26 AM
#153
JK Newbie
Join Date: Jan 2013
Location: San Ramon, CA
Posts: 99
Likes: 0
Received 0 Likes
on
0 Posts
 Just a quick tip - that bolt hole to the upper right of the gas tank hole isn't for a nutsert. It's for one of the bolts that hold the tire carrier brackets (and it's not the same size). So you'll need to remove the nutsert and save the hole for the bracket installation (unless you're not planning on getting the tire carrier, and just the skins).
02-27-2013, 11:02 AM
Just a quick tip - that bolt hole to the upper right of the gas tank hole isn't for a nutsert. It's for one of the bolts that hold the tire carrier brackets (and it's not the same size). So you'll need to remove the nutsert and save the hole for the bracket installation (unless you're not planning on getting the tire carrier, and just the skins).
02-27-2013, 11:02 AM
#154
JK Freak
Join Date: Jan 2012
Location: corpus christi, tx
Posts: 665
Likes: 0
Received 0 Likes
on
0 Posts
Looks great!
Just a quick tip - that bolt hole to the upper right of the gas tank hole isn't for a nutsert. It's for one of the bolts that hold the tire carrier brackets (and it's not the same size). So you'll need to remove the nutsert and save the hole for the bracket installation (unless you're not planning on getting the tire carrier, and just the skins).
02-27-2013, 12:15 PM
#155
Sponsoring Vendor

Join Date: May 2012
Location: FULLERTON,CA
Posts: 1,423
Likes: 0
Received 0 Likes
on
0 Posts
02-27-2013, 12:21 PM
#156
JK Newbie
Join Date: Jan 2013
Location: San Ramon, CA
Posts: 99
Likes: 0
Received 0 Likes
on
0 Posts
The best tool for that is the 4.5" hole saw, for the following reasons. It does the job in a minute or less, whereas a cutter or sawzall would take much longer. Second, you'll find additional metal plates and structural elements behind the body panel - the hole saw will help you cut right through those with no problem and without cutting any extra metal off. Third, I found it very handy to do cleanup cutting of the sheet metal with the Rockskins already installed. My pre-marked hole was just a tad off after torquing down the Rockskins, so I used the 4.5" hole saw to cut exactly where the hole in the Rockskin was. (For that reason I recommend getting exactly the 4.5-inch size, no bigger or smaller. Besides, I'll be able to use that hole size again for stuff like recessed lighting in ceilings, etc.) At first I hesitated spending $30 for it at Home Depot, but looking back it was well worth it in time saved and migraines avoided.
 03-01-2013, 06:02 AM
#159
JK Junkie
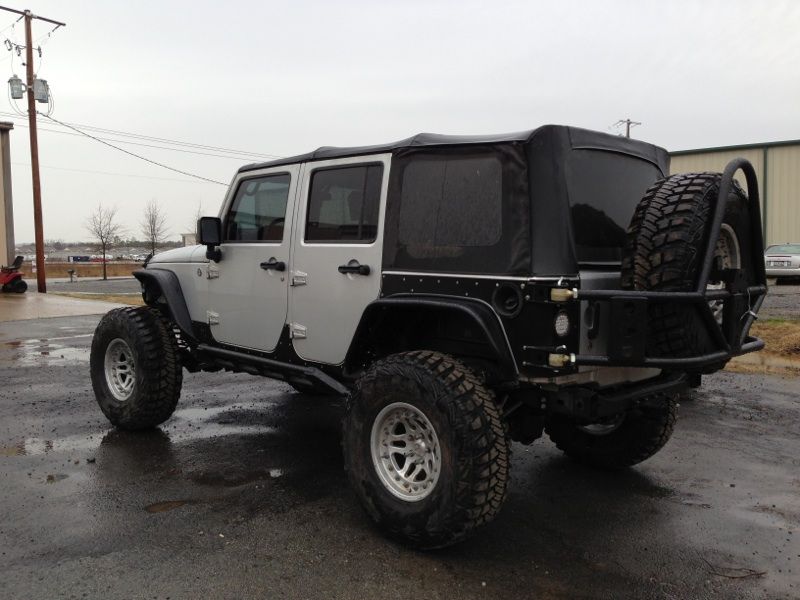
Painted them wed and installed them and wired up taillights yesterday. I'm so happy that I finally put them on
<img src="https://www.jk-forum.com/forums/attachment.php?attachmentid=428162"/>
<img src="https://www.jk-forum.com/forums/attachment.php?attachmentid=428161"/>
<img src="https://www.jk-forum.com/forums/attachment.php?attachmentid=428160"/>
<img src="https://www.jk-forum.com/forums/attachment.php?attachmentid=428162"/>
<img src="https://www.jk-forum.com/forums/attachment.php?attachmentid=428161"/>
<img src="https://www.jk-forum.com/forums/attachment.php?attachmentid=428160"/>