
Custom modular JK hardtop
 03-21-2015 | 06:59 AM
#281

Thread Starter
JK Super Freak
Joined: Jul 2012
Posts: 1,556
Likes: 37
From: Elmira, NY
If you need help testing, please let me know. I run my half doors year round on the east coast (DC area) so they get a good variety of weather. For what it's worth, if there is a tinted option, pretty much everybody goes that route. Even if its just a factory style tint
I thought tint was going to be a simple issue until I checked the list of the various state laws on the subject. Laws about the front windows range from no tint allowed (NJ) down to 20% light transfer (NM), with most states in the 35-50 range and quite a few at 70. Rear side windows vary by state, with most states either limiting the tint to the same as they limit the front but some states allowing darker tint on the rears. There's no rhyme or reason, for example NJ, which doesn't legally allow any tint on the front side windows, allows any amount of tint on the rear side windows. All of this info is from the Tintlaws.com website.
Seems to me clear has to be one of the options offered. Then maybe a tint that matches the factory tinted hardtop windows, which will be legal in the front in some states and in the back in most or all states, then it would be up to the buyer to decide whether he needs to get clear or tinted for the fronts to be legal in his state, if in fact he cares to be legal.
03-21-2015 | 07:08 AM
#282
Thread Starter
JK Super Freak
Joined: Jul 2012
Posts: 1,556
Likes: 37
From: Elmira, NY
My friend Tom has been running a barn door we made for him on his 2014 JKU since October, he's seems very happy not having to do the two-step tailgate/hatch process in the upstate NY winter.
If you're asking about commercial availability of the barn door, I haven't done anything about that yet. One company that's contacted me about it and the full Safari Cab told me they were interested in getting started on the barn door now, even before the rest of the Safari Cab was done because they think there's a market for the barn door as an upgrade to the factory hardtop (like Tom's been running all winter). I'll bet the Jeep Africa concept increases interest in the barn door as a factory hardtop upgrade . I told them a few weeks ago that I wanted to wait until I finished the rest of the Safari Cab molds before I decided if I wanted either the barn door or the Safari Cab become a commercial product.

If you're asking about commercial availability of the barn door, I haven't done anything about that yet. One company that's contacted me about it and the full Safari Cab told me they were interested in getting started on the barn door now, even before the rest of the Safari Cab was done because they think there's a market for the barn door as an upgrade to the factory hardtop (like Tom's been running all winter). I'll bet the Jeep Africa concept increases interest in the barn door as a factory hardtop upgrade
. I told them a few weeks ago that I wanted to wait until I finished the rest of the Safari Cab molds before I decided if I wanted either the barn door or the Safari Cab become a commercial product.
03-21-2015 | 09:24 AM
#283
JK Enthusiast
Joined: Mar 2011
Posts: 434
Likes: 0
From: College Park, MD
I'll pass your interest in testing along to the company.
I thought tint was going to be a simple issue until I checked the list of the various state laws on the subject. Laws about the front windows range from no tint allowed (NJ) down to 20% light transfer (NM), with most states in the 35-50 range and quite a few at 70. Rear side windows vary by state, with most states either limiting the tint to the same as they limit the front but some states allowing darker tint on the rears. There's no rhyme or reason, for example NJ, which doesn't legally allow any tint on the front side windows, allows any amount of tint on the rear side windows. All of this info is from the Tintlaws.com website.
Seems to me clear has to be one of the options offered. Then maybe a tint that matches the factory tinted hardtop windows, which will be legal in the front in some states and in the back in most or all states, then it would be up to the buyer to decide whether he needs to get clear or tinted for the fronts to be legal in his state, if in fact he cares to be legal.
03-23-2015 | 10:52 AM
#284
Thread Starter
JK Super Freak
Joined: Jul 2012
Posts: 1,556
Likes: 37
From: Elmira, NY
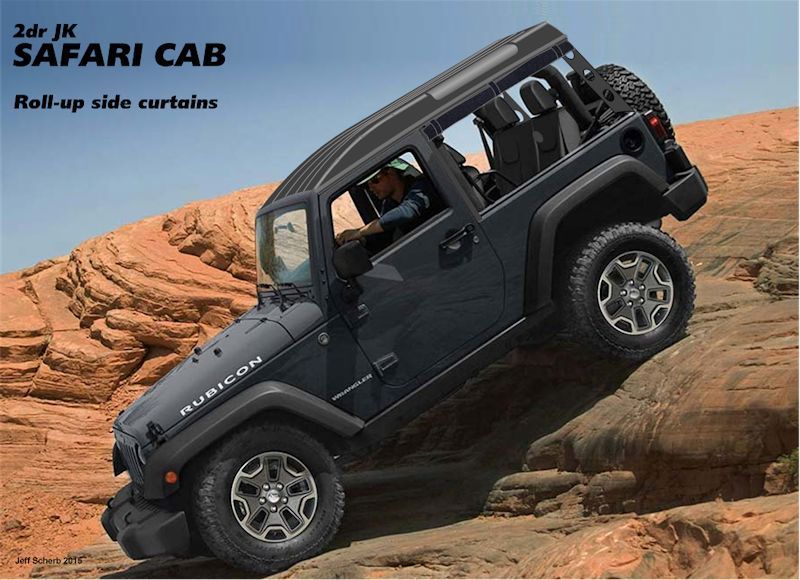
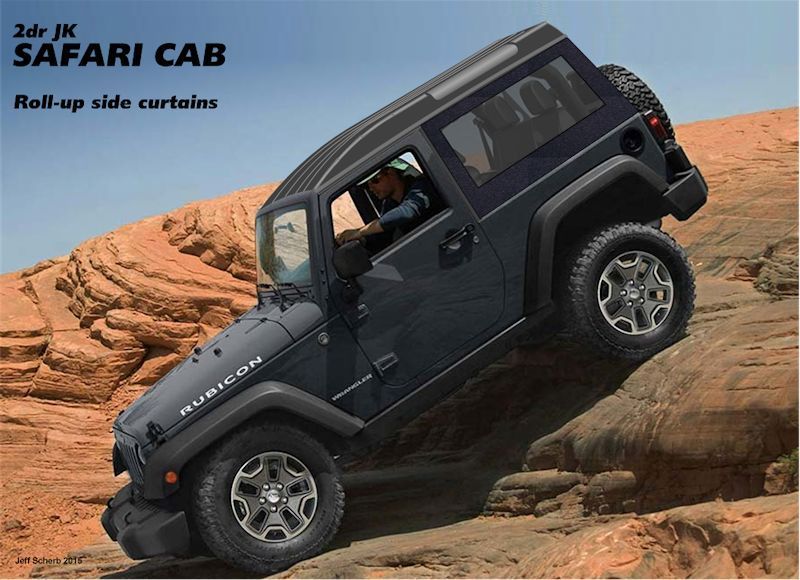
JK Safari Cab project update... I'm continuing work on the molds for the roof. This past week I've been working on the molds for the front part of the drip rails and the upper jambs for the doors. The parts are circled in the photo below...
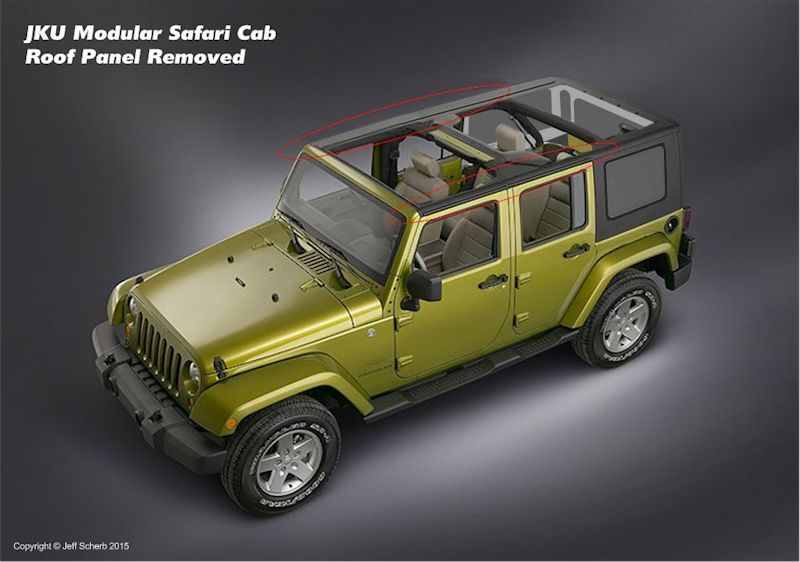
For traditional hard tops the upper jambs would just be part of the main roof panel, but for the Safari Cab they're separate parts. For most Safari Cab configurations, they'd bolt to the bottom of the main roof panel, acting just as if they'd been molded as part of the roof panel. But for some configurations, they'd be installed separately.
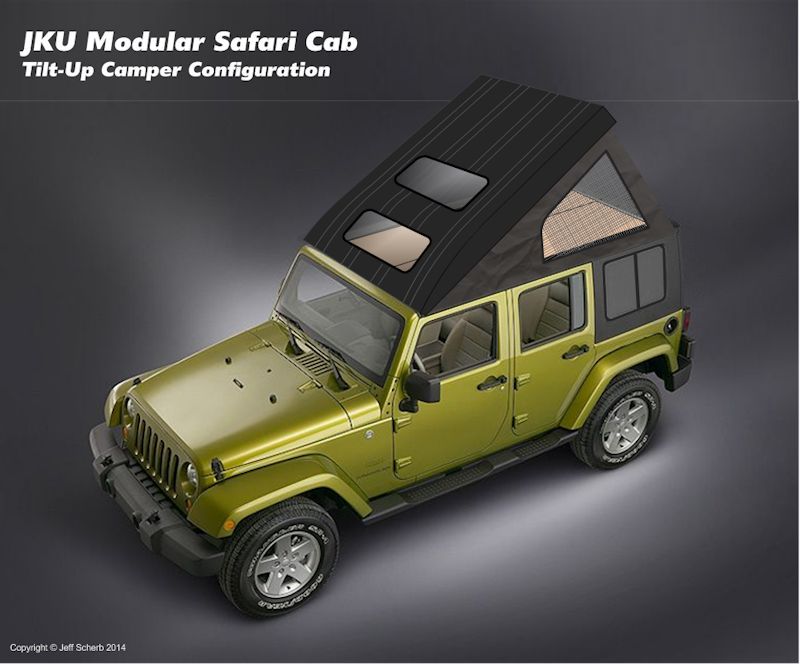
One reason for them being separate parts is that the roof panel is also designed so that it can be configured as a flip-up camper. In that configuration, the upper jambs would stay in place while the roof hinged up, providing a place where the bottom of the canvas sides attach.
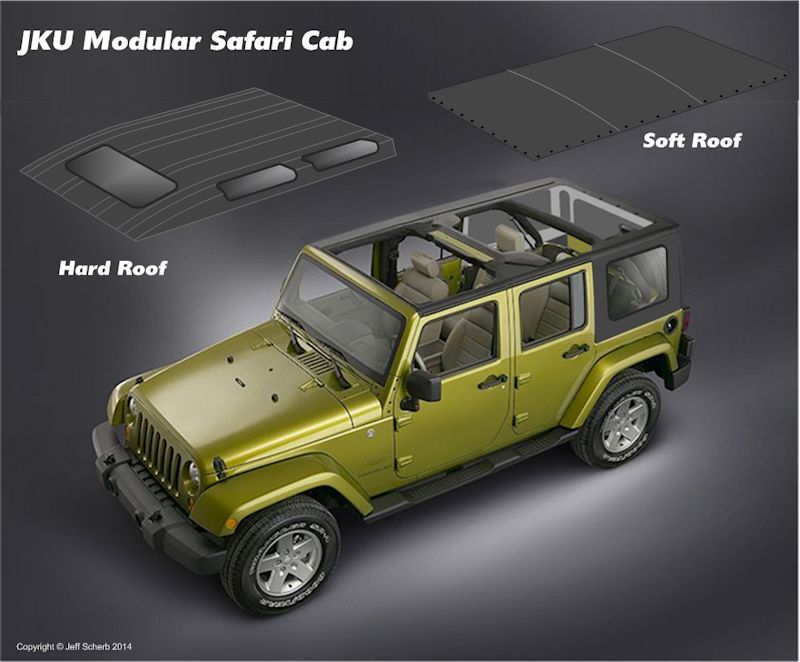
Another benefit is that the removable roof panel could be swapped for the soft roof panel, the soft panel would attach the the upper jambs and the top of the side and rear panels.
I've also been working on the mold for the part of the drip rails that accompany the parts above, and also for two parts that are needed for the soft side configuration.
For traditional hard tops the upper jambs would just be part of the main roof panel, but for the Safari Cab they're separate parts. For most Safari Cab configurations, they'd bolt to the bottom of the main roof panel, acting just as if they'd been molded as part of the roof panel. But for some configurations, they'd be installed separately.
One reason for them being separate parts is that the roof panel is also designed so that it can be configured as a flip-up camper. In that configuration, the upper jambs would stay in place while the roof hinged up, providing a place where the bottom of the canvas sides attach.
Another benefit is that the removable roof panel could be swapped for the soft roof panel, the soft panel would attach the the upper jambs and the top of the side and rear panels.
I've also been working on the mold for the part of the drip rails that accompany the parts above, and also for two parts that are needed for the soft side configuration.
03-23-2015 | 05:25 PM
#285
JK Freak
Joined: Jun 2009
Posts: 929
Likes: 3
From: Marshall, Texas
As far as window tint goes, u could always offer this option. Smarttint.com Dimmable window tint varies with 12vdc
https://vimeo.com/109653170
https://vimeo.com/109653170
Last edited by Earth Siege; 03-23-2015 at 05:31 PM.
03-24-2015 | 10:00 AM
#286
Thread Starter
JK Super Freak
Joined: Jul 2012
Posts: 1,556
Likes: 37
From: Elmira, NY
When I last talked to the company, they told me they were thinking that offering both clear and 35% might make sense, at least for the initial production run.
03-24-2015 | 10:15 AM
#287
JK Freak
Joined: Jun 2009
Posts: 929
Likes: 3
From: Marshall, Texas
Well u could get the norrmal kit and determine what resistance is needed to achieve the 35% and do away with dimmer (which is nothing but a variable resistor)
With no power tint is blacked out
With full power tint is clear
With resisted power tint achieves 35%( or whatever thier state allows.)
A three way switch with keyed power source with one side of switch being full power and other side of switch being resisted power could toggle back and forth as needed.
Key off means no power to switch so tint blacks out for security.
I think im gonna order this kit for my rig and test it out for just this setup.
03-24-2015 | 12:58 PM
#288
Thread Starter
JK Super Freak
Joined: Jul 2012
Posts: 1,556
Likes: 37
From: Elmira, NY
Here are a few photos of the mold master for the upper jambs that I just finished. A mold master is the master part from which a mold will be made - it's a perfect replica of what I want the final part to look like, plus a little extra that will be trimmed off after the part comes out of the mold...
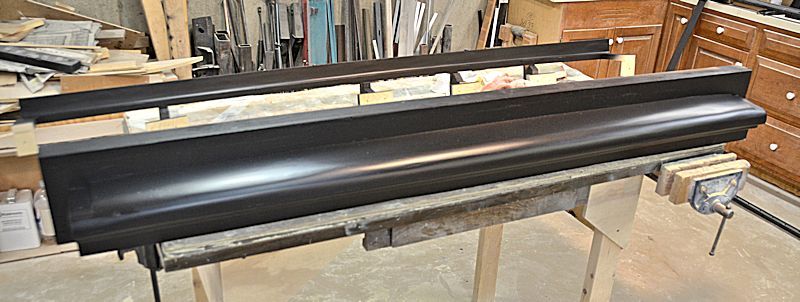
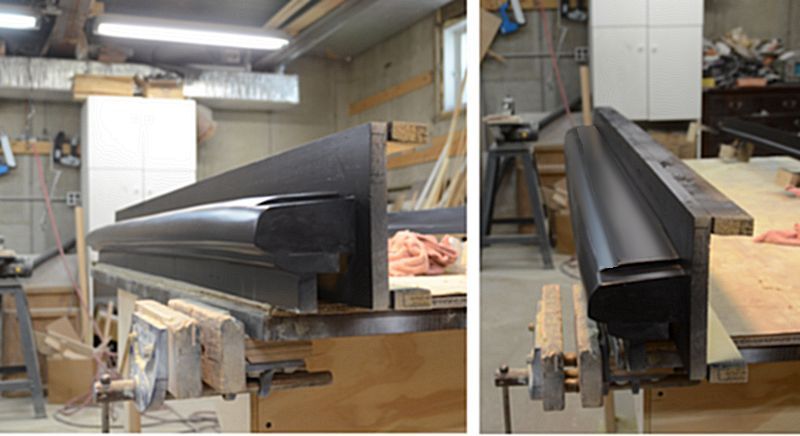
If I've done my work correctly, this part will be a near-perfect replica of the factory upper door jambs and the first few inches of the top of the factory hardtop roof. There are a few differences though - for example, there's no drip rail on this part - that's a separate part that also serves as the bolt-flange to attach the roof panel, so it gets molded separately and then bonded to the underside of the roof. The drip rail mold can be seen on the back of the table in the first photo.
Another difference you might not really be able to see in these photos is that this master is "double ended" - there's a "front" on both ends. I did that because the way the curves on the hardtop work out, it's possible to mold both left and right versions of the part just by making the mold a little longer and putting "fronts" on both ends. Once out of the mold, one "front" or the other will be trimmed off to make either a left-side or a right-side part.
One final difference - at the front (both fronts), there's a notch in the top surface. This notch allows the roof panel to sit down level with the back edge of the windshield frame. Without this, the roof panel edge would sit above the top edge of the windshield frame and wouldn't look right. This notch is also "optional", meaning that notch can be trimmed off and the part left longer on the other end by the same amount so if a full length factory profile is needed for some application, the same mold can make that part, it'll just be trimmed a little differently when it comes out of the mold.
BTW the reason this part replicates the first few inches of the factory roof surface is that while the Safari Cab roof panel is part of the complete Safari Cab, it can also be installed on a factory roof, for perhaps building a tilt-up camper top on a factory top. So the bolt-flange surface that attaches the roof to the rest of the Safari cab parts also matches the shapes and profile of the factory hardtop, enabling the roof to be installed on a factory hardtop just as well as it can be installed on the rest of the Safari Cab parts.
The next step is to make a mold from this master, and then make the parts in that mold.
If I've done my work correctly, this part will be a near-perfect replica of the factory upper door jambs and the first few inches of the top of the factory hardtop roof. There are a few differences though - for example, there's no drip rail on this part - that's a separate part that also serves as the bolt-flange to attach the roof panel, so it gets molded separately and then bonded to the underside of the roof. The drip rail mold can be seen on the back of the table in the first photo.
Another difference you might not really be able to see in these photos is that this master is "double ended" - there's a "front" on both ends. I did that because the way the curves on the hardtop work out, it's possible to mold both left and right versions of the part just by making the mold a little longer and putting "fronts" on both ends. Once out of the mold, one "front" or the other will be trimmed off to make either a left-side or a right-side part.
One final difference - at the front (both fronts
), there's a notch in the top surface. This notch allows the roof panel to sit down level with the back edge of the windshield frame. Without this, the roof panel edge would sit above the top edge of the windshield frame and wouldn't look right. This notch is also "optional", meaning that notch can be trimmed off and the part left longer on the other end by the same amount so if a full length factory profile is needed for some application, the same mold can make that part, it'll just be trimmed a little differently when it comes out of the mold.BTW the reason this part replicates the first few inches of the factory roof surface is that while the Safari Cab roof panel is part of the complete Safari Cab, it can also be installed on a factory roof, for perhaps building a tilt-up camper top on a factory top. So the bolt-flange surface that attaches the roof to the rest of the Safari cab parts also matches the shapes and profile of the factory hardtop, enabling the roof to be installed on a factory hardtop just as well as it can be installed on the rest of the Safari Cab parts.
The next step is to make a mold from this master, and then make the parts in that mold.
Last edited by jscherb; 03-24-2015 at 01:15 PM.
03-25-2015 | 05:25 AM
#290
Thread Starter
JK Super Freak
Joined: Jul 2012
Posts: 1,556
Likes: 37
From: Elmira, NY
Another pair of molds I worked up this past week are the ones for the rear door surround, which is used with the roll-up soft side panels. The soft panels need somewhere to attach to at the back of the door, and the door needs a jamb surface to seal against, so these parts are narrow pieces that serve both purposes. The rear surround is in this concept drawing, just barely visible as a narrow gray line just behind the door.
A comparison shot of the LJ Safari Cab on the trail with the soft sides rolled up:
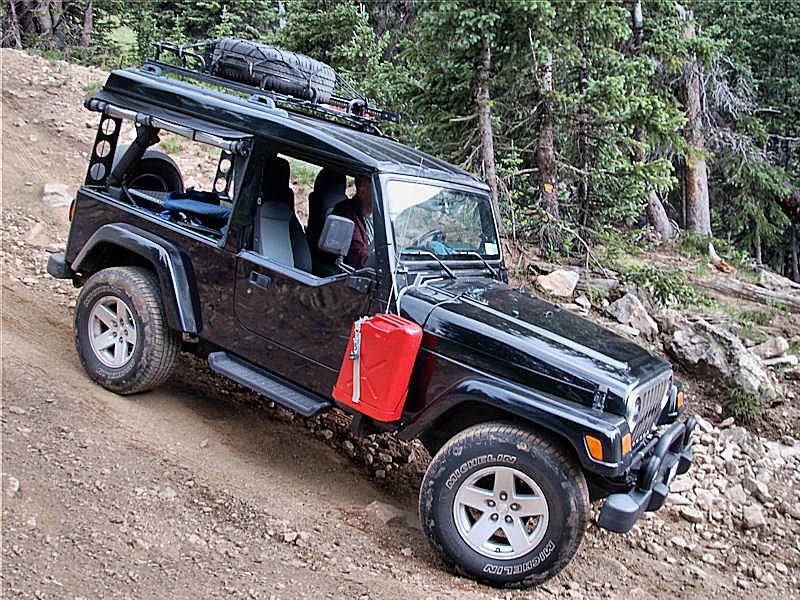
With the soft sides rolled down:
A comparison shot of the LJ Safari Cab on the trail with the soft sides rolled up:
With the soft sides rolled down: