
"Bolt-on Build" of the Baja Banshee
 06-27-2012, 02:02 PM
#1
JK Enthusiast
Thread Starter

Join Date: Sep 2011
Location: USA
Posts: 429
Likes: 0
Received 0 Likes
on
0 Posts
This thread will be changed to a new thread soon. I sold this jeep andd will be performing this exact same build but NOW ON A 2013!!!

Build Thread Purpose
The purpose of this thread is to have fun. I will use it to keep the build on track and to hold myself accountable for the build. I also hope it serves as a source of information to other people that are new to Building Big!
Just like many other threads, my continued posts will be pics and info of the build. I will post complications encountered, and solutions to those snags, in as much detail as possible. Please feel free to chime in with recommendations, possible complications I should prepare for! Thanks for reading guys!
Buliding Background
So when I purchased my JK, I knew I couldn’t wait to get it topless, go for a cruise on the weekends, and every other spare chance I got. I imagined taking it down in the creek beds and hill sides of my Southern Ohio home town. I have been around fairly stock jeeps my entire life. The majority of add-ons I have helped with were slightly larger than stock MT tires and VERY mild bolt on lifts. These jeeps were a great time and capable of taking me many of the places I wanted to go. Theeeeeeeeen came my JK.
My original plans were to build it like all the old jeeps I’ve always been in and around. Keep it near stock, place a little bit of money in suspension upgrades, go with 33”-35” tires, and install a mild lift. I then found online forums. They sucked me in with numbers, specs, and possibilities. I read and watching people with these insane (in my mind at the time) lift systems that were capable of running 37”, 40”, and even 42” tires. I couldn’t quit reading of the changes they made to accommodate these upgrades.
Then came all the horror stories and failures from improperly building their rig for the functions they wanted it to perform. Many of these failures were due to shotty aftermarket kits and parts that were built for looks and not function. Many were from going too big on a budget and breaking parts (i.e. Axle tubes or inner knuckles) they could have saved by taking their time and “building it backwards”.
Building it Backwards
As I continued to read I realized that to properly build my rig, I needed to consider the next part “upstream”. Larger tires place stress on the knuckles and axle tubes. They often require an upgrade in gearing to make up for the loss in torque and fuel economy. A lift system (that is lacking proper components) will misalign the track bars, drive shafts, draglink, etc.
Then you will have to think of all the future added weight. Add a sport cage, heavy bumpers, winch, roof rack, heavy full sized spare tire, etc. and you will place added strain on these components that weren't designed for extreme use.
My original thoughts of 33”-35” tires went quickly to 37’s. I started to think out the build and my mind began flirtting with the possibility of 40’s. I know myself all too well, and that I will later regret not building it capable of handling bigger. I also know that I hate to spend money twice! I then made my mind up to build it for the magic number 40!
Building it Bolt-on
I looked at the required components to make an extremely reliable rig and the numbers started to add up. I knew I wanted a Long Arm lift and began noticing that there were MANY good lift systems. Some were bolt-on and some were weld on…..(disclaimer--> I know how to wrench but when it comes to welding and electrical work, my skills are TREMENDOUSLY sub-par. So for anything weld on I would require a professional’s assistance)
I next began contacting shops and quickly realized the labor cost involved in installing the weld on lift kits would range up to and even over $2,500. That’s sometimes more than the cost of the lift itself!!! I could buy my front and rear bumpers with a winch for $2,500!!! Then you factor in other components and you quickly see the cost of install adding up.
This has driven me to research my build for a year. I want to build the best rig I can, while taking all the money saved from installation and reinvesting it into upgraded, more capable, parts.
Last edited by StrizzyChris; 08-23-2012 at 11:01 PM.
 06-27-2012, 02:03 PM
#2
JK Enthusiast
Thread Starter
Join Date: Sep 2011
Location: USA
Posts: 429
Likes: 0
Received 0 Likes
on
0 Posts
Pending Parts to Purchase (I have researched but have not yet made my decision to which kit/system I will install)
1- 1 ton axles with 5.38 gearing, 8 on 6.5 lug pattern, lockers and full float rear
2- Bolt-on Long Arm suspension system
3- Drag Link Flip
4- Front Track Bar reloctation
5- 1350 Front and Rear Drive Shafts
6- Electrical system with rocker switches
7- Hydrolic Assist Steering
8- Rear Tire carrier (with or w/o bumper to be determined)
9- Oil Skid
10- Onboard Air System
11- Off Road Lighting
12- 10-12K Winch
13- Sliders
14- Cat Back Exhaust
15- CAI System
16- CB Radio
==================================================
Purchased Mods
1- Toyo Open Country MT 40x13.50r17 tires
2- American Racing ATX Slab Beadlock 17x9, 8on6.5� wheels
3- Off Road Evolution bolt on King coilover system
4- Rugged Ridge XHD Stubby Bumper with hoop
5- Flashpaq 3875 Tuner
Last edited by StrizzyChris; 07-21-2012 at 12:03 AM. Reason: List updated
06-27-2012, 02:11 PM
#3
JK Enthusiast
Thread Starter
Join Date: Sep 2011
Location: USA
Posts: 429
Likes: 0
Received 0 Likes
on
0 Posts
Many people, myself included, want one of their first mods to be their front bumper. I felt like it was an plastic, non-rugged apearing, piece that takes away from what I want my jeep to look like. It also has limitations in its abilities on the trail unless modified, which led to my first mod.

I selected the Rugged Ridge XHD modular front bumper purchased from Amazon. This is the only install I won�t be able to give detailed install information/write up due to doing it prior to this thread. WOL did a great write-up of an aftermarket bumper install that you can check out here--> Project-JK.com - Jeep JK Wrangler Resource � Hanson Stubby Front Stinger Bumper Installation Write-Up
To install this you will remove the stock bumper. To do this you will detach the upper and lower air dams. The plastic screws are notorious for not coming out with a Philips head screwdriver. I got a tip from another member and used an old drywall screw to help me in this process. I slightly screwed it into the face of the plastic screw and then pulled out easily.

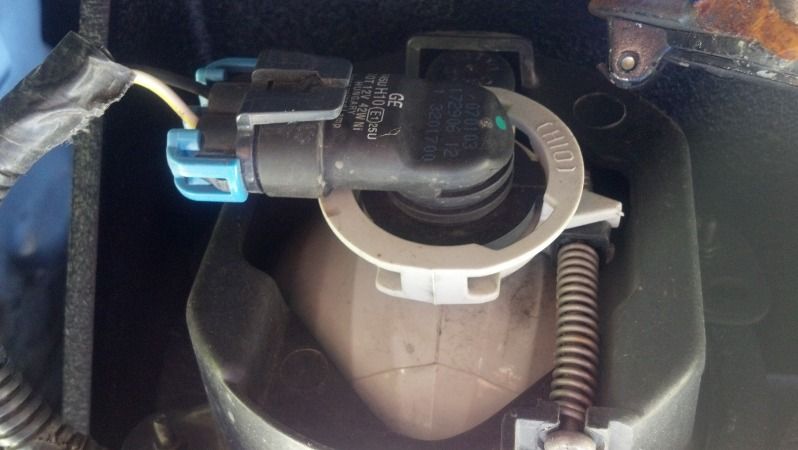
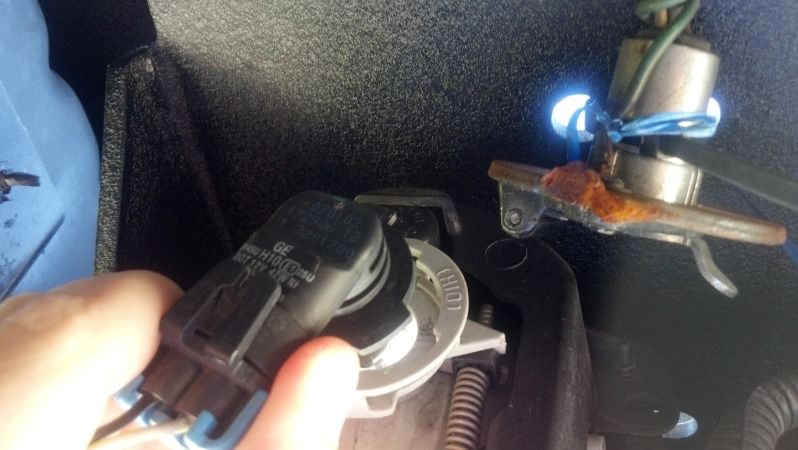
Next you will need to detach the factory fog lights. To do this you will need to gently turn the wiring harness a � turn counter clockwise until you meet resistance. The bulb will then pull directly out of the housing.
You will then remove the 4 nuts on the back side of the bumper. Be careful on the final nuts as the bumper could fall off. Now remove the bumper. Common asking price for a used bumper in great condition is $50-$100. But the market is also flooded with them, and many give them away for free, so it will be a hard sell.
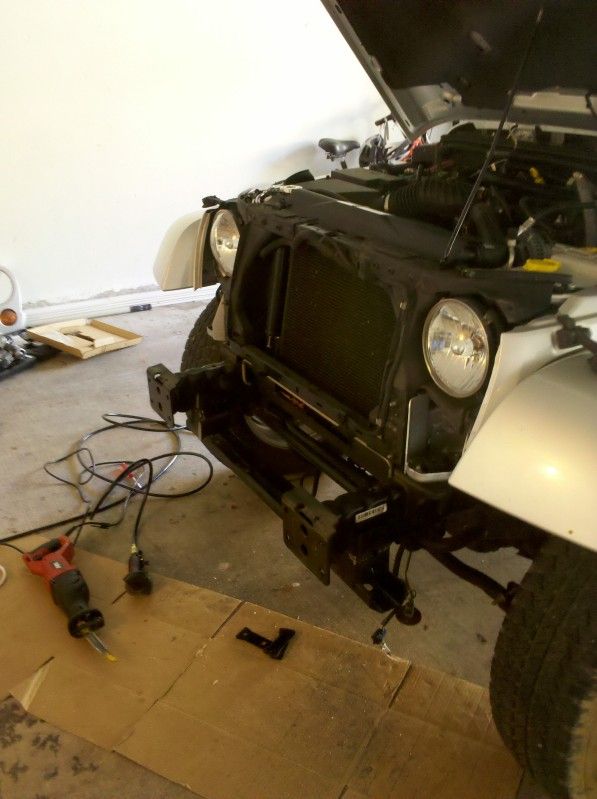
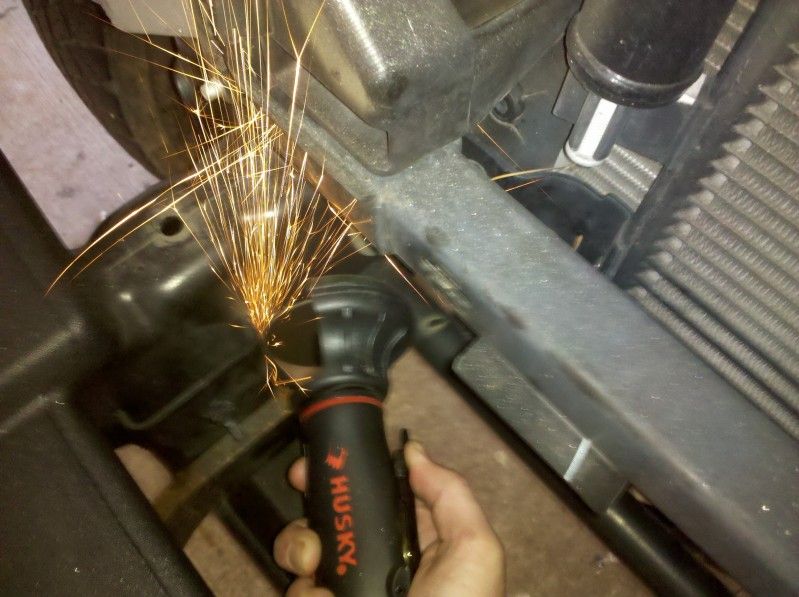
Your next step will be to cut off (at least part of) the frame brace/sway bar guard/lower air dam attachment point. This awkwardly sticks down and has a cross section that gets in the way of many aftermarket bumpers. Be sure to not cut the round tube cross member!!! After cutting it off, be sure to clean up the cuts and hit them with a few passes of primer to protect it from rusting.
Now place your bumper on the frame ends and install the 4 bolts on each side. My only complication with the bumper is one of the bolt holes did not match up with the frame holes and required drilling to ream out one side by 1/32 of an inch. The last bolt then fit in with some slight resistance.

Overall the install was pretty easy and strait forward. The core of the bumper is beefy and sturdy. The hoop is very cheap, and would easily bend under much force at all. There are many options for end caps, hoops, stingers, etc to choose from but beware that not all of these add-ons are as sturdy as the bumper itself.
I selected the Rugged Ridge XHD modular front bumper purchased from Amazon. This is the only install I won�t be able to give detailed install information/write up due to doing it prior to this thread. WOL did a great write-up of an aftermarket bumper install that you can check out here--> Project-JK.com - Jeep JK Wrangler Resource � Hanson Stubby Front Stinger Bumper Installation Write-Up
To install this you will remove the stock bumper. To do this you will detach the upper and lower air dams. The plastic screws are notorious for not coming out with a Philips head screwdriver. I got a tip from another member and used an old drywall screw to help me in this process. I slightly screwed it into the face of the plastic screw and then pulled out easily.
Next you will need to detach the factory fog lights. To do this you will need to gently turn the wiring harness a � turn counter clockwise until you meet resistance. The bulb will then pull directly out of the housing.
You will then remove the 4 nuts on the back side of the bumper. Be careful on the final nuts as the bumper could fall off. Now remove the bumper. Common asking price for a used bumper in great condition is $50-$100. But the market is also flooded with them, and many give them away for free, so it will be a hard sell.
Your next step will be to cut off (at least part of) the frame brace/sway bar guard/lower air dam attachment point. This awkwardly sticks down and has a cross section that gets in the way of many aftermarket bumpers. Be sure to not cut the round tube cross member!!! After cutting it off, be sure to clean up the cuts and hit them with a few passes of primer to protect it from rusting.
Now place your bumper on the frame ends and install the 4 bolts on each side. My only complication with the bumper is one of the bolt holes did not match up with the frame holes and required drilling to ream out one side by 1/32 of an inch. The last bolt then fit in with some slight resistance.
Overall the install was pretty easy and strait forward. The core of the bumper is beefy and sturdy. The hoop is very cheap, and would easily bend under much force at all. There are many options for end caps, hoops, stingers, etc to choose from but beware that not all of these add-ons are as sturdy as the bumper itself.
Last edited by StrizzyChris; 06-27-2012 at 02:50 PM.
06-27-2012, 04:03 PM
#5
JK Enthusiast
Thread Starter
Join Date: Sep 2011
Location: USA
Posts: 429
Likes: 0
Received 0 Likes
on
0 Posts
 06-28-2012, 06:14 AM
#7
JK Enthusiast
Thread Starter
Join Date: Sep 2011
Location: USA
Posts: 429
Likes: 0
Received 0 Likes
on
0 Posts
I may do some of the smaller/easier mods in the next month or so, but the bulk of this build will be performed 13 weeks from now when I take a month off work to do the build. I hope to do the whole build all at once in +/- 3 weeks while having no other obligations. 
Trending Topics
06-28-2012, 07:38 AM
#9
JK Enthusiast
Thread Starter
Join Date: Sep 2011
Location: USA
Posts: 429
Likes: 0
Received 0 Likes
on
0 Posts
Absolutely! I am glad you mentioned it, and I will make sure to post pics of it as it is done. I originally anticipated aftermarket flares, but had seen many people complain of damage it caused to the body when they steel version made impact with trees and rocks. Trimmed stock flares will keep you legal, but will also not cause body damage.
06-29-2012, 06:48 PM
#10
JK Enthusiast
Thread Starter
Join Date: Sep 2011
Location: USA
Posts: 429
Likes: 0
Received 0 Likes
on
0 Posts
Made a stop yesterday in my "research" for the 1-ton axles I am going to use. That visit was at a little shop some of you guys might have heard of called Dynatrac.
I had spoke to Steve in the past and he is a really nice guy. On this visit, Steve was out of town on an off road trip and, I spoke with Dan Seldon. He is a great guy as well. I was there and we just chatted for a ccouple hours about all things off road. This guy knows his stuff and really personable.
On both occurences I never felt any pressure to buy. Never have they tried to push any expensive upgrades on me that I didnt need. Dan actually gave me recommendations of "not needing" some upgrades for my purpose and told me to save that for other upgrades more suitable.


You can check them out at Dynatrac.com or give them a call at (714)596-4461
I had spoke to Steve in the past and he is a really nice guy. On this visit, Steve was out of town on an off road trip and, I spoke with Dan Seldon. He is a great guy as well. I was there and we just chatted for a ccouple hours about all things off road. This guy knows his stuff and really personable.
On both occurences I never felt any pressure to buy. Never have they tried to push any expensive upgrades on me that I didnt need. Dan actually gave me recommendations of "not needing" some upgrades for my purpose and told me to save that for other upgrades more suitable.
You can check them out at Dynatrac.com or give them a call at (714)596-4461
Last edited by StrizzyChris; 06-29-2012 at 06:53 PM.