
Benchmark Dual Battery Install
 02-19-2011, 06:49 PM
#1
JK Enthusiast
Thread Starter
A lot of swearing and cursing of the creator during the install but after it was done everything fit really well.
 02-19-2011, 07:29 PM
#3
JK Enthusiast
Thread Starter
I'd say about 3 hours after you subtract the time I spent looking for parts that were in the instructions but not in the kit I bought or the search for metric tools. Removing and re-installing the factory shock for no reason was also fun.
That's also not counting the time I spent mounting circuit breakers and routing power wires.
In the defense of the manufacturer the kit I had was shipped without instructions. I asked for them and he sent me what I assume was the original design. There are a couple pieces the appear to have been eliminated.
I am happy with the final outcome but anyone installing this kit should plan it all out including consideration of the age of your spark plugs. Once this kit is in getting the passenger plugs out means removing the batteries.
02-19-2011, 07:37 PM
#4
Sorry but
 - I've been there and done that so i know how you feel. Glad you got it all installed!
Did you order directly from benchmark? I'm suprise dof the lack of instructions etc.
Also is that a stage 3 kit? I always wondered if i could buy a stage 1 kit with the Stage 2 to Stage 3 Upgrade Module and save $100 bucks.
 02-19-2011, 07:58 PM
#5
JK Enthusiast
Thread Starter

 02-20-2011, 01:32 AM
#7
JK Jedi Master


... looking for parts that were in the instructions but not in the kit I bought or the search for metric tools. Removing and re-installing the factory shock for no reason was also fun.
That's also not counting the time I spent mounting circuit breakers and routing power wires.
... There are a couple pieces the appear to have been eliminated.
I am happy with the final outcome but anyone installing this kit should plan it all out including consideration of the age of your spark plugs. Once this kit is in getting the passenger plugs out means removing the batteries.

Trending Topics
02-20-2011, 07:12 AM
#8
JK Enthusiast
Thread Starter
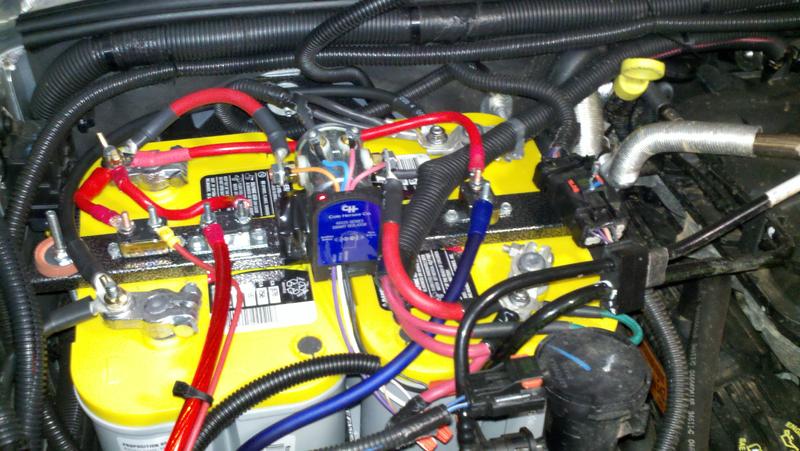
I'm getting very close to ordering one of these kits. What parts should I not bother to look for? Why the problem with tools? I have a very well-equipped shop, but is there something peculiar I should have on hand? Could you please explain more about why you removed the shock and it wasn't necessary? And thanks for the spark plugs suggestion--I just crossed 80K miles on stock plugs, so I'll make that part of the install.
The lack of tools was my own fault. The hardware that came with the kit had a mix of metric and imperial..... Time to put all my sockets back in their places. The most used tool was a 10mm socket.
The instructions say to use a shock tower brace (requires stock shock removal) and associated hardware but the kit has no brace or hardware. I thought I lost it in the sea of crumpled brown paper that the system was shipped with so I tore up the house. Once I gave up and thought I'd need to fabricate my own I realized that the mounting points on the battery tray weren't there. There was no way to attach the brace or any brace I made to the tray without modification. The tray is very stable and seems well secured but I am keeping an eye on it just to make sure it's really is right.
If you compare Echo's pic with mine you'll see a few differences in the kit. The bar across the top on mine lacks the "wings" and the solenoid is mounted in the middle.
My biggest complaint was the directions not matching. Before and during the install I kept thinking about everything thing that was attached to the battery tray and the heater hoses that run right next to it-over heating the battery or rubbing a hole.. But once it was all in place there was clearance and through the miracle of black zip ties everything is secured and almost looks like it belongs there. The final point of no return involved a saw and cutting the air box off of the oem battery tray. But it all comes together.
02-20-2011, 07:49 AM
#9
JK Freak
Join Date: Feb 2008
Location: Madera , Ca
Posts: 715
Likes: 0
Received 0 Likes
on
0 Posts
my next venture is the dual battery ...I am running a winch, some lights and the ARB onboard air system....what the heck are you guys running with all those wires?????