
ACE Tire Carrier and Bumper Install
 03-24-2012, 05:09 PM
#1
JK Super Freak
Thread Starter
Join Date: Sep 2011
Location: Boston, MA
Posts: 1,012
Likes: 0
Received 0 Likes
on
0 Posts
So, the sexy thread you've all been waiting for. First off, some details. Ace ships these via freight, not UPS. When the freight guy showed up, we wound up chewing the fat, and eventually decided I would have no easy way to deal with a pallet, so he and I just unloaded it onto the sidewalk. The packaging itself wasn't sexy, but everything arived safe and sound. It comes in a few peices; the bumper itself, the spindle/carrier, the tailgate bracket, and the part that you actually mount the tire to, as well as a big bag of hardware. Also, another bottle opener. Damn you Adam, I wanted a t-shirt! Oh well. Also, I will give fair warning now, I only took pictures at the end. Deal with it, didn't realize I was making the first install thread!
So first off, a quick inspection shows the powdercoating held up to shipping. However I dinged the bumper on the sidewalk (sucker is still heavy, at least 100lbs), and the powder coating on the spindle/carrier had a few thin spots. Nothing to hold against ace, when you outsource powdercoating, it can happen. Anyways, as any jeeper would, I had a few cans of bedliner laying around, so I just gave the bumper and carrier a quick coating, and went to work wiring up to install the fogs.
I used the factory fogs, and the holes in the bumper were cut perfectly for them. I had to drill out the mounting holes a bit to fit the hardware ACE provides to mount with, but the factory fogs fit nicely and give some great light. I was super lazy with the install; since I wasn't using my own fogs in the front, I simply cut the factory fog connectors, spliced in the wire, and ran it through the frame and up over the heat shield covering the muffler. Looks clean, and I get some nice light in the rear when I throw the fog switch.
At this point, I need to give a huge shout out to Adam at ACE. They were in a rush to get out the first order of bumpers, and he got my out in such a rush, that he was actually hoping it would get to me after they had made an install video. Alas, the shipping people crushed Adams hopes and dreams, and so Adam gave me his cell number and told me I could call him as late as 10pm with any and all questions. He was so helpful, he actually called me at the end of the night just to see how the install went. If anything, one of the best things about ACE products are the people behind them; and Adam is awesome for taking the time to personally help me get the bumper installed.
Now, the install itself is straight forward, so I do have to slip in some critique. The actually tire carrier and bumper parts are all super heavy duty, and Adam tries to continue that with the hardware he provides with the kit. The nut for the spindle is 1 1/6" (HUGE!!!!) and the 4 bolts to attach the bumper to the frame are 15/16" (MASSIVE!!!) However, these big sizes mean having to buy extra sockets for the install. That aside, the install is pretty straight forward. Remove the factory bumper. Slide the new bumper inside the factory rails. Hand thread in the 4 bolts (the nuts are welded on, so very easy). Center the bumper to your liking, and torque everything down. There is no torque value, just because these bolts are so big, it would be next to impossible to shear. None the less, Adam instructed me to use a breaker bar to tighten, and when it felt like it wouldn't move any more, to stop trying to tighten. The backmost bolt on the passenger side, near the spindle bracket, is very tough to get to. I used a universal joint on a breaker bar to tighten it down, but its not easy. I might recommend just using a big ol adjustable wrench to tighten it.Quick side note, if you are wiring in fogs, install the fogs completely, wires and all, before installing the bumper, as you cannot access the wires once the bumper is on the jeep.
Next up, remove the stock tire carrier. very easy, 13mm wrench and remove all the bolts. Hold onto them as you will need to reuse these bolts. I think its a 25 Torx wrench to remove the screws on the back of the carrier to unclip the wire harness for the 3rd brake light. Also worth noting, there are no previsions for a 3rd brake light with this kit. Adam recommends going with something like the AEV 3rd brake light kit, I will most like go with this one. I tucked the wiring back into the door, and just folding the wire over the grommet. You want to pull the factory rubber stoppers, but I'm leaving them in until I get something to cover those holes, as its going to rain this weekend. To install the tailgate portion of the carrier, simple line up the holes and the ACE piece, with the heim joint holes on the right side of the tailgate. Secure with the factory hardware, save for the lower of the 2 left holes. In this hole, you will install the spacer as provides, with their bolt and washer. Do not tighten it too hard, as it will compress the rubber. I chose to just go a few twists past hand tight.
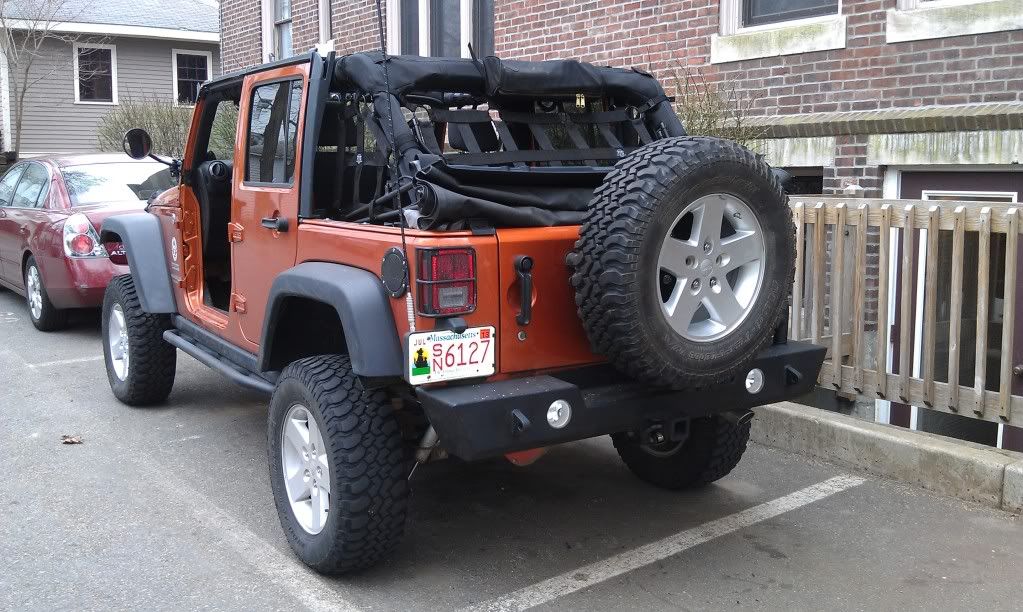
Next, I install the spindle portion. You just drop it in the hole in the bumper, get a ratchet with an extension, and tighten it up. Adam recommended 80 ft/lbs, which feels tight, but he assures me it will loosen up. Inbetween tightening it with a ratchet and getting my torque wrench, I hit the grease zerk with a good amount of grease. I just packed it in till I felt I couldn't push anymore. He said it doesn't need alot, but hey, the more the merrier. After its tightened down, I installed the tire carrier portion. Another ding here against ace, they provided 4 bolts, 4 nuts, 4 lock rings, but only 4 washers. I would have felt better with 8, and I just happened to have 4 washers laying around that fit, so I threw them on. With stock wheels with rubi tires on them, I had to go up one row from the bottom most set of mounting holes. It looks to be approximately at factory height. On the lowest rung, the tire itself comes into contact with the bumper; I'm sure with some lower backspaced wheels you could easily fit a 32 or 33 on the bottom row and gain a slightly lower than stock mounting position.
Last part, the heim joints. This is really my one and only complaint, and I did let Adam know, because theres a chance its just me. The concept is straight forward. Attach the heim joints on top of the mounting hole on both the carrier and the tailgate. Secure one side, then adjust until the the tailgate is only tight to close at the last 3 inches of shutting the door (due to the spacer). Two fold problem is a) at 80 ft/lbs on the spindle, there is alot of resistance so it's very very hard to feel that snug spot without loosening up the bolt first and b) the hardware for this part sucks. I sheered 2 bolts, and jammed a third and had to use a breaker bar just to finish tightening it. It's simple hardware, just 3/8" bolts with a washer and locknut. But they seem like cheap hardware, and just deformed the first time I attempted to install them, and consequently sheered and snapped in half when I went to remove them to re-adjust the length of the links. A quick stop to Home depot for some grade 5 bolts and nuts and lockrings quickly fixed the problem. I made my final adjustments, and now everything looks sexy. I adjusted the bottom link first, tested for fit, then adjusted the upper link to line up with the hole (I found it easiest to work on the links when the door was opened 90*). I found my top link was longer than the bottom one, but I'm assuming its due to the curve of the tailgate.
I 100% recommend this bumper/carrier to anyone and everyone. The minor issues I ran into are not real issues, and if anything the only downside to this bumper is the weight (150 lbs, according to ace). It's rock solid, looks great, zero rattles, and the install is a breeze. And for the price, you can't go wrong. You better order yours now before the price goes up!


So first off, a quick inspection shows the powdercoating held up to shipping. However I dinged the bumper on the sidewalk (sucker is still heavy, at least 100lbs), and the powder coating on the spindle/carrier had a few thin spots. Nothing to hold against ace, when you outsource powdercoating, it can happen. Anyways, as any jeeper would, I had a few cans of bedliner laying around, so I just gave the bumper and carrier a quick coating, and went to work wiring up to install the fogs.
I used the factory fogs, and the holes in the bumper were cut perfectly for them. I had to drill out the mounting holes a bit to fit the hardware ACE provides to mount with, but the factory fogs fit nicely and give some great light. I was super lazy with the install; since I wasn't using my own fogs in the front, I simply cut the factory fog connectors, spliced in the wire, and ran it through the frame and up over the heat shield covering the muffler. Looks clean, and I get some nice light in the rear when I throw the fog switch.
At this point, I need to give a huge shout out to Adam at ACE. They were in a rush to get out the first order of bumpers, and he got my out in such a rush, that he was actually hoping it would get to me after they had made an install video. Alas, the shipping people crushed Adams hopes and dreams, and so Adam gave me his cell number and told me I could call him as late as 10pm with any and all questions. He was so helpful, he actually called me at the end of the night just to see how the install went. If anything, one of the best things about ACE products are the people behind them; and Adam is awesome for taking the time to personally help me get the bumper installed.
Now, the install itself is straight forward, so I do have to slip in some critique. The actually tire carrier and bumper parts are all super heavy duty, and Adam tries to continue that with the hardware he provides with the kit. The nut for the spindle is 1 1/6" (HUGE!!!!) and the 4 bolts to attach the bumper to the frame are 15/16" (MASSIVE!!!) However, these big sizes mean having to buy extra sockets for the install. That aside, the install is pretty straight forward. Remove the factory bumper. Slide the new bumper inside the factory rails. Hand thread in the 4 bolts (the nuts are welded on, so very easy). Center the bumper to your liking, and torque everything down. There is no torque value, just because these bolts are so big, it would be next to impossible to shear. None the less, Adam instructed me to use a breaker bar to tighten, and when it felt like it wouldn't move any more, to stop trying to tighten. The backmost bolt on the passenger side, near the spindle bracket, is very tough to get to. I used a universal joint on a breaker bar to tighten it down, but its not easy. I might recommend just using a big ol adjustable wrench to tighten it.Quick side note, if you are wiring in fogs, install the fogs completely, wires and all, before installing the bumper, as you cannot access the wires once the bumper is on the jeep.
Next up, remove the stock tire carrier. very easy, 13mm wrench and remove all the bolts. Hold onto them as you will need to reuse these bolts. I think its a 25 Torx wrench to remove the screws on the back of the carrier to unclip the wire harness for the 3rd brake light. Also worth noting, there are no previsions for a 3rd brake light with this kit. Adam recommends going with something like the AEV 3rd brake light kit, I will most like go with this one. I tucked the wiring back into the door, and just folding the wire over the grommet. You want to pull the factory rubber stoppers, but I'm leaving them in until I get something to cover those holes, as its going to rain this weekend. To install the tailgate portion of the carrier, simple line up the holes and the ACE piece, with the heim joint holes on the right side of the tailgate. Secure with the factory hardware, save for the lower of the 2 left holes. In this hole, you will install the spacer as provides, with their bolt and washer. Do not tighten it too hard, as it will compress the rubber. I chose to just go a few twists past hand tight.
Next, I install the spindle portion. You just drop it in the hole in the bumper, get a ratchet with an extension, and tighten it up. Adam recommended 80 ft/lbs, which feels tight, but he assures me it will loosen up. Inbetween tightening it with a ratchet and getting my torque wrench, I hit the grease zerk with a good amount of grease. I just packed it in till I felt I couldn't push anymore. He said it doesn't need alot, but hey, the more the merrier. After its tightened down, I installed the tire carrier portion. Another ding here against ace, they provided 4 bolts, 4 nuts, 4 lock rings, but only 4 washers. I would have felt better with 8, and I just happened to have 4 washers laying around that fit, so I threw them on. With stock wheels with rubi tires on them, I had to go up one row from the bottom most set of mounting holes. It looks to be approximately at factory height. On the lowest rung, the tire itself comes into contact with the bumper; I'm sure with some lower backspaced wheels you could easily fit a 32 or 33 on the bottom row and gain a slightly lower than stock mounting position.
Last part, the heim joints. This is really my one and only complaint, and I did let Adam know, because theres a chance its just me. The concept is straight forward. Attach the heim joints on top of the mounting hole on both the carrier and the tailgate. Secure one side, then adjust until the the tailgate is only tight to close at the last 3 inches of shutting the door (due to the spacer). Two fold problem is a) at 80 ft/lbs on the spindle, there is alot of resistance so it's very very hard to feel that snug spot without loosening up the bolt first and b) the hardware for this part sucks. I sheered 2 bolts, and jammed a third and had to use a breaker bar just to finish tightening it. It's simple hardware, just 3/8" bolts with a washer and locknut. But they seem like cheap hardware, and just deformed the first time I attempted to install them, and consequently sheered and snapped in half when I went to remove them to re-adjust the length of the links. A quick stop to Home depot for some grade 5 bolts and nuts and lockrings quickly fixed the problem. I made my final adjustments, and now everything looks sexy. I adjusted the bottom link first, tested for fit, then adjusted the upper link to line up with the hole (I found it easiest to work on the links when the door was opened 90*). I found my top link was longer than the bottom one, but I'm assuming its due to the curve of the tailgate.
I 100% recommend this bumper/carrier to anyone and everyone. The minor issues I ran into are not real issues, and if anything the only downside to this bumper is the weight (150 lbs, according to ace). It's rock solid, looks great, zero rattles, and the install is a breeze. And for the price, you can't go wrong. You better order yours now before the price goes up!
Last edited by sneck; 03-24-2012 at 06:19 PM.
 03-25-2012, 04:14 AM
#3
JK Newbie
Join Date: Dec 2011
Location: Orange Park, FL
Posts: 25
Likes: 0
Received 0 Likes
on
0 Posts
Thanks for the write up, I ordered mine from American Four Wheeler on Friday. I am curious about the comment concerning having the drill the mounting holes to fit the hardware. I was thinking of using Rigid Duallys in the rear along with the new BDF mounts. Hoping this combo will work.
03-25-2012, 05:56 AM
#4
JK Super Freak
Thread Starter
Join Date: Sep 2011
Location: Boston, MA
Posts: 1,012
Likes: 0
Received 0 Likes
on
0 Posts
Thanks for the write up, I ordered mine from American Four Wheeler on Friday. I am curious about the comment concerning having the drill the mounting holes to fit the hardware. I was thinking of using Rigid Duallys in the rear along with the new BDF mounts. Hoping this combo will work.