
The Re-Build
 08-26-2024, 06:00 PM
#31
Super Moderator

Thread Starter
I test painted some interior trim because I happened to find "Gun Metal" in my hobby paint bin. I think I like it. There's a satin clear over the paint, I feel like a good clear coat adds significant protection.

And I cleaned the big dash cover. So many nooks and crannies. I took a pic in the middle for an idea of the amount of mud and dust that I'm finding back there.

I have to replace all the extra foams. You can see some up there on the defroster vent and there's more around the little vents at the corners of the dash. And the four circular vents. The tombstones are still there, I went to cut them out but the whole piece was so gross I got sidetracked into cleaning it. I also went a little nuts and replaced all the HVAC component screws with stainless. A bunch of them were rusty and it was only like 8 bucks to buy enough to swap them all out. They are #8 x 5/8" for posterity. I also just love stainless hardware so it makes me happy knowing they're in there.
Tomorrow I'm calling it on the red paint cure and I'll bolt those steel bars in. I'm waiting on the heater inlet and outlet hoses, after getting them off the old heater core they were sloppy loose around the new fittings. Actually now that I think about it maybe I'll clean up those hose clamps. The heater and evap housings use little metal clips, those were all rusted so I cleaned them up and cold blued them. I could do the same for the hose clamps. I also got a little weirded out at the new heater core, the inlet and outlet lines turned pretty freely where they joined the core. I filled it up and shook it every which way, but no drips. So I guess that's good?
One last thing, I had a CB radio installed, the one where everything is done on the handset and the radio is just a box hidden out of sight. I'm thinking of just scrapping that for handheld radios? I did a group drive in the Miata and someone lent me one for the ride and it was great. That's one less connection, more room for all the other garbage I've plugged in over the years.
And I cleaned the big dash cover. So many nooks and crannies. I took a pic in the middle for an idea of the amount of mud and dust that I'm finding back there.
I have to replace all the extra foams. You can see some up there on the defroster vent and there's more around the little vents at the corners of the dash. And the four circular vents. The tombstones are still there, I went to cut them out but the whole piece was so gross I got sidetracked into cleaning it. I also went a little nuts and replaced all the HVAC component screws with stainless. A bunch of them were rusty and it was only like 8 bucks to buy enough to swap them all out. They are #8 x 5/8" for posterity. I also just love stainless hardware so it makes me happy knowing they're in there.
Tomorrow I'm calling it on the red paint cure and I'll bolt those steel bars in. I'm waiting on the heater inlet and outlet hoses, after getting them off the old heater core they were sloppy loose around the new fittings. Actually now that I think about it maybe I'll clean up those hose clamps. The heater and evap housings use little metal clips, those were all rusted so I cleaned them up and cold blued them. I could do the same for the hose clamps. I also got a little weirded out at the new heater core, the inlet and outlet lines turned pretty freely where they joined the core. I filled it up and shook it every which way, but no drips. So I guess that's good?
One last thing, I had a CB radio installed, the one where everything is done on the handset and the radio is just a box hidden out of sight. I'm thinking of just scrapping that for handheld radios? I did a group drive in the Miata and someone lent me one for the ride and it was great. That's one less connection, more room for all the other garbage I've plugged in over the years.
 08-27-2024, 09:25 AM
#32
Super Moderator
Thread Starter
I'm having a hard time deciding this morning:


The light one is the stock silver. Then there's a light gunmetal and a dark gunmetal. They look different outside and inside and it's tough to choose because I have no idea how they'll look in the Jeep. It'll probably look like both depending on the season and the state of the roof and doors.
Super happy with this coming together though:
08-27-2024, 12:23 PM
#34
Super Moderator
Thread Starter
Agreed. That's the look I'm going for but here's what I've learned in the last few hours - These are both metallic colors. The contrast from highlights to darks is huge. The same part will be blinding silver on a bright highlight and almost black on the shadowy side. The vent rings were a poor test piece because I think they accentuate the darks, especially inside. I mocked them up in the dash for a better look:


That last pic is kinda what tipped me over the edge. I just like the color and I think it's subtle and flashy at the same time. The light gunmetal on the right looks almost like the stock silver in sunlight. So I went with the darker color. Honestly, if I hate it, it's easy enough to pull the trim and repaint them. The Gun Metal in the above photos was Tamiya PS-23 which is for Lexan RC car bodies, but it's what I had on hand. I picked up two cans of the TS-38 Gun Metal which is for everything-besides-Lexan and the color seems to be a hint lighter than the PS can. Here are all the parts done inside:

I decided to do the steering wheel spoke trim to match, which was gloss black with the Guardian Designs wheel. This is the same color in the sunlight:

Even this picture doesn't show how bright, sparkling silver it is. So I'm happy with it for now, if nothing else it'll be fun. While they cure I'll clean out the rest of the vents and start the tweeter project. Plenty of hours left in the day. Work has been blissfully slow so I'm dumping all my spare time into the Jeep.
That last pic is kinda what tipped me over the edge. I just like the color and I think it's subtle and flashy at the same time. The light gunmetal on the right looks almost like the stock silver in sunlight. So I went with the darker color. Honestly, if I hate it, it's easy enough to pull the trim and repaint them. The Gun Metal in the above photos was Tamiya PS-23 which is for Lexan RC car bodies, but it's what I had on hand. I picked up two cans of the TS-38 Gun Metal which is for everything-besides-Lexan and the color seems to be a hint lighter than the PS can. Here are all the parts done inside:
I decided to do the steering wheel spoke trim to match, which was gloss black with the Guardian Designs wheel. This is the same color in the sunlight:
Even this picture doesn't show how bright, sparkling silver it is. So I'm happy with it for now, if nothing else it'll be fun. While they cure I'll clean out the rest of the vents and start the tweeter project. Plenty of hours left in the day. Work has been blissfully slow so I'm dumping all my spare time into the Jeep.
08-27-2024, 06:20 PM
#35
Super Moderator
Thread Starter
Weeeell I don't know how this happened but I opened up the gauge cluster and pulled out these chrome rings.


I've read that if I soak these in Easy Off oven cleaner for a day the chrome will come off. I'm going to try that. Then I think I'll just paint them to match the rest? Except I might do the tach ring in red, I like a little asymmetry. I've also been looking at gauge faces, there are a couple of options I like but man are they spendy. I wonder if I can pull the chrome rings off the HVAC controls..
I've read that if I soak these in Easy Off oven cleaner for a day the chrome will come off. I'm going to try that. Then I think I'll just paint them to match the rest? Except I might do the tach ring in red, I like a little asymmetry. I've also been looking at gauge faces, there are a couple of options I like but man are they spendy. I wonder if I can pull the chrome rings off the HVAC controls..

The following users liked this post:
pc1p (08-28-2024)
 08-30-2024, 02:52 PM
#38
Super Moderator
Thread Starter
I tried the Easy Off today. It was a mixed bag. The gauge trim ring chrome dissolved almost on contact and left a beautiful gloss black finish. It looked so good I decided not to mess with it.

The HVAC Trim rings have been sitting in the goop for hours with no apparent effect. I'll give them a day and then just scuff them up and paint.
I cut out the first tweeter pod.

Pretty easy with a Dremel and a drywall bit. There is a bit of structure behind it that I wanted to leave so it got a little sloppy around there but it will all get covered up. In the process of designing the bracket now. I'd like something that I can unscrew from the top to remove the tweeter without a hassle. There will be an inner bracket and the cover/tweeter mount to accomplish that. It'll be easier to explain with pictures as I get further along. Everything will be 3D printed. The machine is crankin along right now...
And I got a fit template done. Looks like it's going to work!

Edit: One more step:

The cover is coming out so easily I briefly thought about just gluing it in. There's access to the back of the tweeter if the passenger airbag trim is removed, which really isn't all that hard. I'm also considering how difficult it will be to get that rear screw out with the dash in place. Still, As soon as the final cover is done I'll start on the inner bracket that will bolt to the dash and receive these three screws. We'll see where it lands.
The HVAC Trim rings have been sitting in the goop for hours with no apparent effect. I'll give them a day and then just scuff them up and paint.
I cut out the first tweeter pod.
Pretty easy with a Dremel and a drywall bit. There is a bit of structure behind it that I wanted to leave so it got a little sloppy around there but it will all get covered up. In the process of designing the bracket now. I'd like something that I can unscrew from the top to remove the tweeter without a hassle. There will be an inner bracket and the cover/tweeter mount to accomplish that. It'll be easier to explain with pictures as I get further along. Everything will be 3D printed. The machine is crankin along right now...
And I got a fit template done. Looks like it's going to work!
Edit: One more step:
The cover is coming out so easily I briefly thought about just gluing it in. There's access to the back of the tweeter if the passenger airbag trim is removed, which really isn't all that hard. I'm also considering how difficult it will be to get that rear screw out with the dash in place. Still, As soon as the final cover is done I'll start on the inner bracket that will bolt to the dash and receive these three screws. We'll see where it lands.
Last edited by icrashbikes; 08-30-2024 at 05:46 PM.
The following users liked this post:
pc1p (08-31-2024)
08-31-2024, 12:35 PM
#39
Super Moderator
Thread Starter
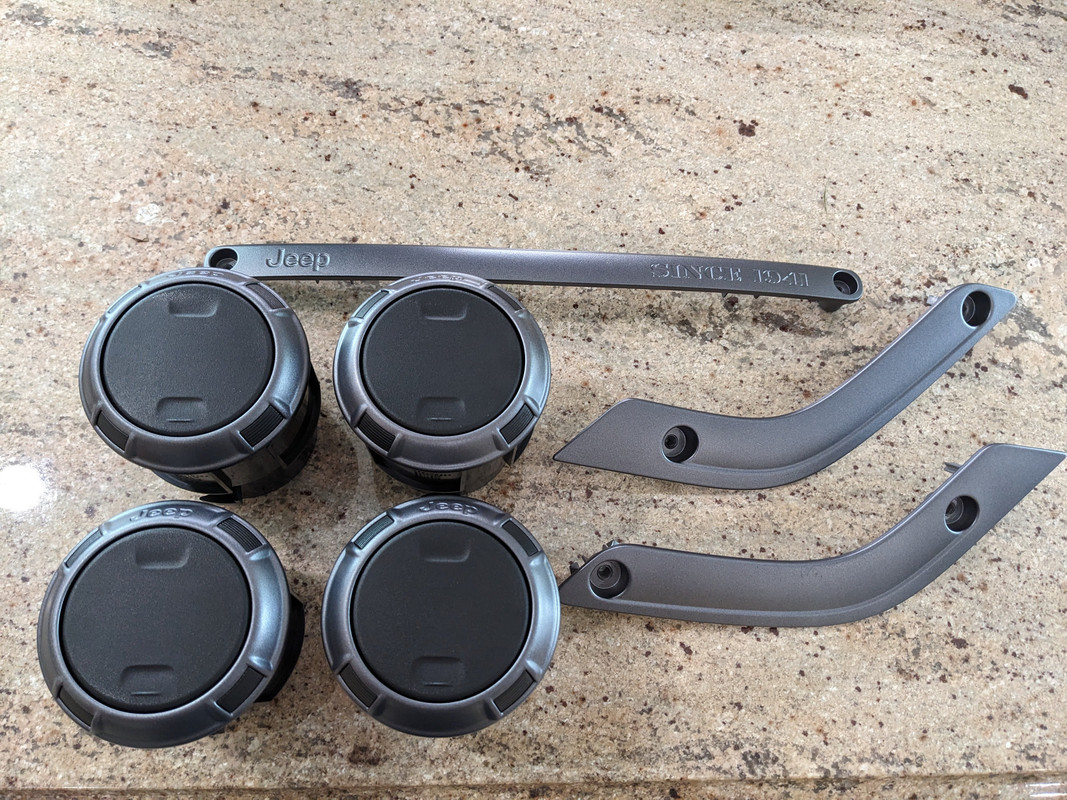
Yeah the HVAC knobs sat in Easy Off all night with no effect. So I sanded and painted them.

The hopefully final version of the tweeter bracket is on the printer now, that's all looking good. Once that's done I can get the dash back together and into place.
The hopefully final version of the tweeter bracket is on the printer now, that's all looking good. Once that's done I can get the dash back together and into place.
