
Selectable Battery/Accessory Power Source
 08-04-2011, 12:25 AM
#1
JK Jedi Master
Thread Starter
On my 2008 JK, there are two power outlets on the bottom of the center stack.
The left outlet is #1, fuse #M6, wired to Accessory power.
The outlet on the right is #3, fuse #M36, always powered.
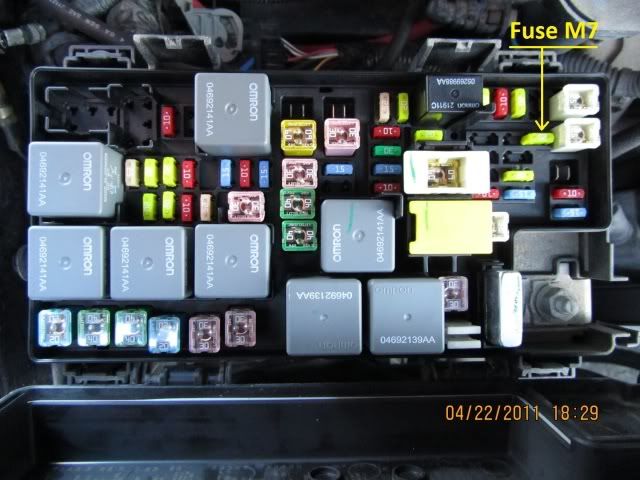
I noticed in the TIPM fuse box, there is a fuse #M7, for outlet #2, selectively powered by the battery and accessory circuits.
I also noticed my JK does not have outlet #2, but the 20 amp fuse is in place, in the 2 position socket.
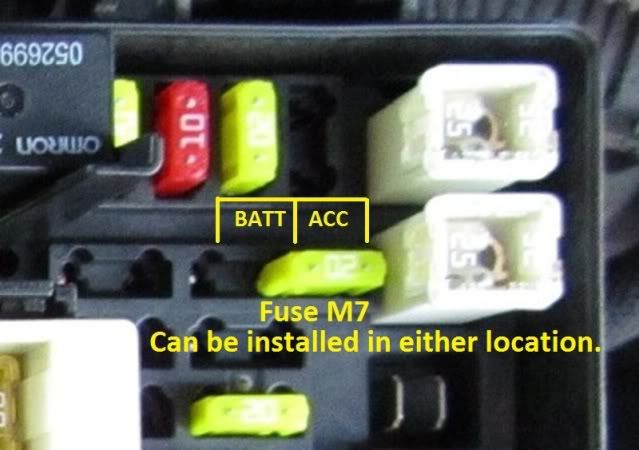
Here is a picture of Fuse M7's location, and a close-up of where to position the fuse for accessory power and battery power.
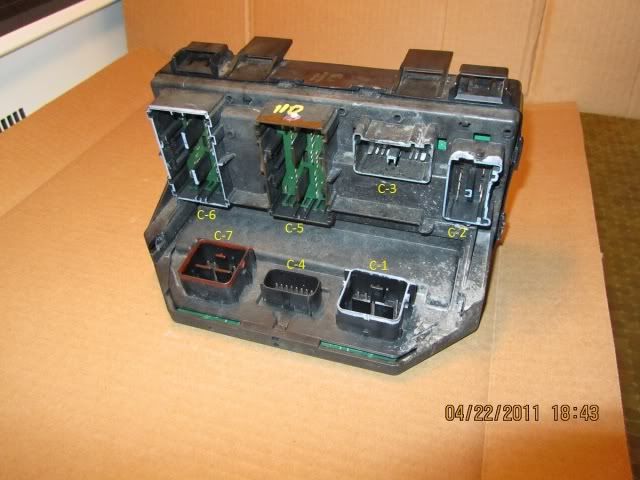
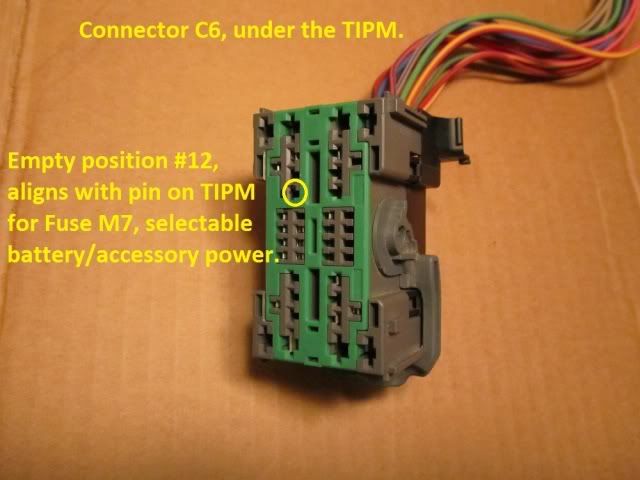
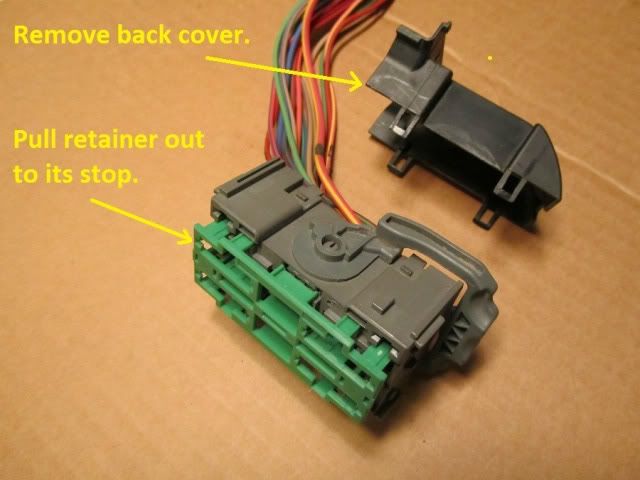
The center pin socket for M7 goes to pin #12 in the TIPM connector C6, shown in the next picture.
The dealer didn't have a wire with the proper terminal to fit in TIPM wire harness connector C6, so I went to a junk yard, found a late model Jeep, (might have been a Patriot), and pulled a 12 AWG wire, with the correct terminal end. For the 20 amp fuse, I wouldn't use a wire smaller than 16 AWG, to be on the safe side.
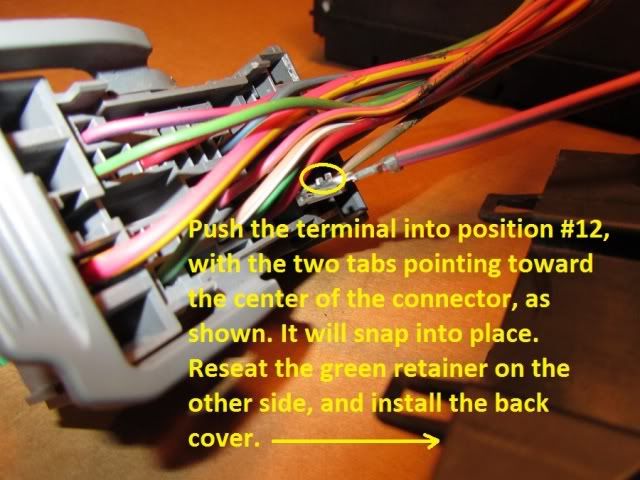
Here is a picture of the terminal end. It has to be exactly like this, or it won't work.

Once I got the wire home, it was a matter of about 20 minutes to install it in location #12 of TIPM connector C6 wire harness.
The first thing I did was disconnect the battery negative terminal.
If you want a built in selectable battery/accessory power source, protected by a 20 amp fuse, consider taking advantage of the unused M7 fuse in your TIPM. Don't do this if you are not comfortable raising the TIPM, and unplugging the connector.
The left outlet is #1, fuse #M6, wired to Accessory power.
The outlet on the right is #3, fuse #M36, always powered.
I noticed in the TIPM fuse box, there is a fuse #M7, for outlet #2, selectively powered by the battery and accessory circuits.
I also noticed my JK does not have outlet #2, but the 20 amp fuse is in place, in the 2 position socket.
Here is a picture of Fuse M7's location, and a close-up of where to position the fuse for accessory power and battery power.
The center pin socket for M7 goes to pin #12 in the TIPM connector C6, shown in the next picture.
The dealer didn't have a wire with the proper terminal to fit in TIPM wire harness connector C6, so I went to a junk yard, found a late model Jeep, (might have been a Patriot), and pulled a 12 AWG wire, with the correct terminal end. For the 20 amp fuse, I wouldn't use a wire smaller than 16 AWG, to be on the safe side.
Here is a picture of the terminal end. It has to be exactly like this, or it won't work.
Once I got the wire home, it was a matter of about 20 minutes to install it in location #12 of TIPM connector C6 wire harness.
The first thing I did was disconnect the battery negative terminal.
If you want a built in selectable battery/accessory power source, protected by a 20 amp fuse, consider taking advantage of the unused M7 fuse in your TIPM. Don't do this if you are not comfortable raising the TIPM, and unplugging the connector.
 08-04-2011, 06:18 AM
#3
JK Jedi Master
Thread Starter
I don't know. Things like this are done over several weeks sometimes, when there are small lulls between things I have to do. That wire sat on the bench for quite a while after I acquired it on the way to work on something else.
01-29-2012, 04:10 PM
#5
JK Enthusiast
Join Date: Dec 2010
Location: Bel Air, MD
Posts: 252
Likes: 0
Received 0 Likes
on
0 Posts
Thanks for the great write up. I just used it to install my airhorn. I did it on a 2011 and there were a few changes I had to make. The M7 selectable is already in use on mine so I switched to the position directly to the right of the #12 in your photo. Then I added a 10amp fuze to the M9 position to the left of the M7(for seat heater) and ran a accessory only line for the horn.
Thanks for the write up!!
Thanks for the write up!!
07-31-2014, 10:39 AM
#6
JK Newbie

Join Date: Mar 2014
Location: Cadillac, MI
Posts: 1
Likes: 0
Received 0 Likes
on
0 Posts
I found that the terminal needed is made by Lear #1326030-8. I found it in the kent-moore terminal kit J-38125, Tray 17. Your local dealership should have it. I work at a GM store and we had it in our kit.
08-29-2020, 03:10 PM
#7
JK Newbie

Great write up. I followed it to install a rear 12v receptacle in my 08 JKU.
I got a C6 plug for 15.00 plus shipping from MAK's TIPM rebuilders. The pig tail were long enough to work with and I have lots of pins for future use.
I have two questions:
Where did you find a pin out chart to know pin 12 was what was needed? I'd like to know in case I plan to expand and add an additional circuit this way.
I ran my wire to the rear through the firewall up high right then down the right side of the dash then followed the harness to the cargo area. I'm somewhat happy with it but think there is a better way to get through the firewall. How would you have done it?
The following users liked this post:
mynameisjeff (11-23-2023)
Trending Topics
08-29-2020, 05:45 PM
#8
JK Jedi Master
Thread Starter
Great write up. I followed it to install a rear 12v receptacle in my 08 JKU.
I got a C6 plug for 15.00 plus shipping from MAK's TIPM rebuilders. The pig tail were long enough to work with and I have lots of pins for future use.
I have two questions:
Where did you find a pin out chart to know pin 12 was what was needed? I'd like to know in case I plan to expand and add an additional circuit this way.
I ran my wire to the rear through the firewall up high right then down the right side of the dash then followed the harness to the cargo area. I'm somewhat happy with it but think there is a better way to get through the firewall. How would you have done it?
I got a C6 plug for 15.00 plus shipping from MAK's TIPM rebuilders. The pig tail were long enough to work with and I have lots of pins for future use.
I have two questions:
Where did you find a pin out chart to know pin 12 was what was needed? I'd like to know in case I plan to expand and add an additional circuit this way.
I ran my wire to the rear through the firewall up high right then down the right side of the dash then followed the harness to the cargo area. I'm somewhat happy with it but think there is a better way to get through the firewall. How would you have done it?
I have passed wires through the firewall at the upper passenger's side corner under the cowl, and also through other wire bundle holes at lower locations on the firewall.
I did the same wire additions to make use of the two heated seat fuses. Search my threads to find that write-up.