
Pillar gauge pods
 06-16-2009, 11:33 AM
#21
JK Enthusiast

Join Date: May 2009
Location: Los Angeles, CA
Posts: 318
Likes: 0
Received 0 Likes
on
0 Posts
Well, those are fine, but I kinda like the built-in look.
Since I have access to a 3-D printer, I'm making my own. I will print it in ABS, then use acetone to smooth it out (it melts the ABS just a bit and gets rid of the rough surface from the print process) and then use several primer coats and finish with a spray paint. Should turn out OK, at least I hope!
I cooked the initial file up in 10 minutes, without having the piece with me. The hole is sized, but I am going to remove my panel from the JK and bring it in and then finalize all my measurements (and add the retention features built into the panel), then work on the curvature and aim of the face of the dial and the look of all the surfaces (it looks a little funky right now). Shouldn't be to hard since I do this all day long, haha...

 07-10-2009, 03:34 PM
#24
JK Super Freak
Join Date: Jun 2007
Location: MD DC area
Posts: 1,461
Likes: 0
Received 0 Likes
on
0 Posts
Well, those are fine, but I kinda like the built-in look.
Since I have access to a 3-D printer, I'm making my own. I will print it in ABS, then use acetone to smooth it out (it melts the ABS just a bit and gets rid of the rough surface from the print process) and then use several primer coats and finish with a spray paint. Should turn out OK, at least I hope!
I cooked the initial file up in 10 minutes, without having the piece with me. The hole is sized, but I am going to remove my panel from the JK and bring it in and then finalize all my measurements (and add the retention features built into the panel), then work on the curvature and aim of the face of the dial and the look of all the surfaces (it looks a little funky right now). Shouldn't be to hard since I do this all day long, haha...
Since I have access to a 3-D printer, I'm making my own. I will print it in ABS, then use acetone to smooth it out (it melts the ABS just a bit and gets rid of the rough surface from the print process) and then use several primer coats and finish with a spray paint. Should turn out OK, at least I hope!
I cooked the initial file up in 10 minutes, without having the piece with me. The hole is sized, but I am going to remove my panel from the JK and bring it in and then finalize all my measurements (and add the retention features built into the panel), then work on the curvature and aim of the face of the dial and the look of all the surfaces (it looks a little funky right now). Shouldn't be to hard since I do this all day long, haha...
07-10-2009, 04:05 PM
#25
JK Enthusiast
Join Date: May 2009
Location: Los Angeles, CA
Posts: 318
Likes: 0
Received 0 Likes
on
0 Posts
Ya know, dude...I got kinda busy and haven't finished it. I have adjusted the dial to face to the right now, but have not had a chance to pull off my panel and bring it in to match the dimensions up. I might do this on Sunday.
I am going to TRY and do this in one shot without building a prototype so I can use as little material as possible on the machine (it's not exactly cheap!). So I wanna copy the panel exactly before I print it...ya know...I also have to guesstimate the angles while sitting in the JK. I also wanna get the gauge to figure out the mounting, but I gotta return my instatrunk first before ordering the Aeroforce (damaged by 4wp during shipping and won't work with my soft top boot).
It shouldn't take a lot more effort, sanding/painting will be the worst part by far (actually, smoothing it out will be worse probably - it takes a while of rubbing with an acetone soaked cloth to get the plastic to slowly melt on the surface and make it smooth)!
07-13-2009, 11:57 AM
#27
JK Enthusiast
Join Date: May 2009
Location: Los Angeles, CA
Posts: 318
Likes: 0
Received 0 Likes
on
0 Posts
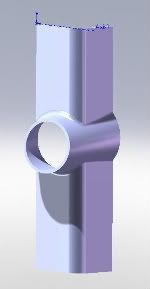
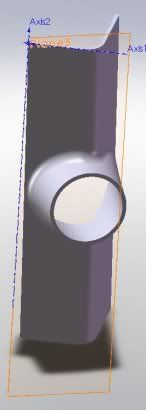
Haha, I was way off on my shape estimates that I did without bringing the panel inside. But it's all fixed now. This is the final shape:
Just need to add the clip mounts on the back...I'll probably print it tonight and should be able to test fit tomorrow...
Just need to add the clip mounts on the back...I'll probably print it tonight and should be able to test fit tomorrow...


 07-14-2009, 08:40 AM
#30
JK Enthusiast
Join Date: May 2009
Location: Los Angeles, CA
Posts: 318
Likes: 0
Received 0 Likes
on
0 Posts
Sorry dudes, I can't make extras...I've been working on it at lunch time and in the evening, and my boss is a cool cat and OK with me using it for stuff once in a while, but I can't do anything more than that really...
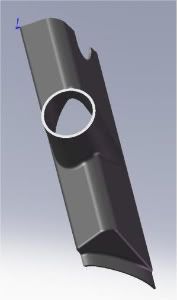
Here she is being born:
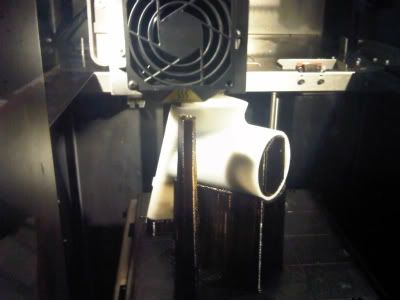
I made the opening for the gauge extra long, because I don't have the gauge yet...and didn't know how much room is needed in the back. If it's too long I will cut it with the saw. If there are LOTS of adjustments needed then I'll have to make a 2nd one but that will most definitely be it...
Here she is being born:
I made the opening for the gauge extra long, because I don't have the gauge yet...and didn't know how much room is needed in the back. If it's too long I will cut it with the saw. If there are LOTS of adjustments needed then I'll have to make a 2nd one but that will most definitely be it...