
PIAA fogs, need help with install!!!!!!!
 08-11-2010, 09:00 AM
#1
JK Enthusiast
Thread Starter
Join Date: Feb 2010
Location: Quebec
Posts: 445
Likes: 0
Received 0 Likes
on
0 Posts
I got the PIAA 520i fog lights and i'm trying to figure out where can i tap the white wire with red dots (switch power wire) to. i tried searching but all i got was a vague write up that might have said tap it to the high beam wires or the factory fog light wiring (i don't have factory fog lights FYI) i'm not sure.
i'm not experienced much in electrical wiring but i've read as much as i could find on the subject and i think i got it.
also how can i run my switch wire under the center console so it can look something like this
do i have to remove the center panel or can the wire fit under somehow.

image borrowed from lakeview's very helpful write up, https://www.jk-forum.com/forums/show...highlight=piaa
i'm not experienced much in electrical wiring but i've read as much as i could find on the subject and i think i got it.
also how can i run my switch wire under the center console so it can look something like this
do i have to remove the center panel or can the wire fit under somehow.
image borrowed from lakeview's very helpful write up, https://www.jk-forum.com/forums/show...highlight=piaa
 08-11-2010, 09:27 AM
#2
JK Freak
Join Date: Apr 2010
Location: Eastvale, ca
Posts: 514
Likes: 0
Received 0 Likes
on
0 Posts
If you have a three-pronged switch, the first tab goes to a powered wire. You can tap into the cigarette lighter's positive wire. This will give your switch power only while the ignition is ON. If you want the lights to stay on with the ignition OFF, then tap into the right power outlet's power wire. The switch will only draw minimal amps, so it's safe to tap into these wires ONLY if you are using a relay. The middle, longest tab will go to your RELAY. The last goes to a ground. There are plenty of ground terminals in the driver and passenger footwells. they are the black nuts with a bunch of wires terminating at them.
08-11-2010, 09:30 AM
#3

I tapped the windshield wiper fuse for 2 of my PIAA sets. I simply pulled the fuse, stuck the wire in the lead side, and slid the fuse back in. It's not the most elegant solution, but it gets the job done and is just as safe and secure as a fuse tap if done properly.
The reason I chose that circuit is that it's ignition controlled, and not on too often (not that the switch circuit draws much power).
As far as running the switch there, your best bet is to pull off the lower dash cover (below the A/C, pops off), upper dash cover (also pops off above radio), and loosen the 4 screws holding the dash surround. Then just pull the surround away, giving you room to work, but not disconnecting anything. Run your wires through the foamed hole behind the passenger side dash side panel (the panel right at the door jamb), behind/under the glovebox, and down the side of the dash to your preferred spot. Another tip, the glovebox swings down and out if you pinch the sides to clear the stop tabs.
Good luck!
08-11-2010, 09:33 AM
#4
If you have a three-pronged switch, the first tab goes to a powered wire. You can tap into the cigarette lighter's positive wire. This will give your switch power only while the ignition is ON. If you want the lights to stay on with the ignition OFF, then tap into the right power outlet's power wire. The switch will only draw minimal amps, so it's safe to tap into these wires ONLY if you are using a relay. The middle, longest tab will go to your RELAY. The last goes to a ground. There are plenty of ground terminals in the driver and passenger footwells. they are the black nuts with a bunch of wires terminating at them.
Yes, you can tap the cig lighter, but since I know the end of your wire is already close to the battery with the others, it's better to tap at the underhood fuse panel.
08-11-2010, 09:59 AM
#5
JK Freak
Join Date: Sep 2009
Location: Kirkland, WA
Posts: 894
Likes: 0
Received 0 Likes
on
0 Posts
I used my DRL's (daytime running lights). This way power is only activated when I turn my headlights on or one click forward. Here's the wire >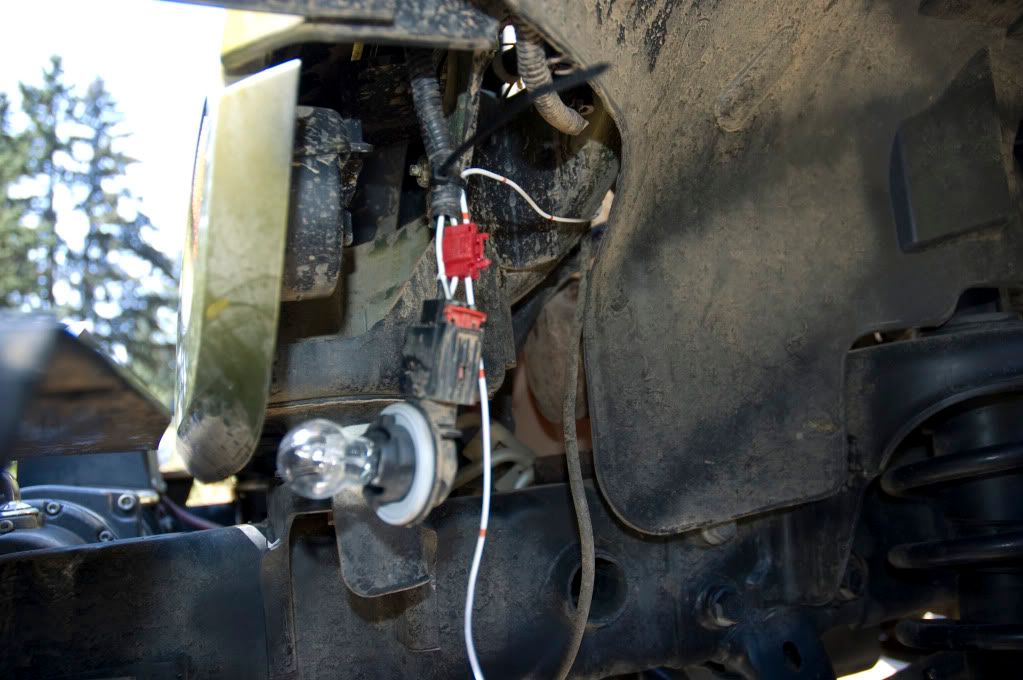
That's the bulb in the grill. I also installed 2 other sets of lights and you can retap that same wire as necessary with future installs.
That's the bulb in the grill. I also installed 2 other sets of lights and you can retap that same wire as necessary with future installs.
Trending Topics
08-11-2010, 12:23 PM
#8
08-11-2010, 01:08 PM
#9
JK Enthusiast
Thread Starter
Join Date: Feb 2010
Location: Quebec
Posts: 445
Likes: 0
Received 0 Likes
on
0 Posts
 08-12-2010, 02:18 PM
#10
JK Enthusiast
Thread Starter
Join Date: Feb 2010
Location: Quebec
Posts: 445
Likes: 0
Received 0 Likes
on
0 Posts
so finally all is installed, and i had time to take some pics.
i'll even attempt a shotty write-up, nothing too too detailed but hopefully enough to help someone else doing a similar install.
step one: hooked up my PIAA fogs to the bar using PIAA 2.5" light brackets with tabs.
bolted in the lights and let their wires dangle.
The wires in this pic are wrapped in a plastic tubing with electro tap to weather proof the connections.

step two ran the connection wires that plug into the lights from the battery area to the front grill. i then tapped the switch wire to the (+) wire (red) of the head light wires on the passenger side with the supplied wire crimper (i didn't take a pic but there's one on this page posted by runit3).

step three i then tie wrapped the relay to an already made hole on the passenger side under the hood

as well as attached power cables to the battery

and the ground to one of the two ground screws on the passenger side (i chose the one on the right).

step four i then passed the switch wire through the hole already made through the firewall on the passenger side. i wrapped the wires in more of that plastic tubbing.
to do this you must remove the air vent by twisting and pulling it towards you.
then simply press the side plastic panel with you're fingers.


step five pull out the glove box by pressing in the side tabs till they go around the edges . i then taped and tie-wrapped the excess switch wire to the mesh grill to keep it out of the way of the glove box.

step six i ran the switch wire under the center console and stuck it by the air dial.
a great instructional vid on how to remove your dash can be found on youtube,
http://www.youtube.com/watch?v=bebj-0ynPsg


and the final product


so anyways thx to all those who posted on this thread and others, you were all a BIG help.
a lot of the steps i took were done by you guys and helped the process.
i'll even attempt a shotty write-up, nothing too too detailed but hopefully enough to help someone else doing a similar install.
step one: hooked up my PIAA fogs to the bar using PIAA 2.5" light brackets with tabs.
bolted in the lights and let their wires dangle.
The wires in this pic are wrapped in a plastic tubing with electro tap to weather proof the connections.
step two ran the connection wires that plug into the lights from the battery area to the front grill. i then tapped the switch wire to the (+) wire (red) of the head light wires on the passenger side with the supplied wire crimper (i didn't take a pic but there's one on this page posted by runit3).
step three i then tie wrapped the relay to an already made hole on the passenger side under the hood
as well as attached power cables to the battery
and the ground to one of the two ground screws on the passenger side (i chose the one on the right).
step four i then passed the switch wire through the hole already made through the firewall on the passenger side. i wrapped the wires in more of that plastic tubbing.
to do this you must remove the air vent by twisting and pulling it towards you.
then simply press the side plastic panel with you're fingers.
step five pull out the glove box by pressing in the side tabs till they go around the edges . i then taped and tie-wrapped the excess switch wire to the mesh grill to keep it out of the way of the glove box.
step six i ran the switch wire under the center console and stuck it by the air dial.
a great instructional vid on how to remove your dash can be found on youtube,
http://www.youtube.com/watch?v=bebj-0ynPsg
and the final product
so anyways thx to all those who posted on this thread and others, you were all a BIG help.
a lot of the steps i took were done by you guys and helped the process.