My Full DVD Monitor Write up part 1
 02-27-2007, 03:37 PM
#1
JK Enthusiast
Thread Starter
Join Date: Feb 2007
Location: Edison NJ
Posts: 456
Likes: 0
Received 0 Likes
on
0 Posts
Please Read This First- I resume no responsibility if you follow what I did. If your car blows up, catches on fire, radio stops working- ANYTHING That goes wrong with YOUR JEEP - Its on YOU!!! Not to be mean, but trying to share what I did.
Ok Now that that's out of the way have a look!!
Things I bought
1- Any Monitor of your choice 12v
1- Radio Shack Power outlet- $12
1 6ft Video RCA- Yellow
Double sided foam tape
Velcro
Zip Ties
Butt connectors
Wire Taps
I used my spare Sirius S50 mount to mount monitor
Tools I used:
philips scew driver
wire stripper
wire crimper
utlilty knife
soldiering iron
pry tool
7mm socket and wratchet
scissors
For this write up the Pics I had were for dismantling the monitor to make it smaller but replaced it w a 7 inch monitor from ebay for $80
Last edited by DBB888; 12-28-2009 at 03:37 PM.
 02-27-2007, 03:38 PM
#2
JK Enthusiast
Thread Starter
Join Date: Feb 2007
Location: Edison NJ
Posts: 456
Likes: 0
Received 0 Likes
on
0 Posts
This part is the important part for wiring it up
Next I took my pry tool and put to on the rear of the radio top housing
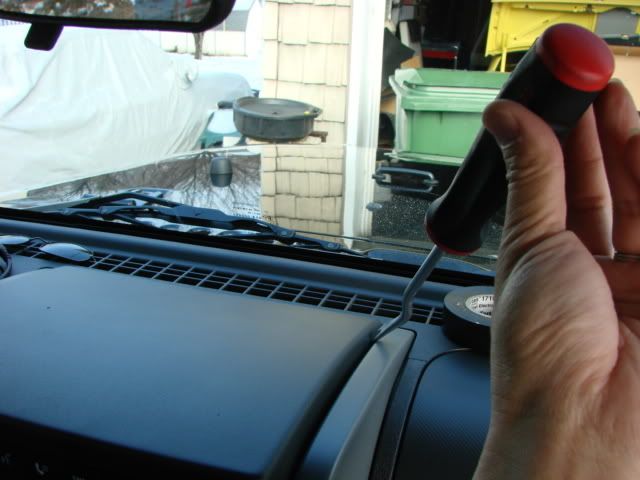
And pried off the bottom cover from the top corners
Next I removed the 4 7mm screws and pulled gently from each side- 2 on top 2 in middle and 2 on the bottom
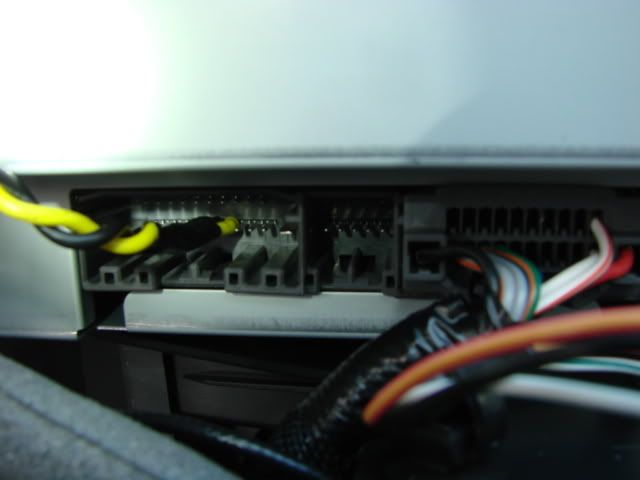
Here I took 2 wires to connect to the video wires. I did this for 2 reasons.
1. I had no female plug to use
2. I can use the wire itself as a plug and its shielded
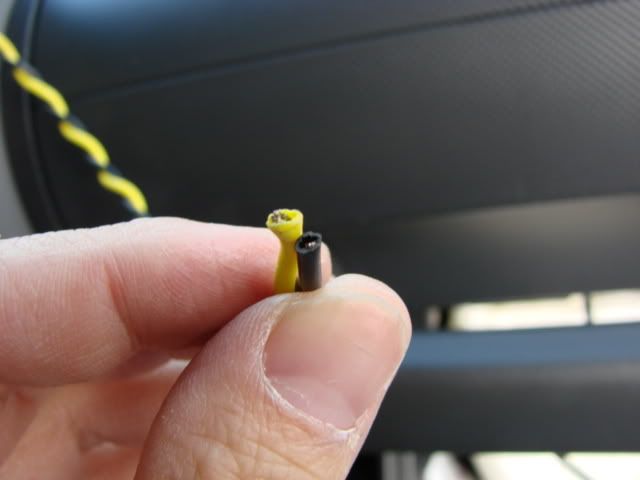
This is important!!
Video is pin 6
Shield ground is pin7
In the picture I have it on 5 for video and 6 for shield. I used the spec sheet from Nitro and saw it wasn’t right and found another site that had the right info
REMEMBER
PIN-6 Center RCA WIRE
PIN-7 OUTER SHIELD
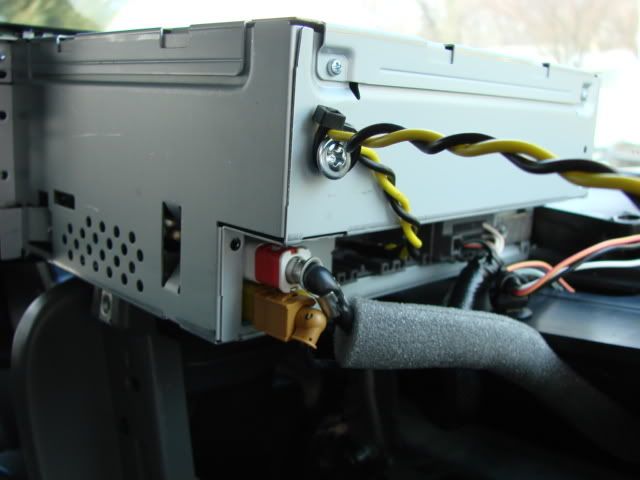
Next I put a screw in the corner hole and zip tied the wire to it so it wouldn’t move.
This way I made sure no matter how the radio was to move, the wire would stay rigid into the radio
This the RCA Wire I stripped and the thin center wire is Video (PIN 6) and the thick outer wire is the shield (PIN 7)

I then soldiered the wires and electric taped them- Black wire was for the ground shield (Pin7)
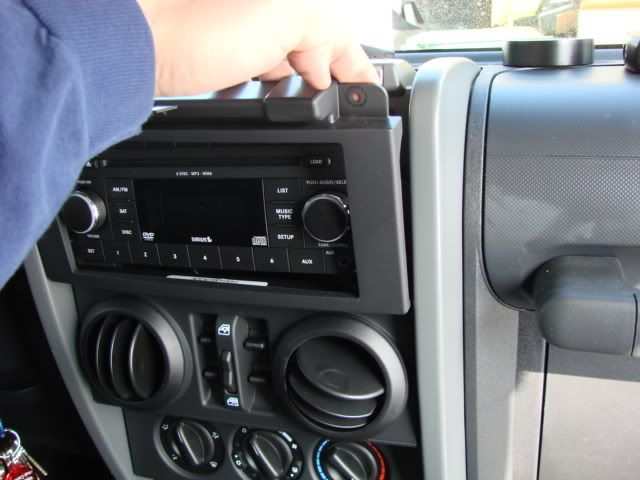
I then popped out the side panel to run the wires
Next I took the house power plug and cut the outlet plug off. I needed the extra length for the cigarette plug. I used the -house plug wire- into the top housing and ran it across the right side windshield along with the video wire.
The house wire reached to the side panel and from there, I cut the plug end of the cigarette power wire. I then butt connected the wires together.
I remembered to look at the marks on the wire- there are white stripes on one side of the wires and solid on the other- match them

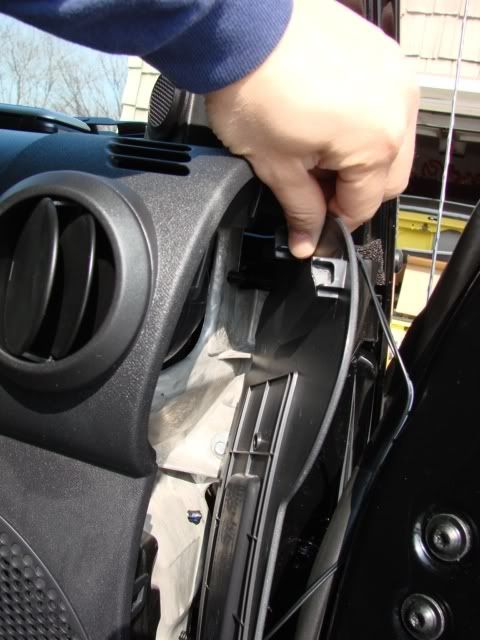
Next I removed the glove box- I opened it up and pressed the sides in and it came right out.
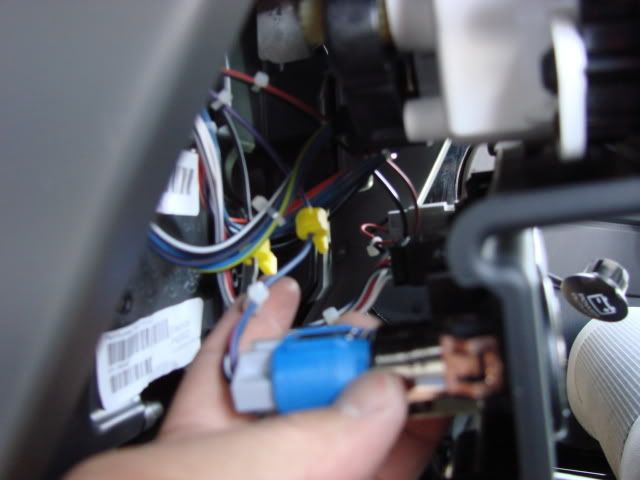
I used the wire taps on the left side cigarette outlet because this one only turns on when the key is turned. If I used the one on the right then it would be constantly on.
The blue wire is (+) ignition on and black (-) ground.
Next I took the radio shack power outlet and cut off the alligator clips. I marked the negative side first with a strip of electrical tape on it. THIS WAS IMPORTANT SO I WOULDN’T SHORT OUT THE MONITOR!!!!!


Then I put it all back together and started to watch DVD’s -MI III was on.
I was still able to use all the features of the housing base- like brightness- color- power

Next I took my pry tool and put to on the rear of the radio top housing
And pried off the bottom cover from the top corners
Next I removed the 4 7mm screws and pulled gently from each side- 2 on top 2 in middle and 2 on the bottom
Here I took 2 wires to connect to the video wires. I did this for 2 reasons.
1. I had no female plug to use
2. I can use the wire itself as a plug and its shielded
This is important!!
Video is pin 6
Shield ground is pin7
In the picture I have it on 5 for video and 6 for shield. I used the spec sheet from Nitro and saw it wasn’t right and found another site that had the right info
REMEMBER
PIN-6 Center RCA WIRE
PIN-7 OUTER SHIELD
Next I put a screw in the corner hole and zip tied the wire to it so it wouldn’t move.
This way I made sure no matter how the radio was to move, the wire would stay rigid into the radio
This the RCA Wire I stripped and the thin center wire is Video (PIN 6) and the thick outer wire is the shield (PIN 7)
I then soldiered the wires and electric taped them- Black wire was for the ground shield (Pin7)
I then popped out the side panel to run the wires
Next I took the house power plug and cut the outlet plug off. I needed the extra length for the cigarette plug. I used the -house plug wire- into the top housing and ran it across the right side windshield along with the video wire.
The house wire reached to the side panel and from there, I cut the plug end of the cigarette power wire. I then butt connected the wires together.
I remembered to look at the marks on the wire- there are white stripes on one side of the wires and solid on the other- match them
Next I removed the glove box- I opened it up and pressed the sides in and it came right out.
I used the wire taps on the left side cigarette outlet because this one only turns on when the key is turned. If I used the one on the right then it would be constantly on.
The blue wire is (+) ignition on and black (-) ground.
Next I took the radio shack power outlet and cut off the alligator clips. I marked the negative side first with a strip of electrical tape on it. THIS WAS IMPORTANT SO I WOULDN’T SHORT OUT THE MONITOR!!!!!
Then I put it all back together and started to watch DVD’s -MI III was on.
I was still able to use all the features of the housing base- like brightness- color- power
Last edited by DBB888; 12-28-2009 at 03:38 PM.
02-27-2007, 04:28 PM
#3
JK Freak

Join Date: Dec 2006
Location: Cleveland, Ohio
Posts: 947
Likes: 0
Received 0 Likes
on
0 Posts
Looks awesome man. I wish i had the sirius radio just for the dvd factor... :( i'll have to pick one up later and try to get the u-connect with it too. Nice write up though, way to go, enjoy it
02-27-2007, 05:07 PM
#4
JK Enthusiast
That was nice!  I love when there is pics to go along with a write up.
How did you connect the video & shield wires to pin 6 & 7...what I mean is how did ya secure the connection to the pins?
maybe it's obvious but not for me.
I love when there is pics to go along with a write up.How did you connect the video & shield wires to pin 6 & 7...what I mean is how did ya secure the connection to the pins?
maybe it's obvious but not for me.
02-27-2007, 05:08 PM
#5
JK Enthusiast
Thread Starter
Join Date: Feb 2007
Location: Edison NJ
Posts: 456
Likes: 0
Received 0 Likes
on
0 Posts
It wasn't that bad- took me an hour to do all the disassembly and 1/2 hour to make the cover.
Then 2 hours for the install in the jeep. I've was an audio installer from 1993 to 2000 and read alot of people who wanted to do a monitor.
I also read that some people bought the target monitor and didnt know where to put it. So I said why not. It'll keep ky wife and future kids busy
I was going to put it on top of the radio, but then there was going to be to much clutter on the dash. I already have my Tomtom on there.
Mike
02-27-2007, 05:12 PM
#6
JK Enthusiast
Thread Starter
Join Date: Feb 2007
Location: Edison NJ
Posts: 456
Likes: 0
Received 0 Likes
on
0 Posts
If you look at the Black and Yellow Wires, I used a pick and pushed the pick in the center of each wire. Then I just pushed the wires directly into the pins.
The other end of the wires, I soldiers the RCA center wire to the Yellow wire and the shield wire to the black wire. Then electric taped them to keep them covered and then tucked them behind the radio dash.
As far as securing it- I used the zip tie to screw on the back of the radio. There are pics- look for the pics of the back of the radio.
I was so into the install that I forgot to take that picture- Sorry.- I'll make a sample and take a pic tonite and display it on this thread.

Here is the sample one
And Here is the NEW Velcro I used

Mike
The other end of the wires, I soldiers the RCA center wire to the Yellow wire and the shield wire to the black wire. Then electric taped them to keep them covered and then tucked them behind the radio dash.
As far as securing it- I used the zip tie to screw on the back of the radio. There are pics- look for the pics of the back of the radio.
I was so into the install that I forgot to take that picture- Sorry.- I'll make a sample and take a pic tonite and display it on this thread.
Here is the sample one
And Here is the NEW Velcro I used
Mike
Last edited by DBB888; 02-27-2007 at 06:10 PM.
02-27-2007, 05:21 PM
#7
JK Enthusiast
If you look at the Black and Yellow Wires, I used a pick and pushed the pick in the center of each wire. Then I just pushed the wires directly into the pins.
The other end of the wires, I soldiers the RCA center wire to the Yellow wire and the shield wire to the black wire. Then electric taped them to keep them covered and then tucked them behind the radio dash.
As far as securing it- I used the zip tie to screw on the back of the radio. There are pics- look for the pics of the back of the radio.
I was so into the install that I forgot to take that picture- Sorry.- I'll make a sample and take a pic tonite and display it on this thread.
Mike
Yeah I was just wondering about the connection to the pins, I saw the screw & zip tie.
Thanks for the info.
Trending Topics
02-27-2007, 06:14 PM
#10
JK Enthusiast
Thread Starter
Join Date: Feb 2007
Location: Edison NJ
Posts: 456
Likes: 0
Received 0 Likes
on
0 Posts
A "Pick" is a like a mini screw driver with just a sharp point end.
The video works while driving because it was designed for dual headrest viewing.
It is DANGEROUS to have on while Driving- So DONT do it- If you dont do it neither will I !!
Or is it If I don't do it neither should you?
Mike
The video works while driving because it was designed for dual headrest viewing.
It is DANGEROUS to have on while Driving- So DONT do it- If you dont do it neither will I !!
Or is it If I don't do it neither should you?
Mike