
DIY CB Mount and Install
 01-15-2014, 06:49 AM
#1
JK Enthusiast
Thread Starter
Join Date: Oct 2013
Location: Jasper, GA
Posts: 162
Likes: 0
Received 0 Likes
on
0 Posts
Received a Uniden Pro 520XL for Christmas so I started perusing the boards to come up with a location to mount it. My original idea was to mount it over head on something like a Smittybuilt Gear Overhead Console. Seemed easy enough to fab, but didn't want to eat up all of my overhead "viewing" with the top off. I stumbled upon the Strike Force Zebra mount and liked the idea, but thought I might be able to change it up a little and tuck mine into the windshield a little more.
First step was design. Now my first design was a little small so I went back and changed my drawings after I had a working mount. I cut this out of .125 steel. Probably a little heavy, but hey I don't have to worry about it bouncing around. I didn't know the exact depth I needed for my radio so I machined slots so I could adjust it. This worked out well because I was able to angle my radio toward me. Here are the dimensions:

After cutting it, I used a mallet and vice to bend to the correct shape. Here it is beside the first "prototype". The original was too small and wouldn't clear the plastic surround. Don't laugh at my machining, still learning how to use that thing.

Then it was off to paint for some black powder coat. I went ahead and had the the silver metal bracket that comes with the radio painted at the same time.

To install, all that was needed was to remove the the 2 torx screws holding in each sun-visor. I removed the plastic screw/ clip on the A arm as well. Not sure this is necessary, but I was putting in a Rugged ridge switch pod at the same time so I left it out.


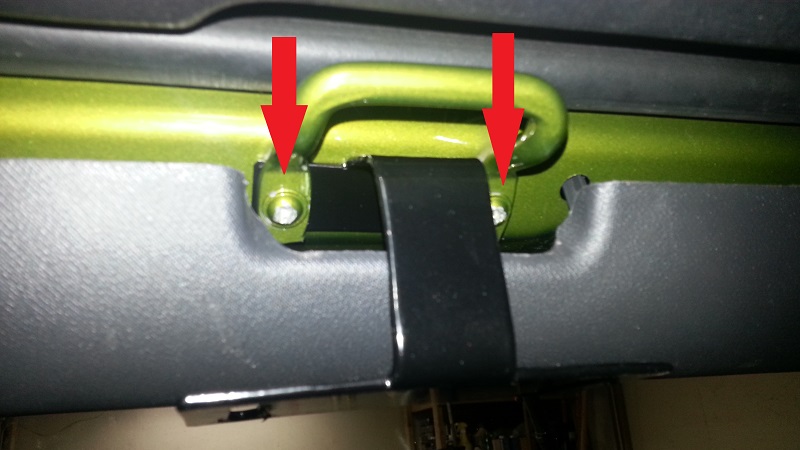
Gently pulling down on the plastic overhead surround released the clips allowing access to the footman loop. On the earlier JKs the loops is held in by rivets. These can be drilled out and nutserts installed, but mine is a '10 so I assume anything after mine uses torx screws. I removed the loop and sandwiched my bracket between the loop and frame.
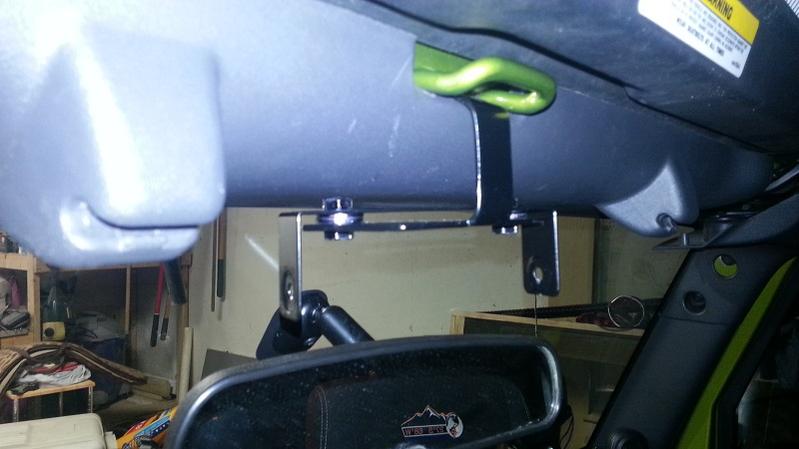
Then I attached the bracket that came with my cb to my fabbed bracket with 1/4" hardware. I used two washers as spacers between the brackets to raise the CB up as much as possible. I couldn't shorten the arm on my fabbed bracket any more because the plastic surround had to fit in behind it. Hit the hardware with a black maker keep that ugly silver at bay.
Mount your CB and your done!

First step was design. Now my first design was a little small so I went back and changed my drawings after I had a working mount. I cut this out of .125 steel. Probably a little heavy, but hey I don't have to worry about it bouncing around. I didn't know the exact depth I needed for my radio so I machined slots so I could adjust it. This worked out well because I was able to angle my radio toward me. Here are the dimensions:
After cutting it, I used a mallet and vice to bend to the correct shape. Here it is beside the first "prototype". The original was too small and wouldn't clear the plastic surround. Don't laugh at my machining, still learning how to use that thing.
Then it was off to paint for some black powder coat. I went ahead and had the the silver metal bracket that comes with the radio painted at the same time.
To install, all that was needed was to remove the the 2 torx screws holding in each sun-visor. I removed the plastic screw/ clip on the A arm as well. Not sure this is necessary, but I was putting in a Rugged ridge switch pod at the same time so I left it out.
Gently pulling down on the plastic overhead surround released the clips allowing access to the footman loop. On the earlier JKs the loops is held in by rivets. These can be drilled out and nutserts installed, but mine is a '10 so I assume anything after mine uses torx screws. I removed the loop and sandwiched my bracket between the loop and frame.
Then I attached the bracket that came with my cb to my fabbed bracket with 1/4" hardware. I used two washers as spacers between the brackets to raise the CB up as much as possible. I couldn't shorten the arm on my fabbed bracket any more because the plastic surround had to fit in behind it. Hit the hardware with a black maker keep that ugly silver at bay.
Mount your CB and your done!


